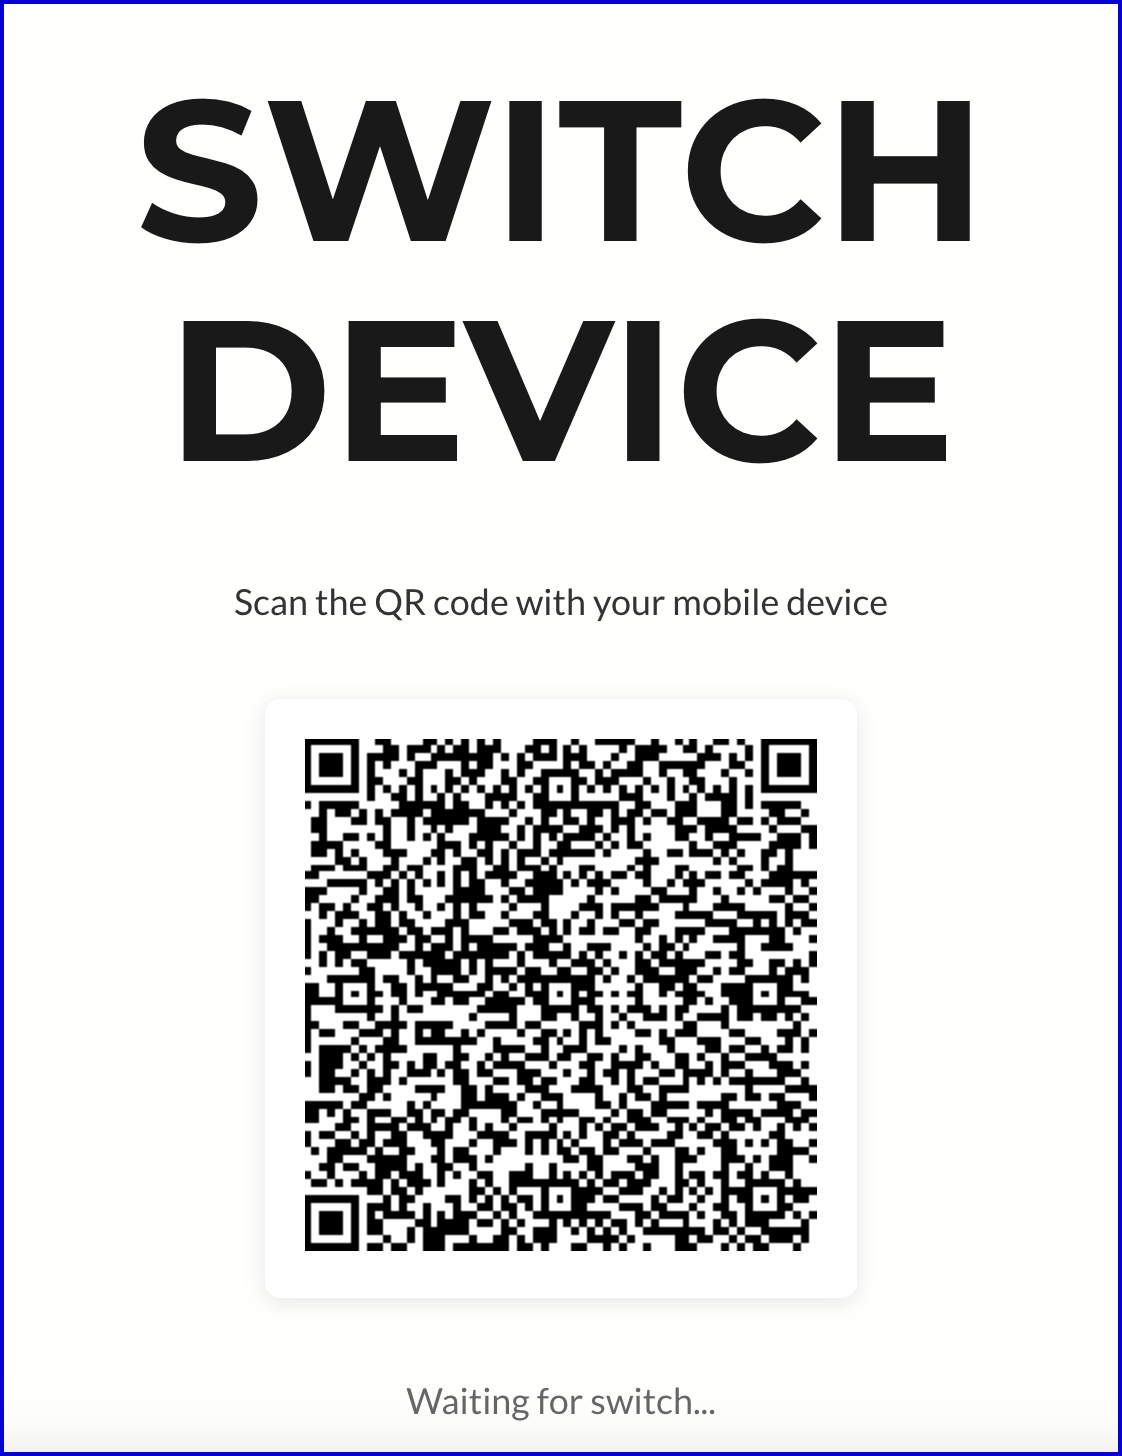
Custom Switch Device Page

Early Access

TrustX provide 'Switch to Browser' and 'Switch to Mobile' activities to request the end-user to change their device during a Process Instance. In some scenarios, it may be desired to customize the look and feel of this flow using a custom page. To accomplish this, a suite of activities can be used to design a Process Definition that will enable users to create their own custom pages that handle this flow.

This guide will demonstrate how to configure a Process Definition in the Backoffice using the appropriate activities available in the Process Designer.

Implementation Overview

The standard 'Switch Device' activities use the H_isSwitchedFromDesktop process variable to determine whether the end-user is completing the process from a mobile or desktop browser. When this boolean value is true , the end-user is on a mobile device. When the value is false , the end-user is on a desktop browser. This is handled in three steps as follows:

  1. Poll the current status of the H_isSwitchedFromDesktop variable.

  2. Trust Web displays a QR code or button as means of switching device.

  3. After scanning the QR code or clicking the switch button, the H_isSwitchedFromDesktop is switched to the opposite value.

A Process Definition implementing a custom Switch Device flow works similarly to the standard switch device process. However, instead of the operation taking place within one activity, this process is performed using the following three activities:

  1. 'Prepare Switch V1' - This activity will generate a poll url that will be made available in session data for the custom page. This poll url is used to get the current device status (mobile or desktop browser).

  2. 'Custom Page V3' - A custom page that will receive the poll url and generate a means of which the device can be changed. For example: QR code.

  3. 'Update Switch Device Status V1' - Updates the device status after the end-user has switched device.

This guide will describe how to implement the following Process Definition that uses a custom page to switch to a mobile device before completing a standard face capture flow.


Create the Custom Page

This section will describe how to configure the custom page so that it can handle the polling request from the 'Prepare Switch v1' activity.

  1. Log in to the Backoffice and navigate to Integration Hub > Custom Pages.

  2. From the landing page, click the 'New Custom Page' button at the top-right of the page.

  3. Upload the .zip bundle containing all custom page assets. Below is a sample custom page that will implement the poll url generated by the 'Prepare Switch v1' activity.

Example Custom Page:

<!DOCTYPE html> <html lang="en"> <head> <meta charset="utf-8" /> <meta http-equiv="X-UA-Compatible" content="IE=edge,chrome=1" /> <meta name="viewport" content="width=device-width, initial-scale=1" /> <title>Switch Device - QR Code</title> <link href="https://fonts.googleapis.com/css?family=Lato:300,400|Montserrat:700" rel="stylesheet" type="text/css" /> <style> @import url(//cdnjs.cloudflare.com/ajax/libs/normalize/3.0.1/normalize.min.css); @import url(//maxcdn.bootstrapcdn.com/font-awesome/4.2.0/css/font-awesome.min.css); </style> <link rel="stylesheet" href="https://2-22-4-dot-lead-pages.appspot.com/static/lp918/min/default_thank_you.css" /> <script src="https://2-22-4-dot-lead-pages.appspot.com/static/lp918/min/jquery-1.9.1.min.js"></script> <script src="https://2-22-4-dot-lead-pages.appspot.com/static/lp918/min/html5shiv.js"></script> <script src="https://cdnjs.cloudflare.com/ajax/libs/qrcodejs/1.0.0/qrcode.js"></script> <style> .qr-container { display: flex; flex-direction: column; align-items: center; justify-content: center; padding: 20px; } #qrcode { margin: 20px 0; padding: 20px; background: white; border-radius: 8px; box-shadow: 0 2px 10px rgba(0,0,0,0.1); } .status-message { font-family: 'Lato', sans-serif; font-size: 18px; color: #333; margin-top: 20px; text-align: center; } .loading { color: #666; } .completed { color: #28a745; font-weight: bold; } </style> </head> <body> <div id="page1"> <header class="site-header" id="header"> <h1 class="site-header__title" data-lead-id="site-header-title"> Switch Device </h1> </header> <div class="main-content"> <div class="qr-container"> <p class="status-message">Scan the QR code with your mobile device</p> <div id="qrcode"></div> <p id="statusText" class="status-message loading">Waiting for switch...</p> </div> </div> <footer class="site-footer" id="footer"> <p class="site-footer__fineprint" id="fineprint"> Copyright ©2025 | All Rights Reserved </p> </footer> </div> <script src="./index.js"></script> </body> </html>
var _pollUrl; var _continueUrl; var _pollingInterval; // Notify parent that page is ready window.parent.postMessage({ event: "READY" }, "*"); // Listen for configuration from parent window window.addEventListener("message", function (event) { console.log("Received message from parent:", event.data); if (event.data.variables) { _continueUrl = event.data.variables.sessionData.continueUrl; _pollUrl = event.data.variables.sessionData.pollUrl; console.log("continueUrl:", _continueUrl); console.log("pollUrl:", _pollUrl); // Generate QR code if (_continueUrl) { generateQRCode(_continueUrl); } else { console.error("No continueUrl provided!"); } // Start polling if (_pollUrl) { startPolling(); } else { console.error("No pollUrl provided!"); } } }); // Generate QR code from the continue URL function generateQRCode(url) { console.log("Generating QR code for URL:", url); console.log("URL length:", url ? url.length : 0); const qrcodeContainer = document.getElementById("qrcode"); // Validate URL if (!url || url.trim() === "") { console.error("Invalid URL provided for QR code"); qrcodeContainer.innerHTML = "<p style='color: red;'>No URL provided</p>"; return; } // Check if URL is too long for QR code if (url.length > 2953) { console.error( "URL is too long for QR code generation:", url.length, "characters" ); qrcodeContainer.innerHTML = "<p style='color: red;'>URL is too long (" + url.length + " chars). Maximum is ~2953 characters.</p>"; return; } // Clear any existing QR code qrcodeContainer.innerHTML = ""; try { // For very long URLs, use lowest error correction var options = { text: String(url), width: 256, height: 256, colorDark: "#000000", colorLight: "#ffffff", }; // Use lower error correction for long URLs if (url.length > 1000) { options.correctLevel = QRCode.CorrectLevel.L; // Lowest error correction for long URLs } else { options.correctLevel = QRCode.CorrectLevel.M; // Medium error correction } var qrcode = new QRCode(qrcodeContainer, options); console.log( "QR code generated successfully with error correction level:", url.length > 1000 ? "L (Low)" : "M (Medium)" ); } catch (error) { console.error("Error generating QR code:", error); qrcodeContainer.innerHTML = "<p style='color: red;'>Error generating QR code: " + error.message + "</p>"; } } // Start polling the poll URL function startPolling() { console.log("Starting polling for:", _pollUrl); // Poll immediately, then every 500ms pollOnce(); _pollingInterval = setInterval(pollOnce, 500); } // Stop polling function stopPolling() { if (_pollingInterval) { clearInterval(_pollingInterval); _pollingInterval = null; console.log("Polling stopped"); } } // Perform a single poll request async function pollOnce() { try { const response = await fetch(_pollUrl, { method: "GET", headers: { "Content-Type": "application/json", }, }); if (!response.ok) { console.error("Polling failed:", response.status, response.statusText); return; } const data = await response.json(); console.log("Poll response:", data); // Check if status is COMPLETED if (data.status === "COMPLETED") { handleCompletion(data); } // Check if status is SWITCHED else if (data.status === "SWITCHED") { handleSwitched(data); } } catch (error) { console.error("Error polling:", error); } } // Handle completion async function handleCompletion(data) { console.log("Upload completed!", data); // Stop polling stopPolling(); // Update UI const statusText = document.getElementById("statusText"); statusText.textContent = "Upload completed successfully!"; statusText.className = "status-message completed"; // Notify parent window console.log("Ping parent with new send event!"); window.parent.postMessage( { event: "SEND_TO_URL", variables: { message: "Success", url: data.url, status: data.status, }, }, "*" ); } // Handle switched to mobile function handleSwitched(data) { console.log("Process switched to mobile!", data); // Don't stop polling - continue waiting for COMPLETED status // Hide QR code and show switched message const qrcodeContainer = document.getElementById("qrcode"); qrcodeContainer.style.display = "none"; // Update UI const statusText = document.getElementById("statusText"); statusText.textContent = "The process has continued on your mobile device"; statusText.className = "status-message completed"; // Optionally notify parent window about the switch window.parent.postMessage( { event: "SWITCHED", variables: { message: "Switched to mobile", url: data.url, status: data.status, }, }, "*" ); }

Configure the Process Definition

Step 1 - Prepare Switch

The first step is to prepare the device switch that generates a polling url using the 'Prepare Switch V1' activity.

  1. Add a 'Prepare Switch V1' activity to the Process Designer and use the 'Global connect tool' to link a sequence arrow from the 'Start' event to the new activity.
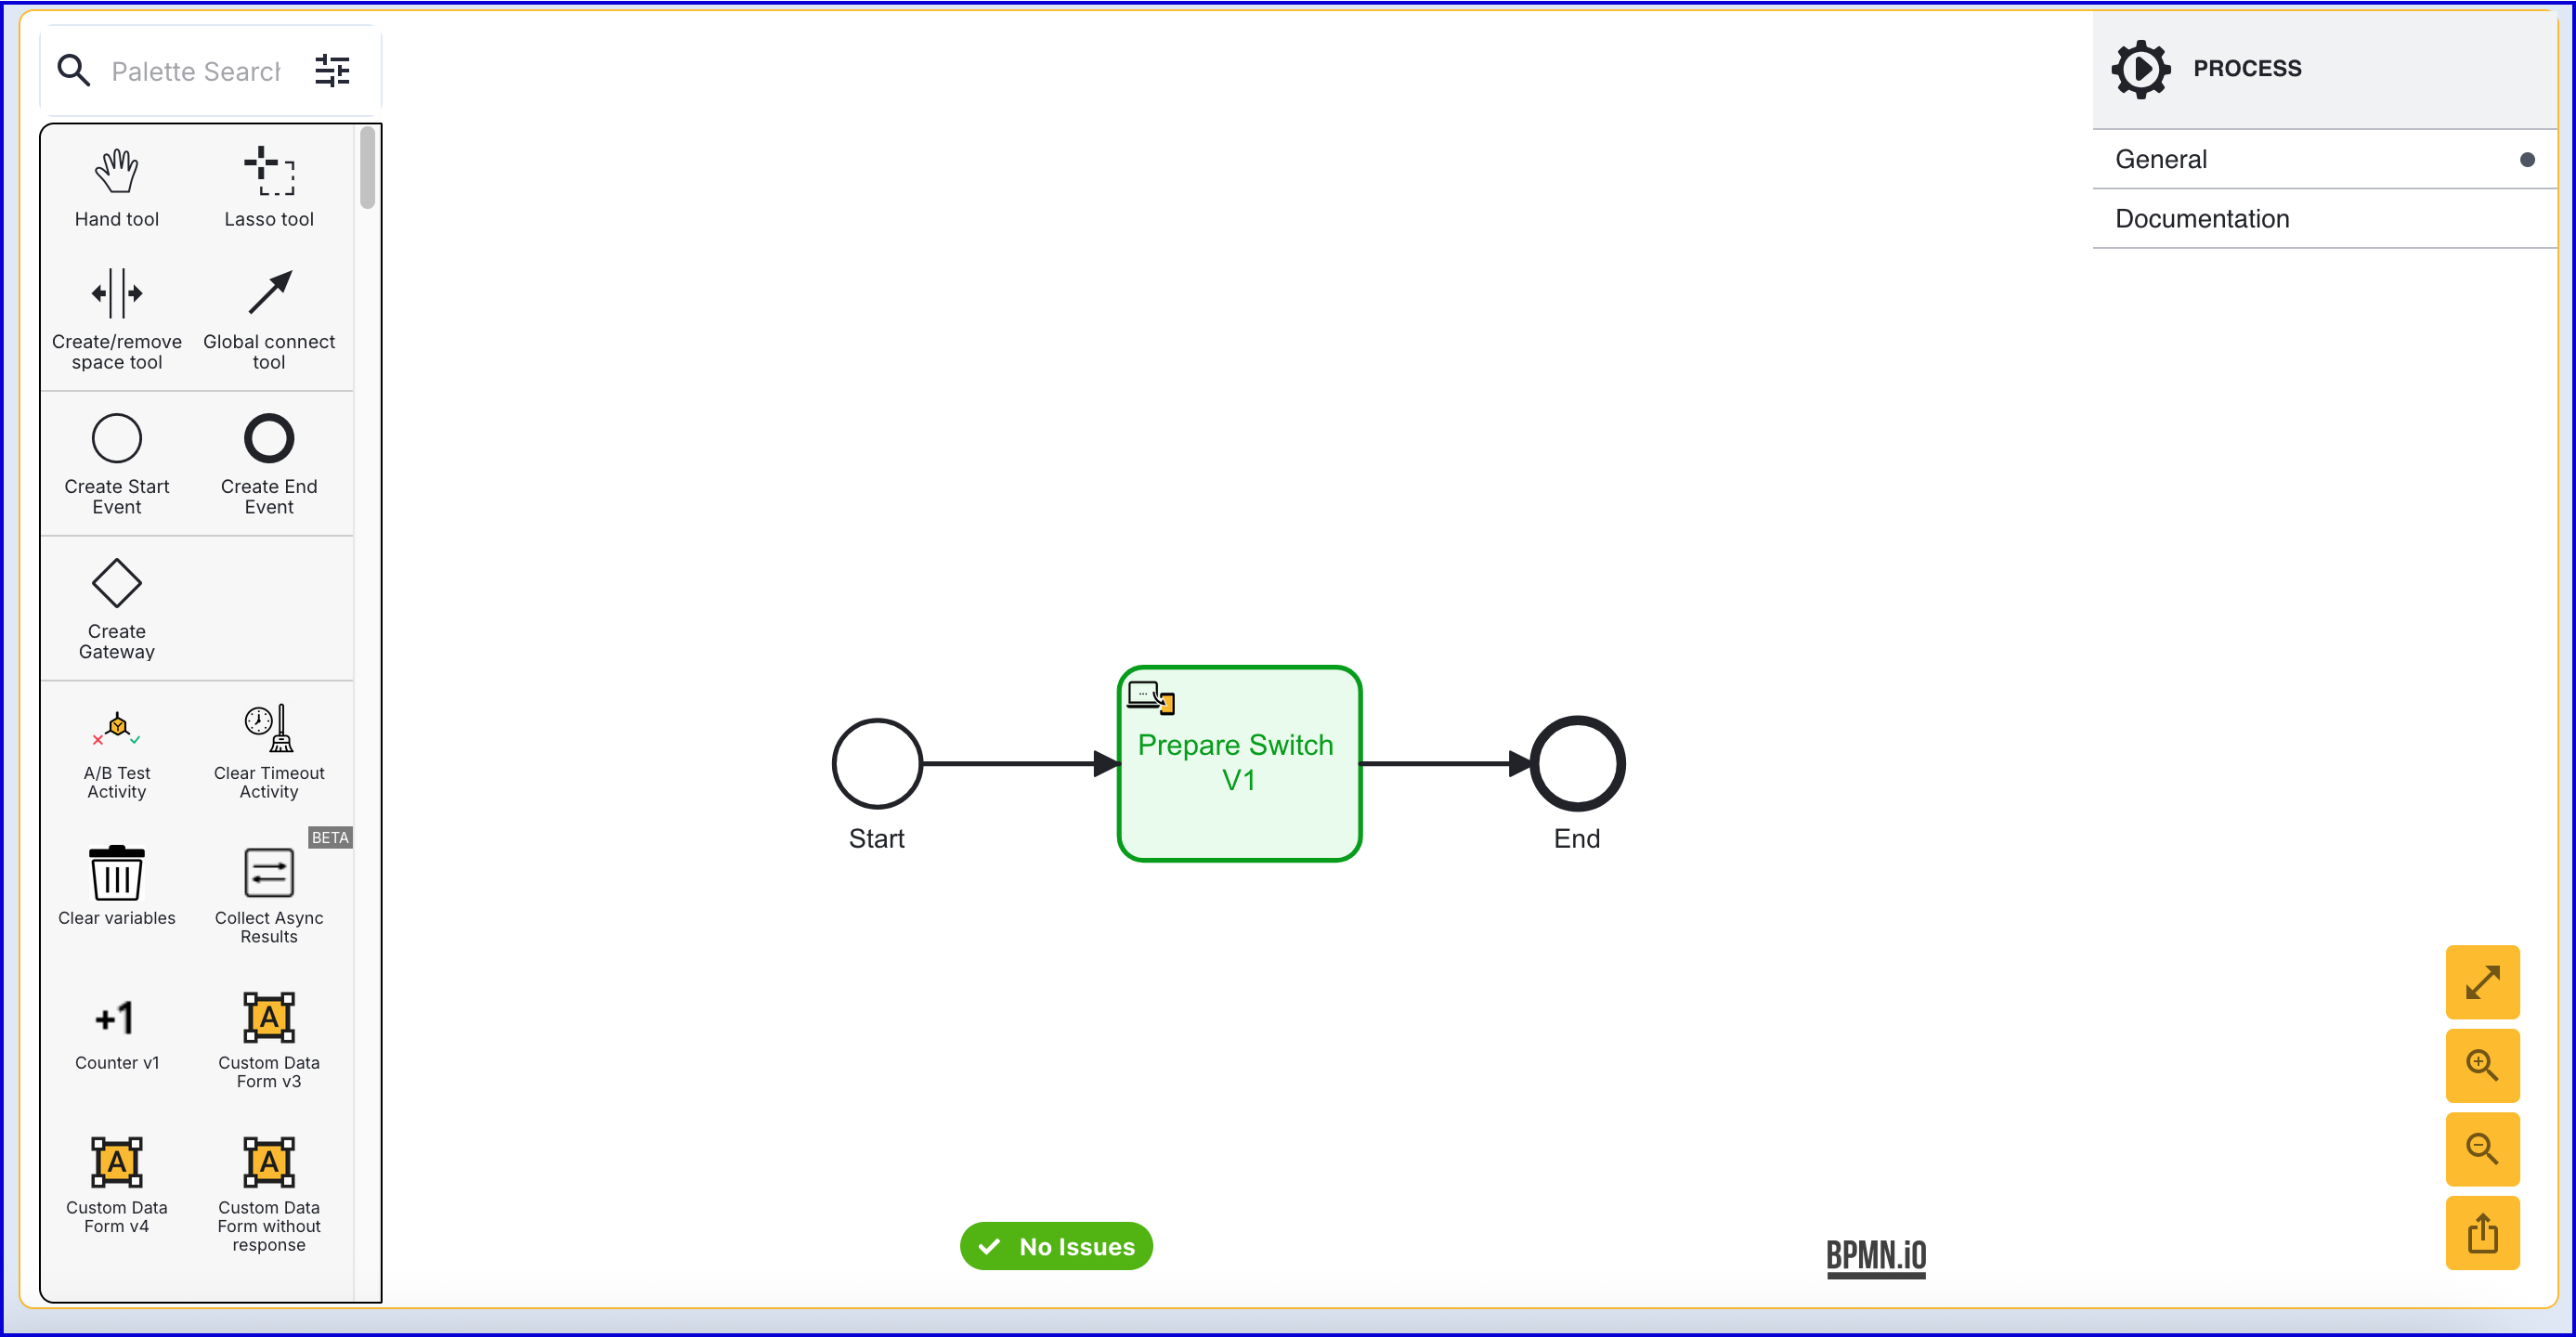

  1. This activity does not contain any configurable input parameters. It will generate a polling url that will be used by the custom page to determine the current device.

Step 2 - Configure the Custom Page Activity

This step will describe how to configure the 'Custom Page V3' activity to accept the poll and continue URLs as session data from the 'Prepare Switch V1' activity to be read by the custom page. Before completing this step, ensure that a custom page has been created by following the steps outlined in the Create the Custom Page section above.

  1. Add a 'Custom Page V3' activity to the Process Designer and connect it to the 'Prepare Switch V1' activity.
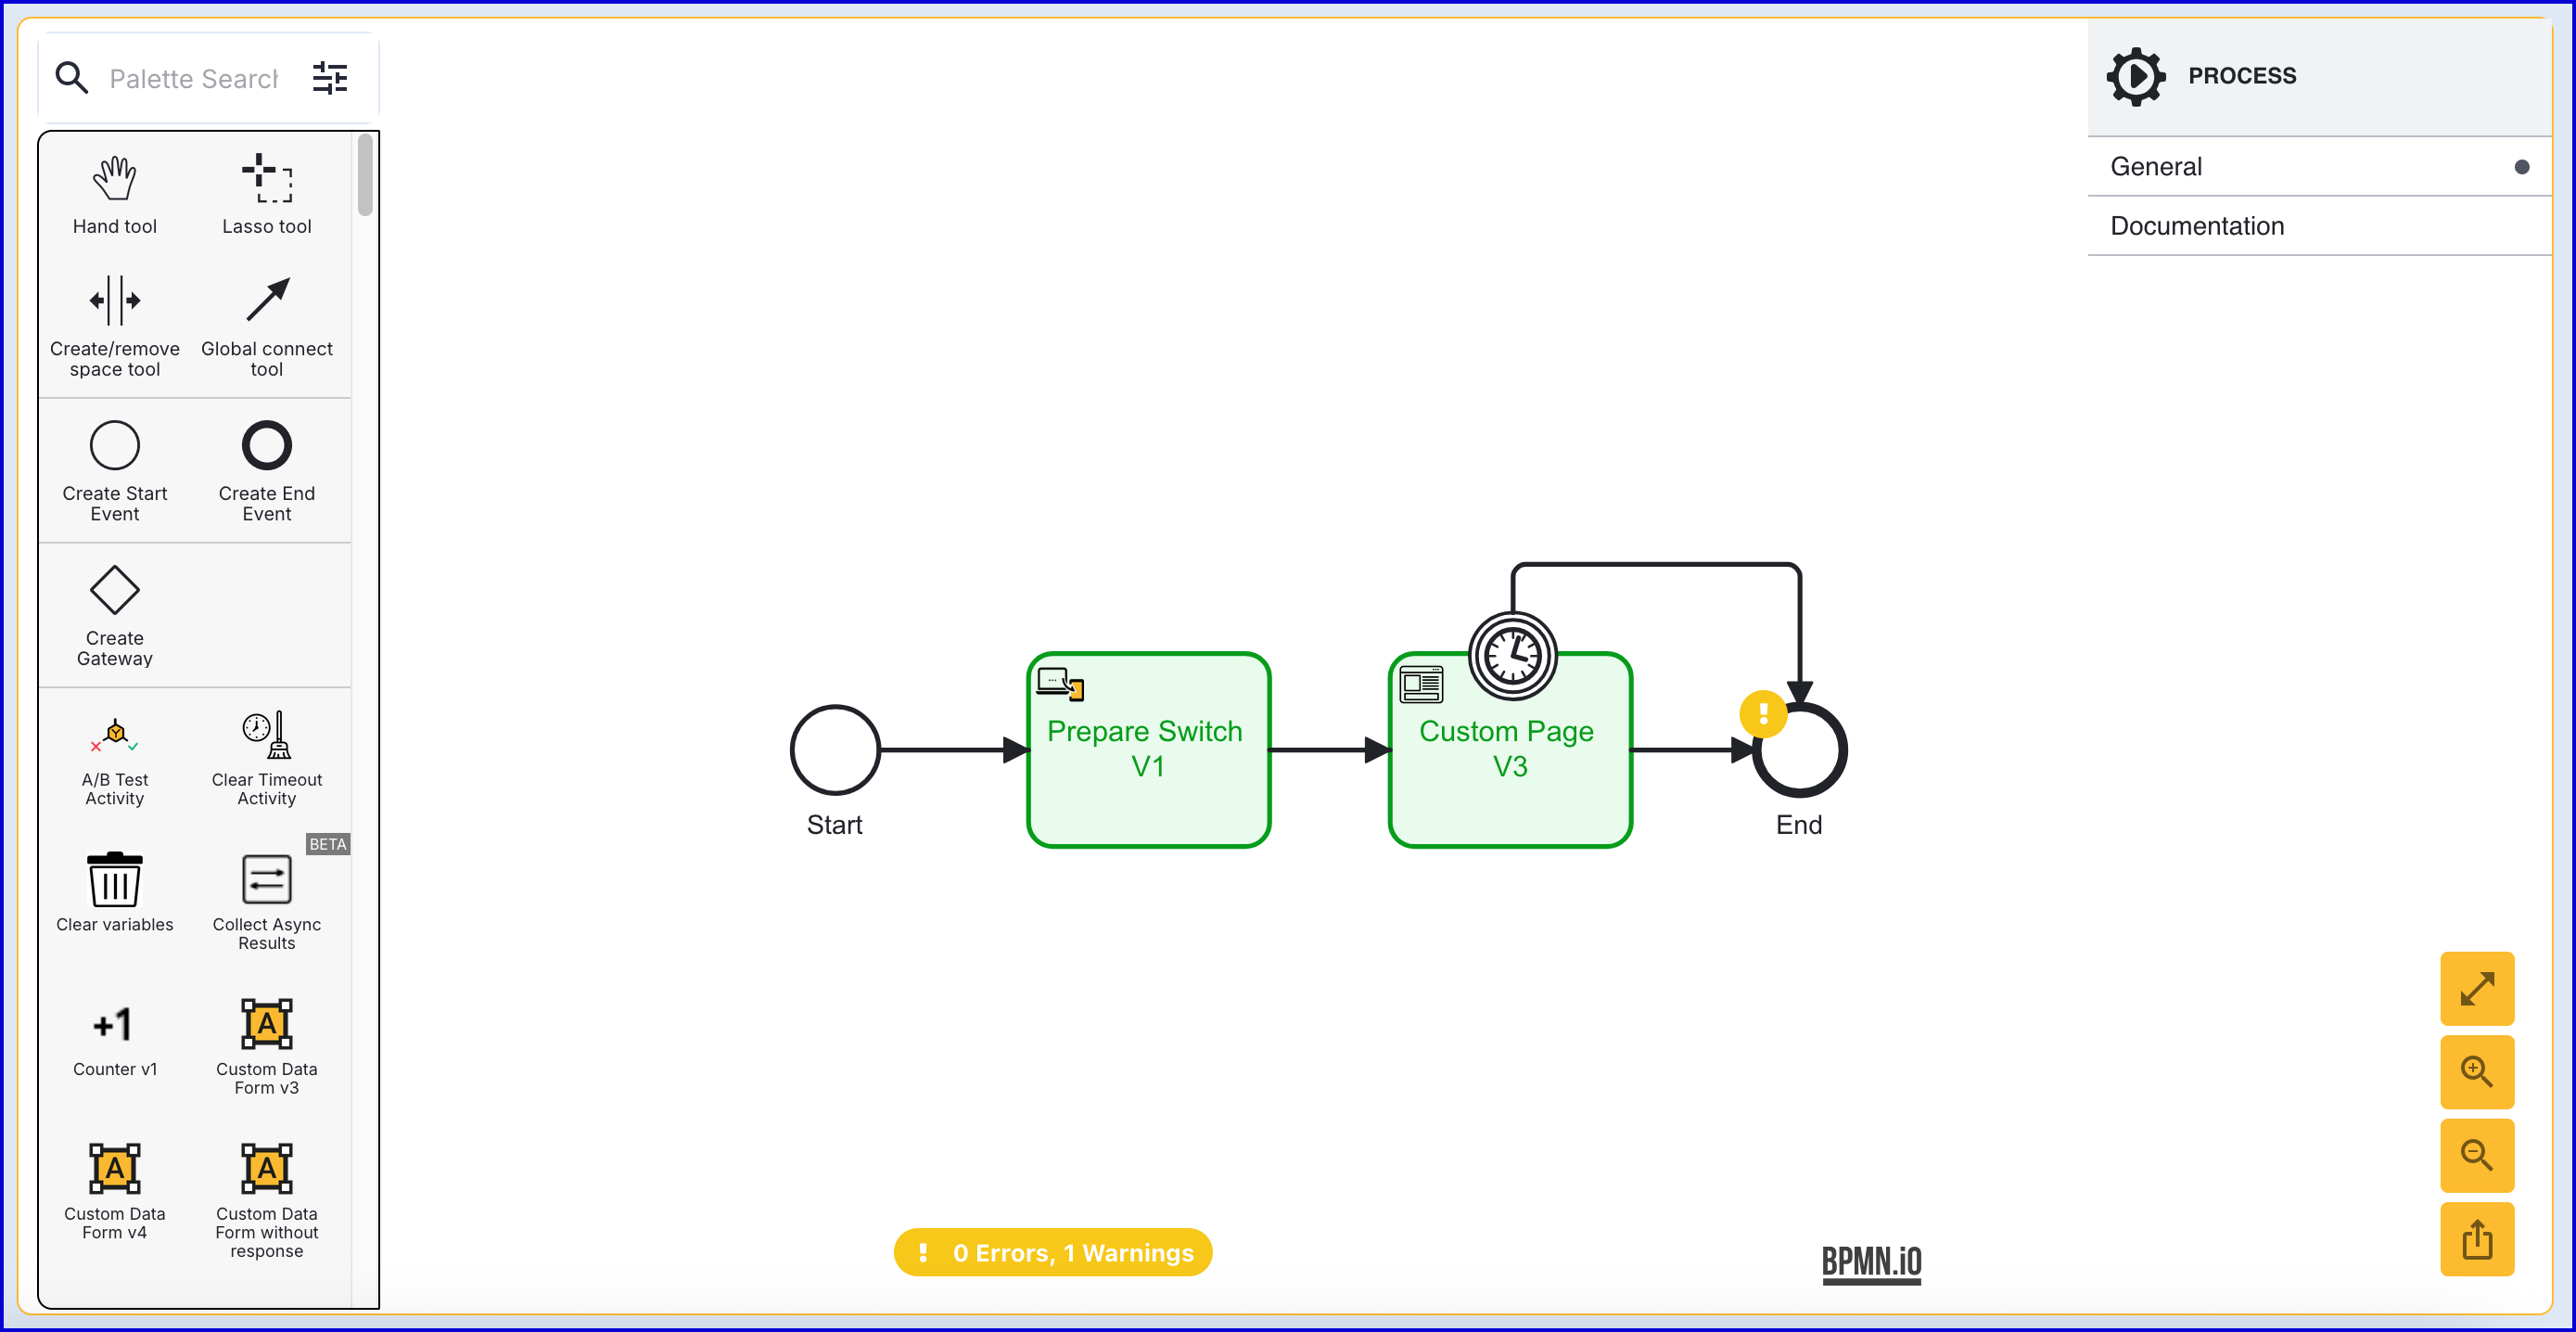

  1. Click the 'Custom Page V3' activity to open the right-side contextual menu where the input parameters for the activity can be defined.

  2. Set the custom page name and version according to the page created in the Create the Custom Page section above.

  3. Under the 'Session Data' input parameter, create two entries for the 'continueUrl' and 'pollUrl'.
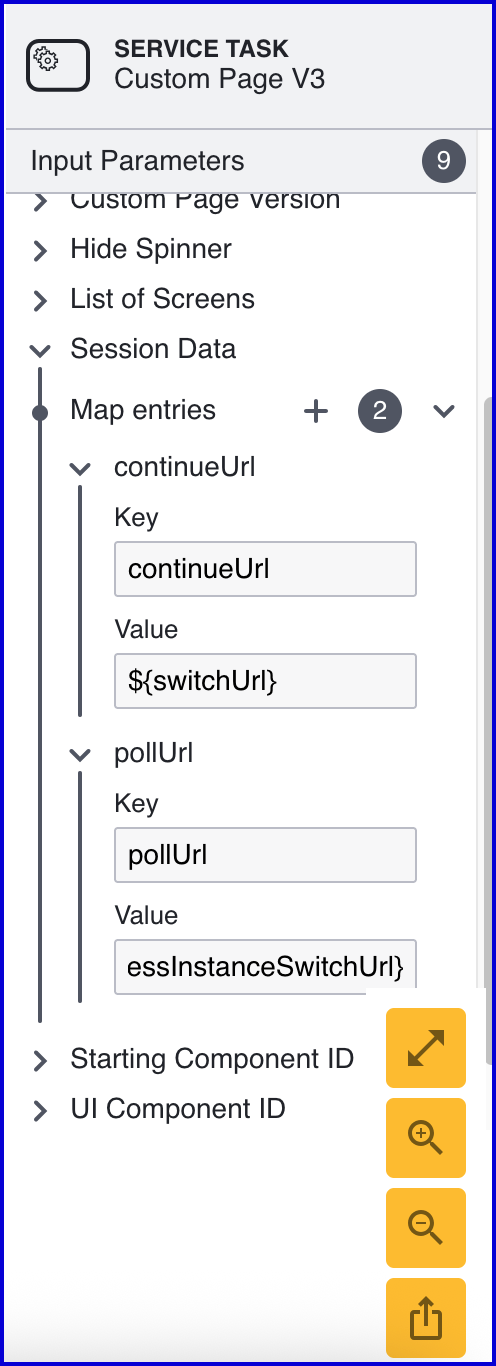

  1. It is important to set the correct session data.For the provided custom page the expected key values are continueUrl and pollUrl The values are:

    1. continueUrl = ${switchUrl} --- this is the TrustWeb url which is ready to be QR encoded and used to switch the device.

    2. pollUrl = ${processInstanceSwitchPollUrl}--- this is a process server endpoint used to GET the status of the device switch.

Step 4 - Update Switch Device Status

After the end-user has scanned the QR code displayed by the custom page, a signal to TrustX is sent to update the status of the device using the 'Update Switch Device Status V1' activity.

  1. After the 'Custom Page V3' activity, add the 'Update Switch Device Status V1' activity and connect them using a sequence flow arrow.
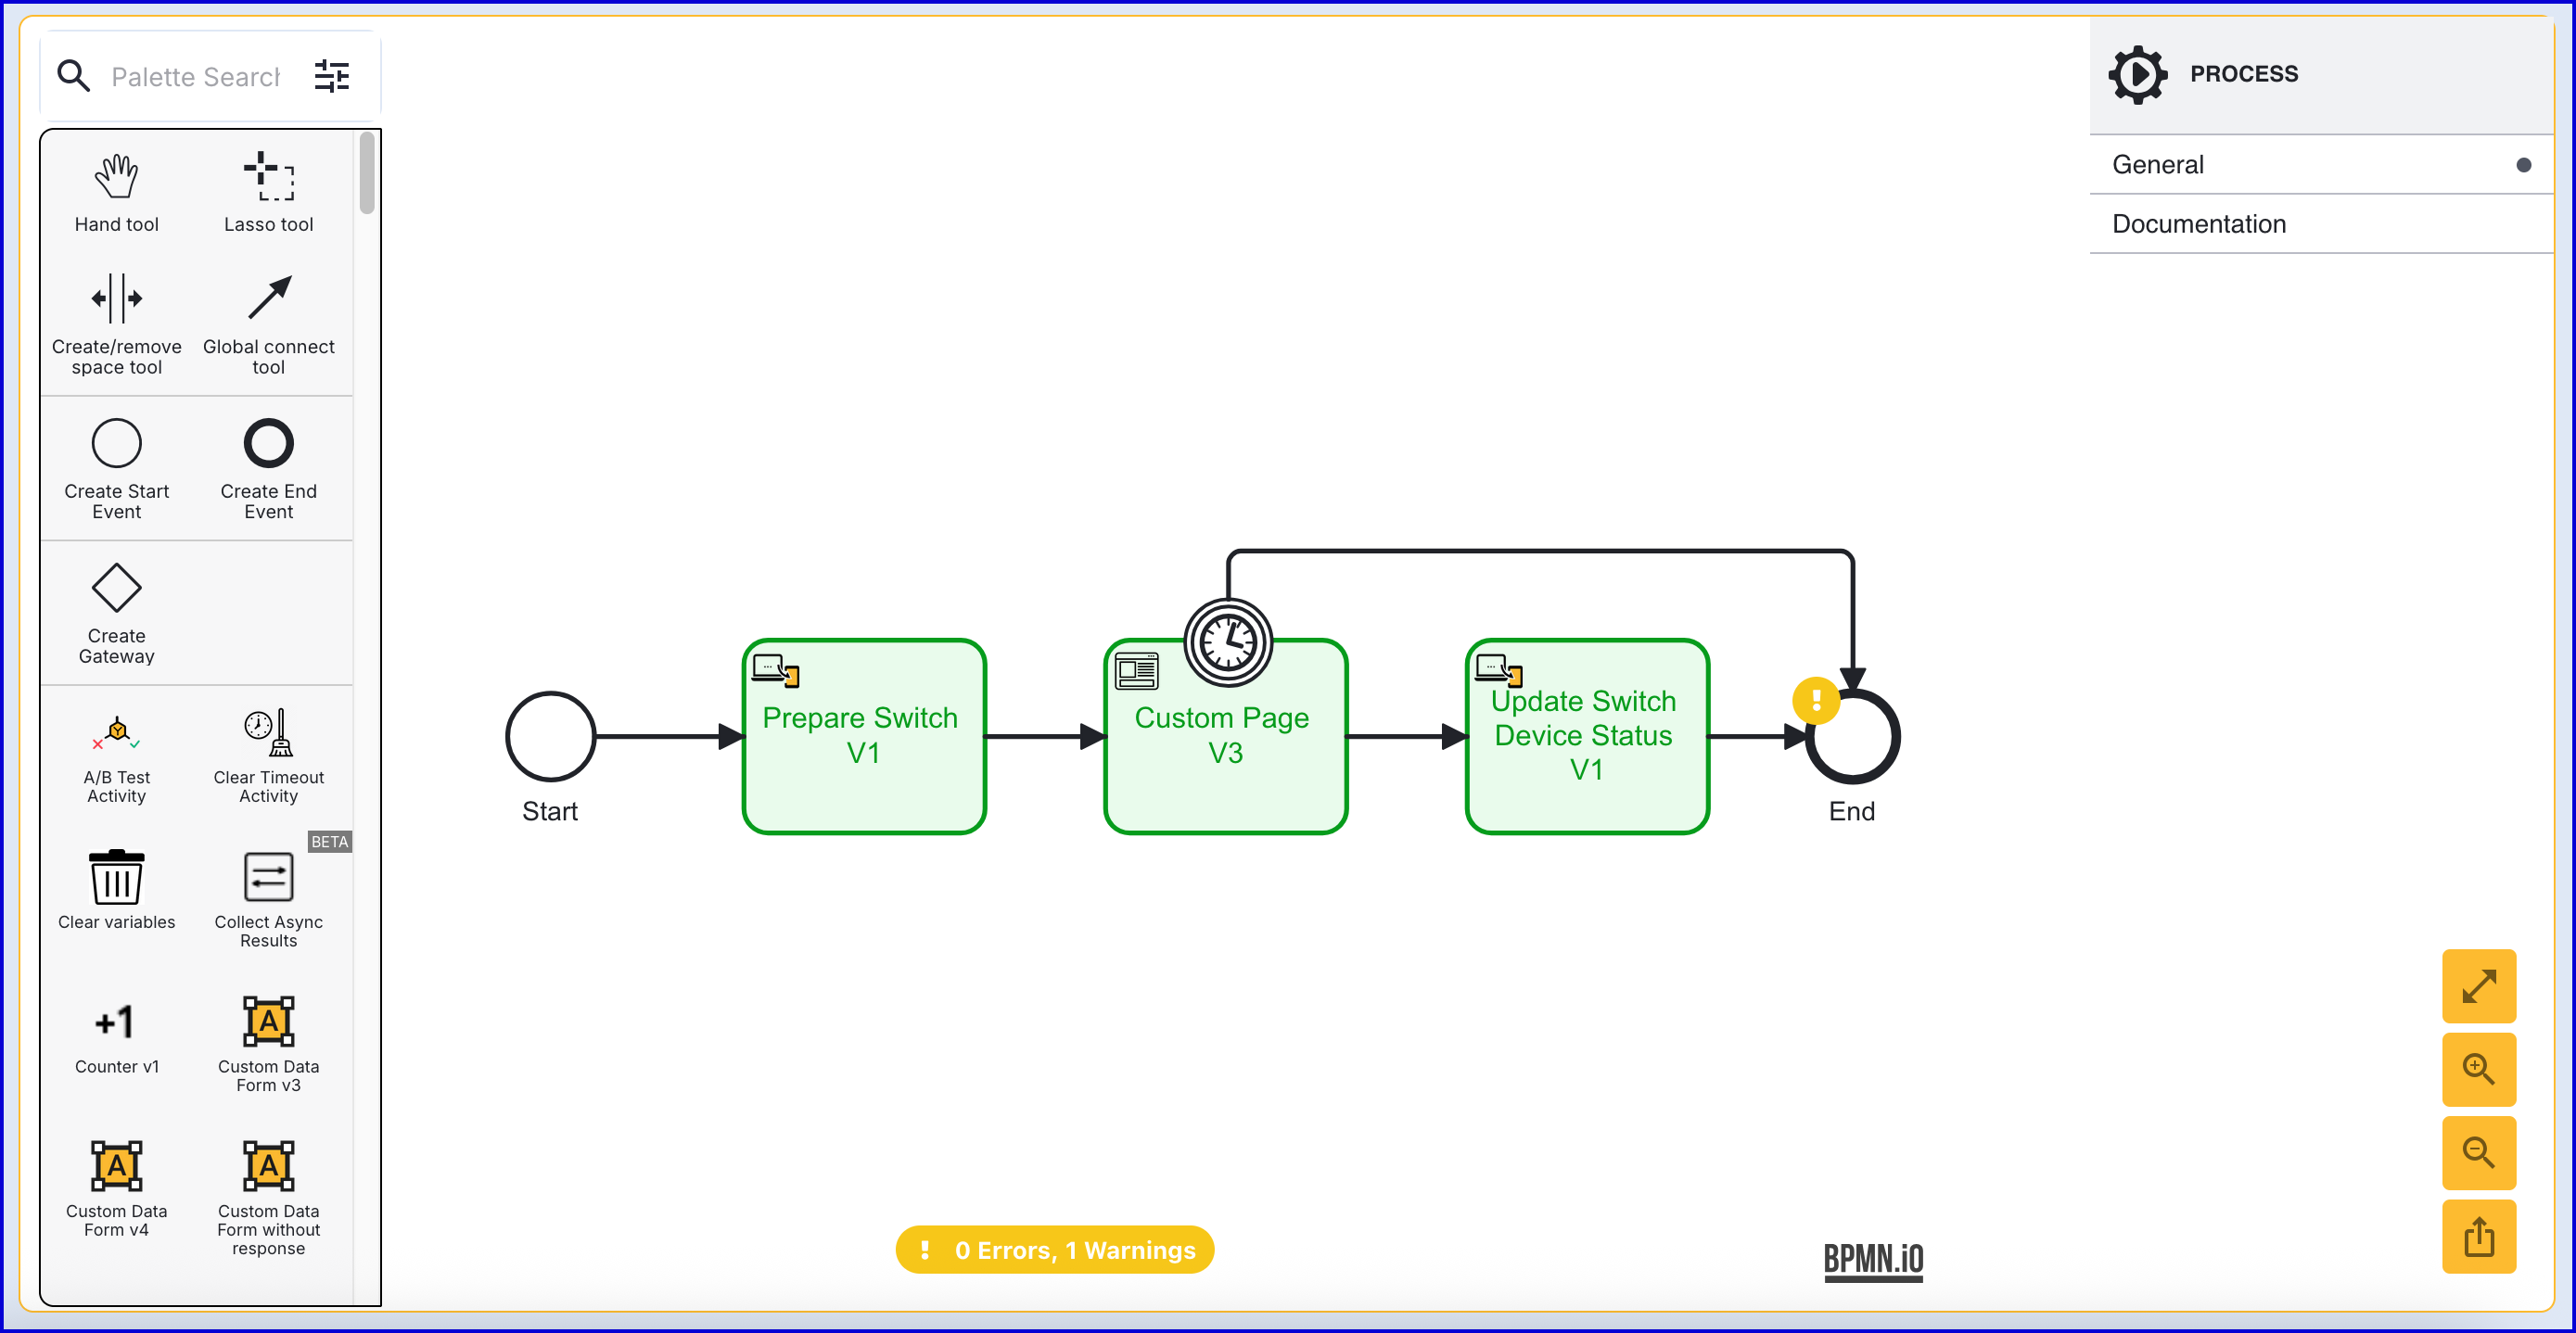

  1. This activity does not include any configurable input parameters. It will update the status of the H_isSwitchedFromDesktop in TrustX to match the new status.

Step 5 - Configure Remaining Process

For this example, a basic face capture will be executed before returning to the browser to finalize the process.

  1. Add a 'Capture Face Image' activity to the flow and connect it to the 'Update Switch Device Status V1' activity.

  2. Afterwards, add a standard 'Switch to Browser' activity. This activity will handle all steps of the switch device process to return the end-user to the desktop browser.

  3. Add a 'Simple Decider' to the flow to complete the process.
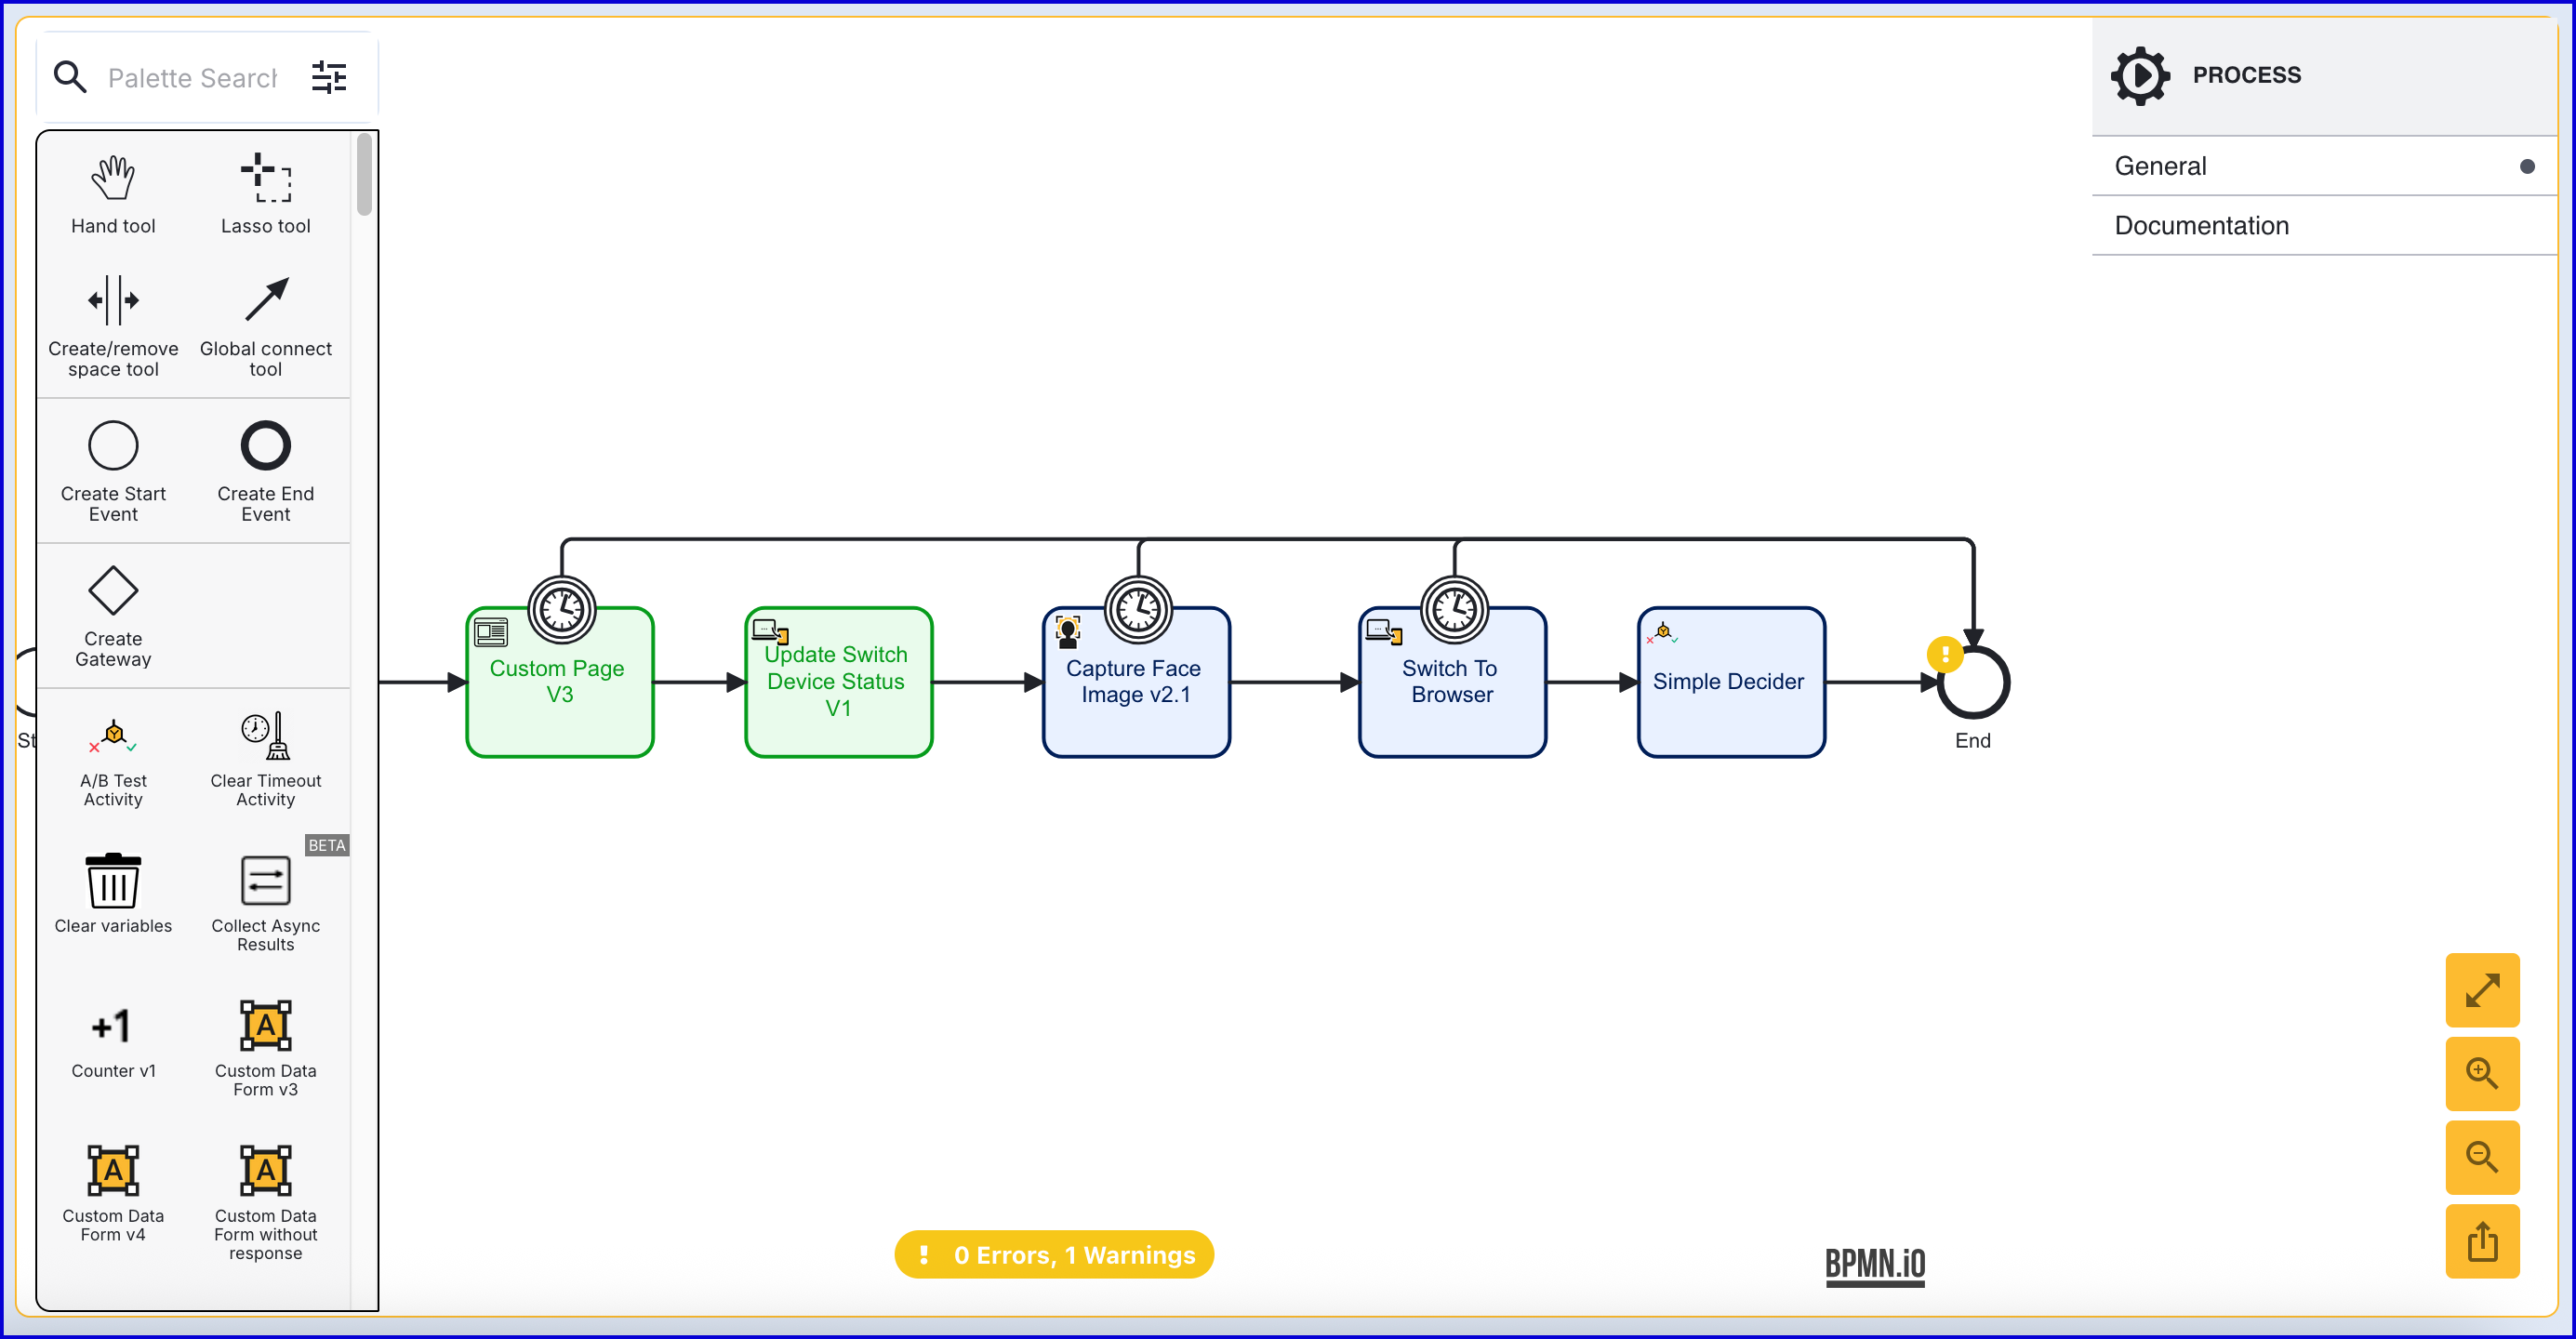

  1. Finalize the Process Definition by click the 'Save & Deploy' button at the bottom of the page.

Testing the Process Definition

This section will describe how to test the Process Definition created above by generating a Process Token.

  1. To test the Process Definition, create a new Process Token by navigating to the Process Definitions > Process Tokens page.

  2. Click the 'New Process Token' button found on the top-right of the page to start creating a new token. A popup modal will appear where details of the token can be entered.
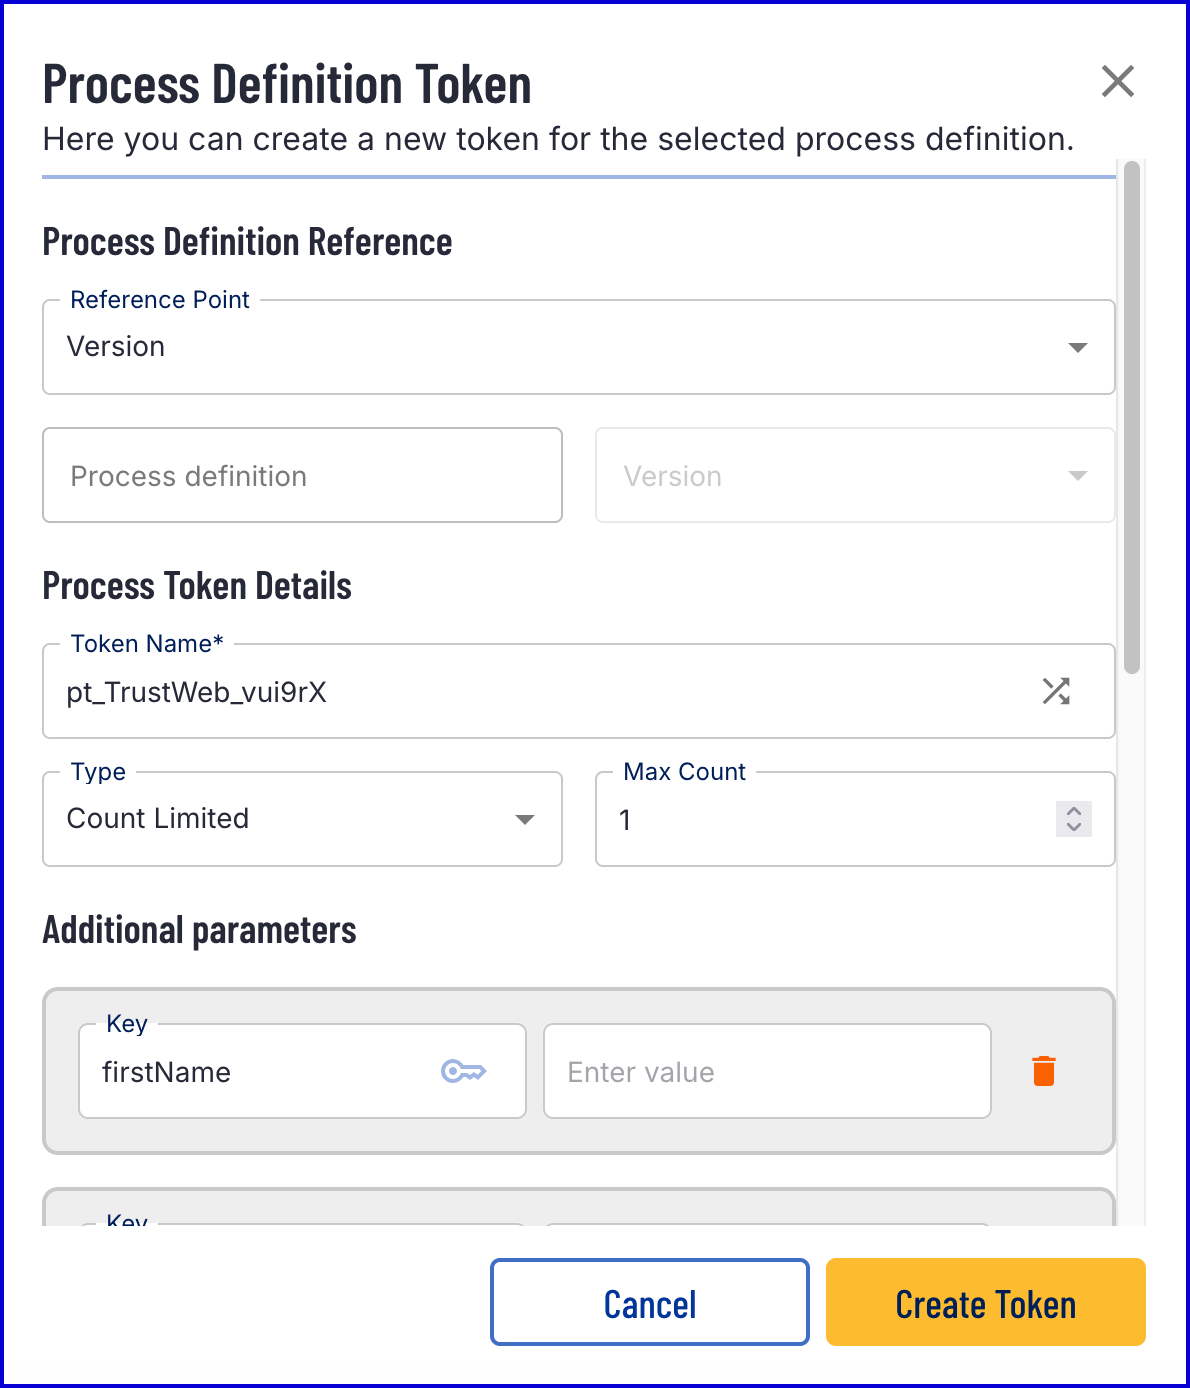

  1. Once the token is created, follow the link in your desktop browser. Trust Web will display the custom page where the QR code can be scanned to switch to a mobile device.