Introduction
This document will cover various functionality around watchlists and Process Definitions. This includes the following topics:
Adding watchlists members during in a Process Definition.
Matching a face image against a watchlist member.
Creating conditional logic using the results of a watchlist match.
Adding Watchlist Member During Process Instance
This section will cover how to add a new watchlist member to an existing watchlist using the Process Designer. The new watchlist member will be automatically populated during the ID&V flow.
Step 1 - Access the Process Designer
Choose an existing Process Definition or create a new Process Definition and access the Process Designer page. For more information on creating and editing Process Definitions, see the Process Definition Guide.
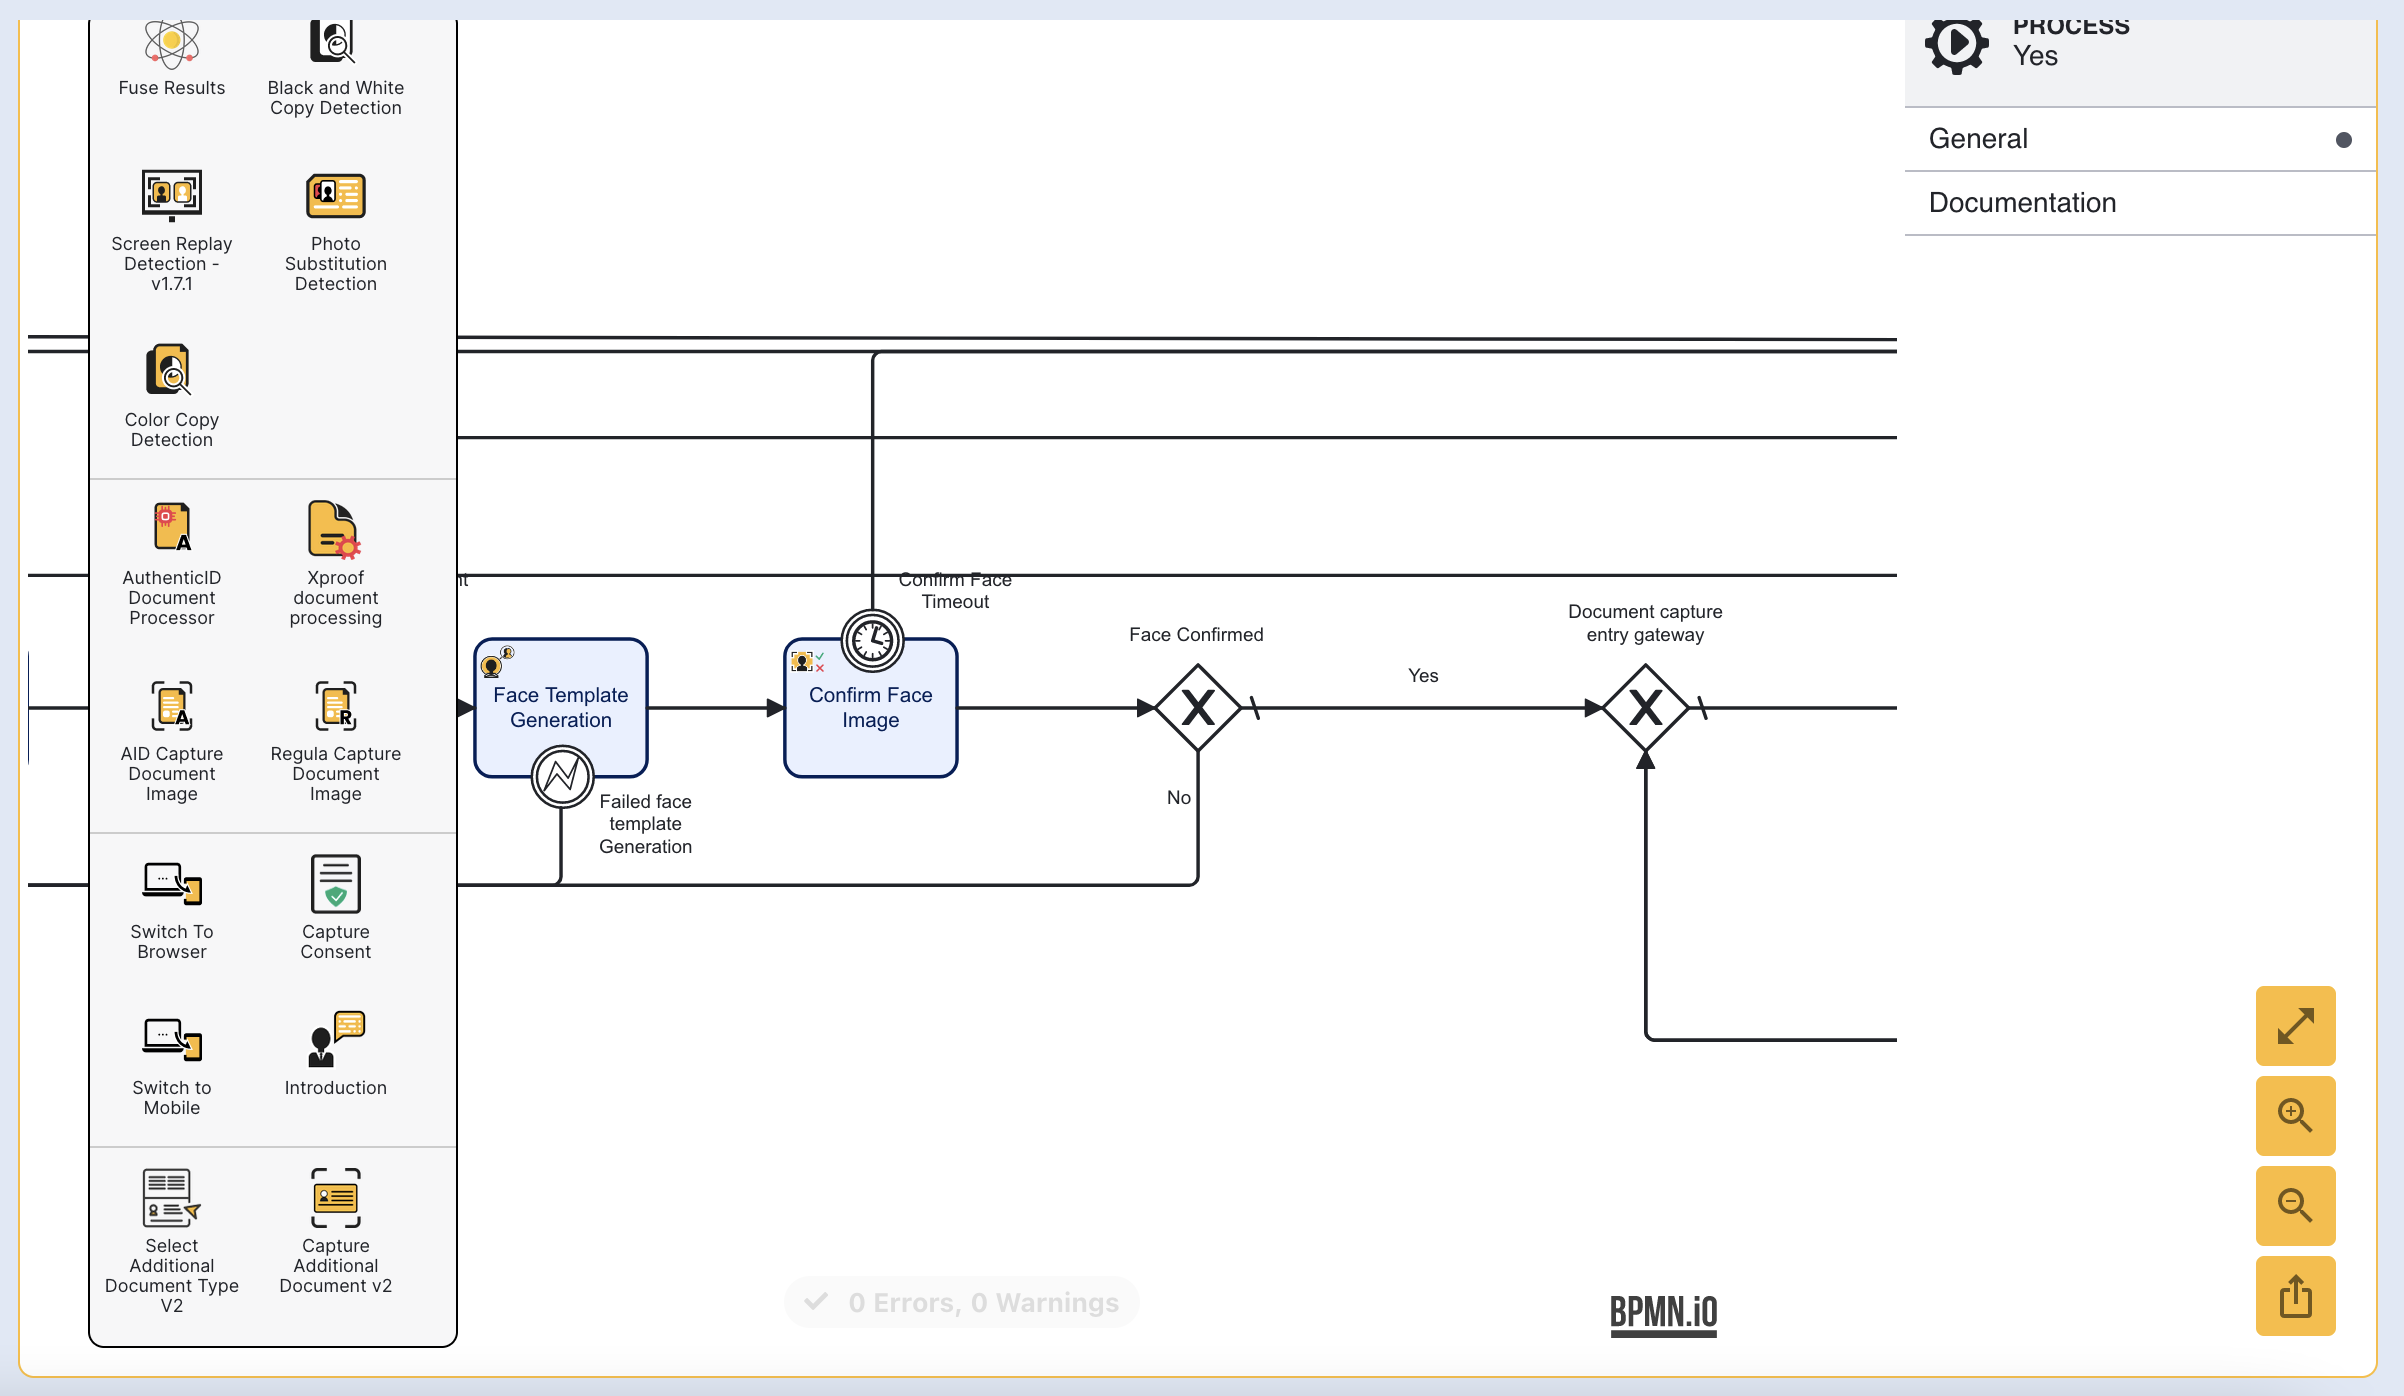
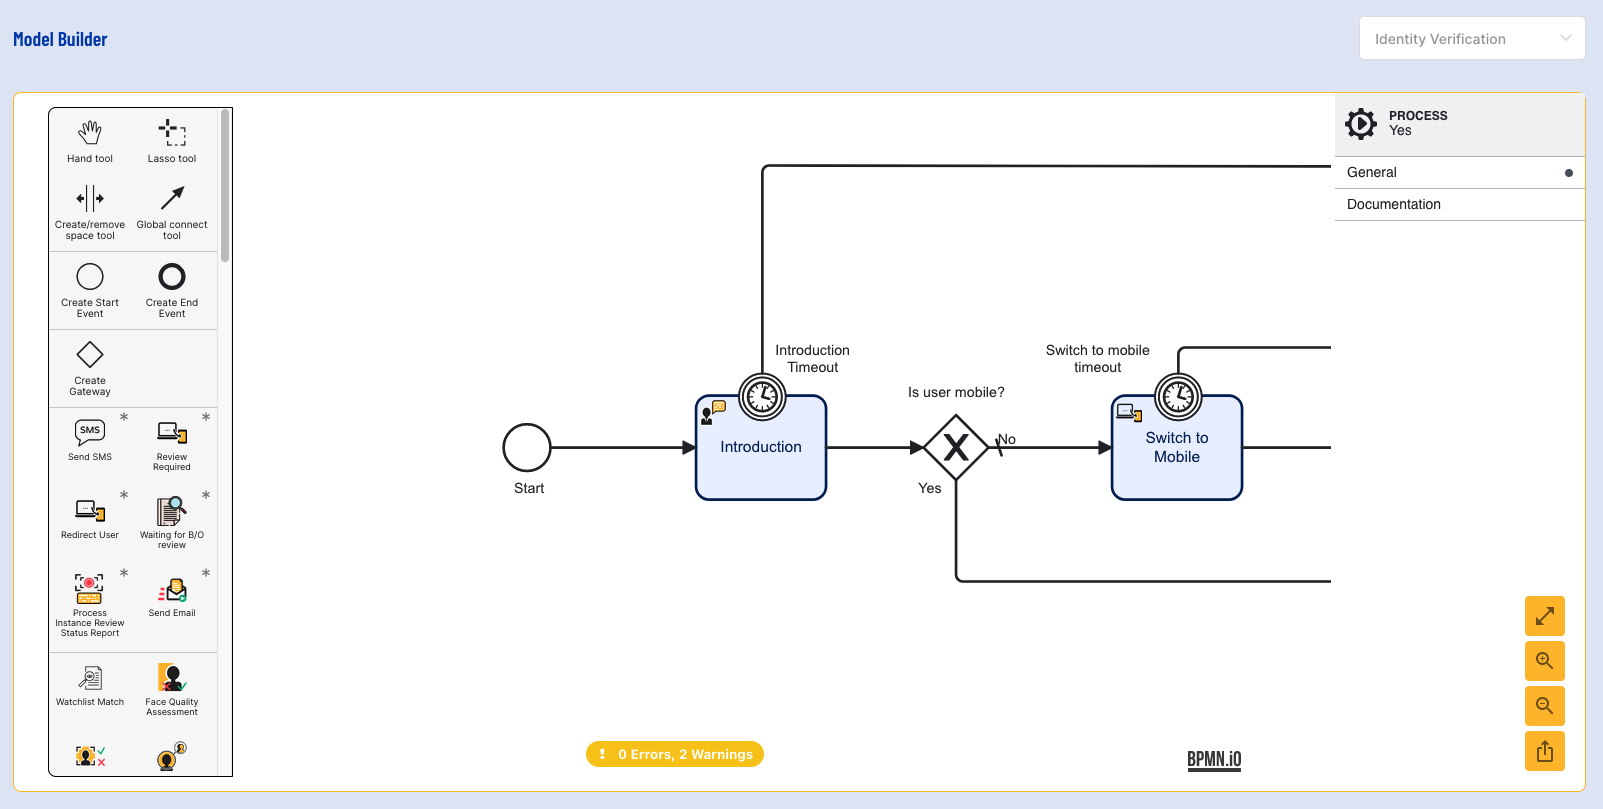
Step 2 - Add the Face Watchlist Member Activity
Next, find the 'Add face watchlist member' activity in the left-side activity palette.
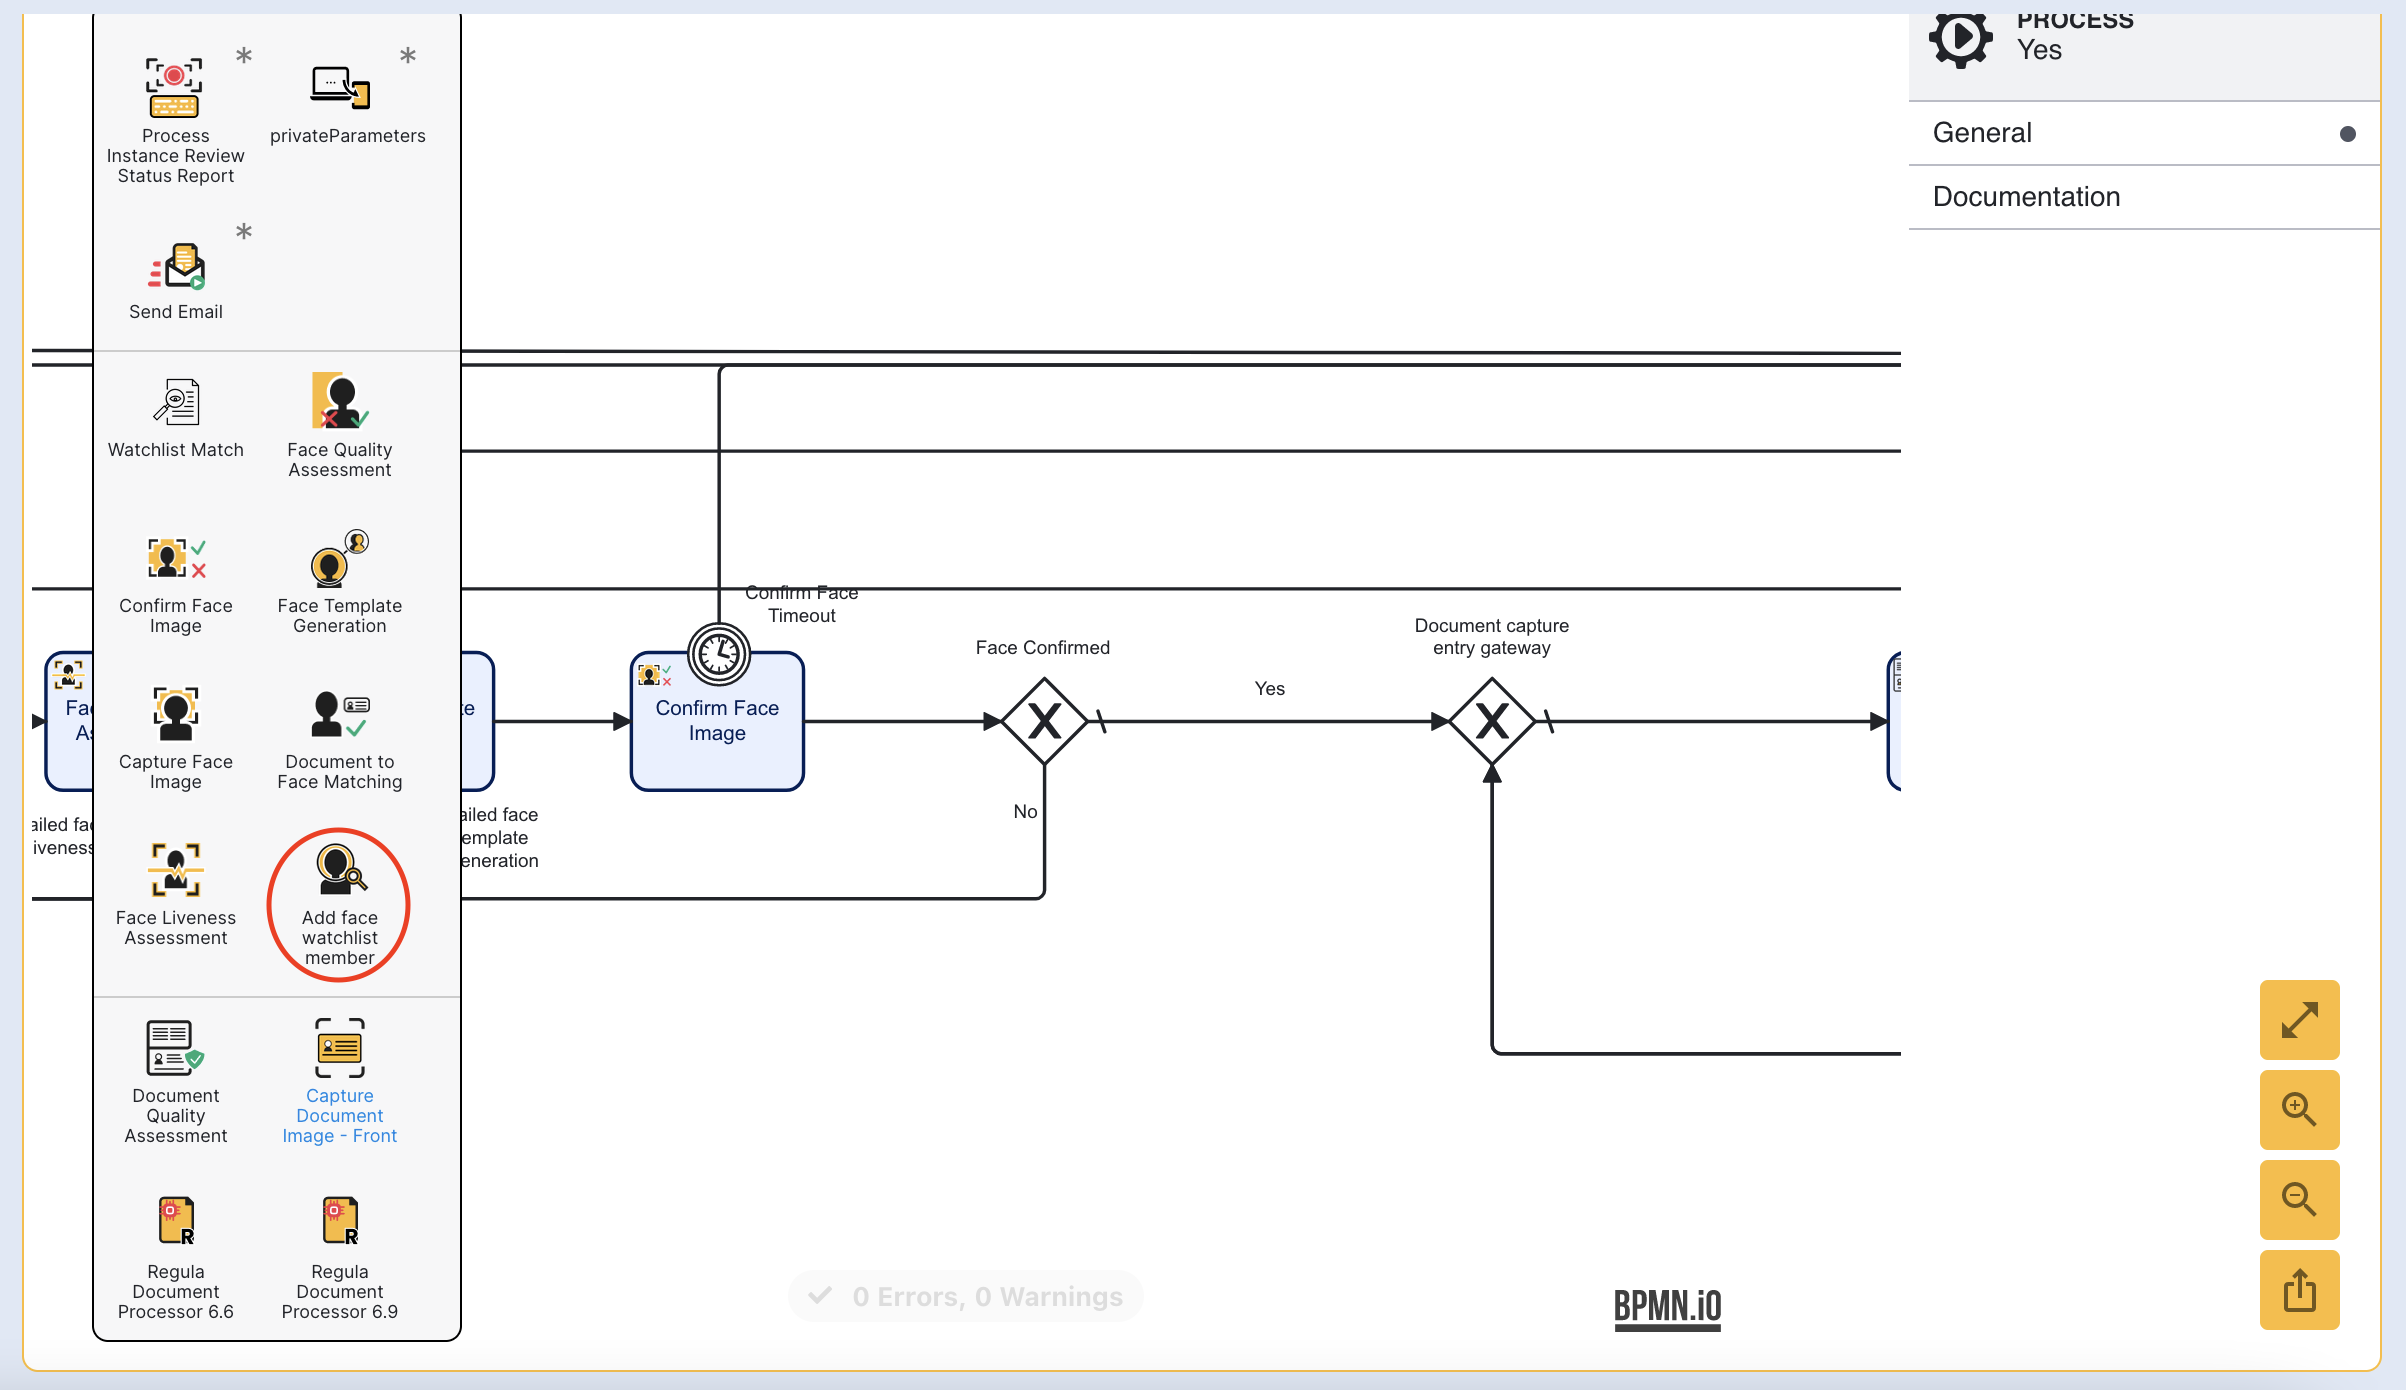
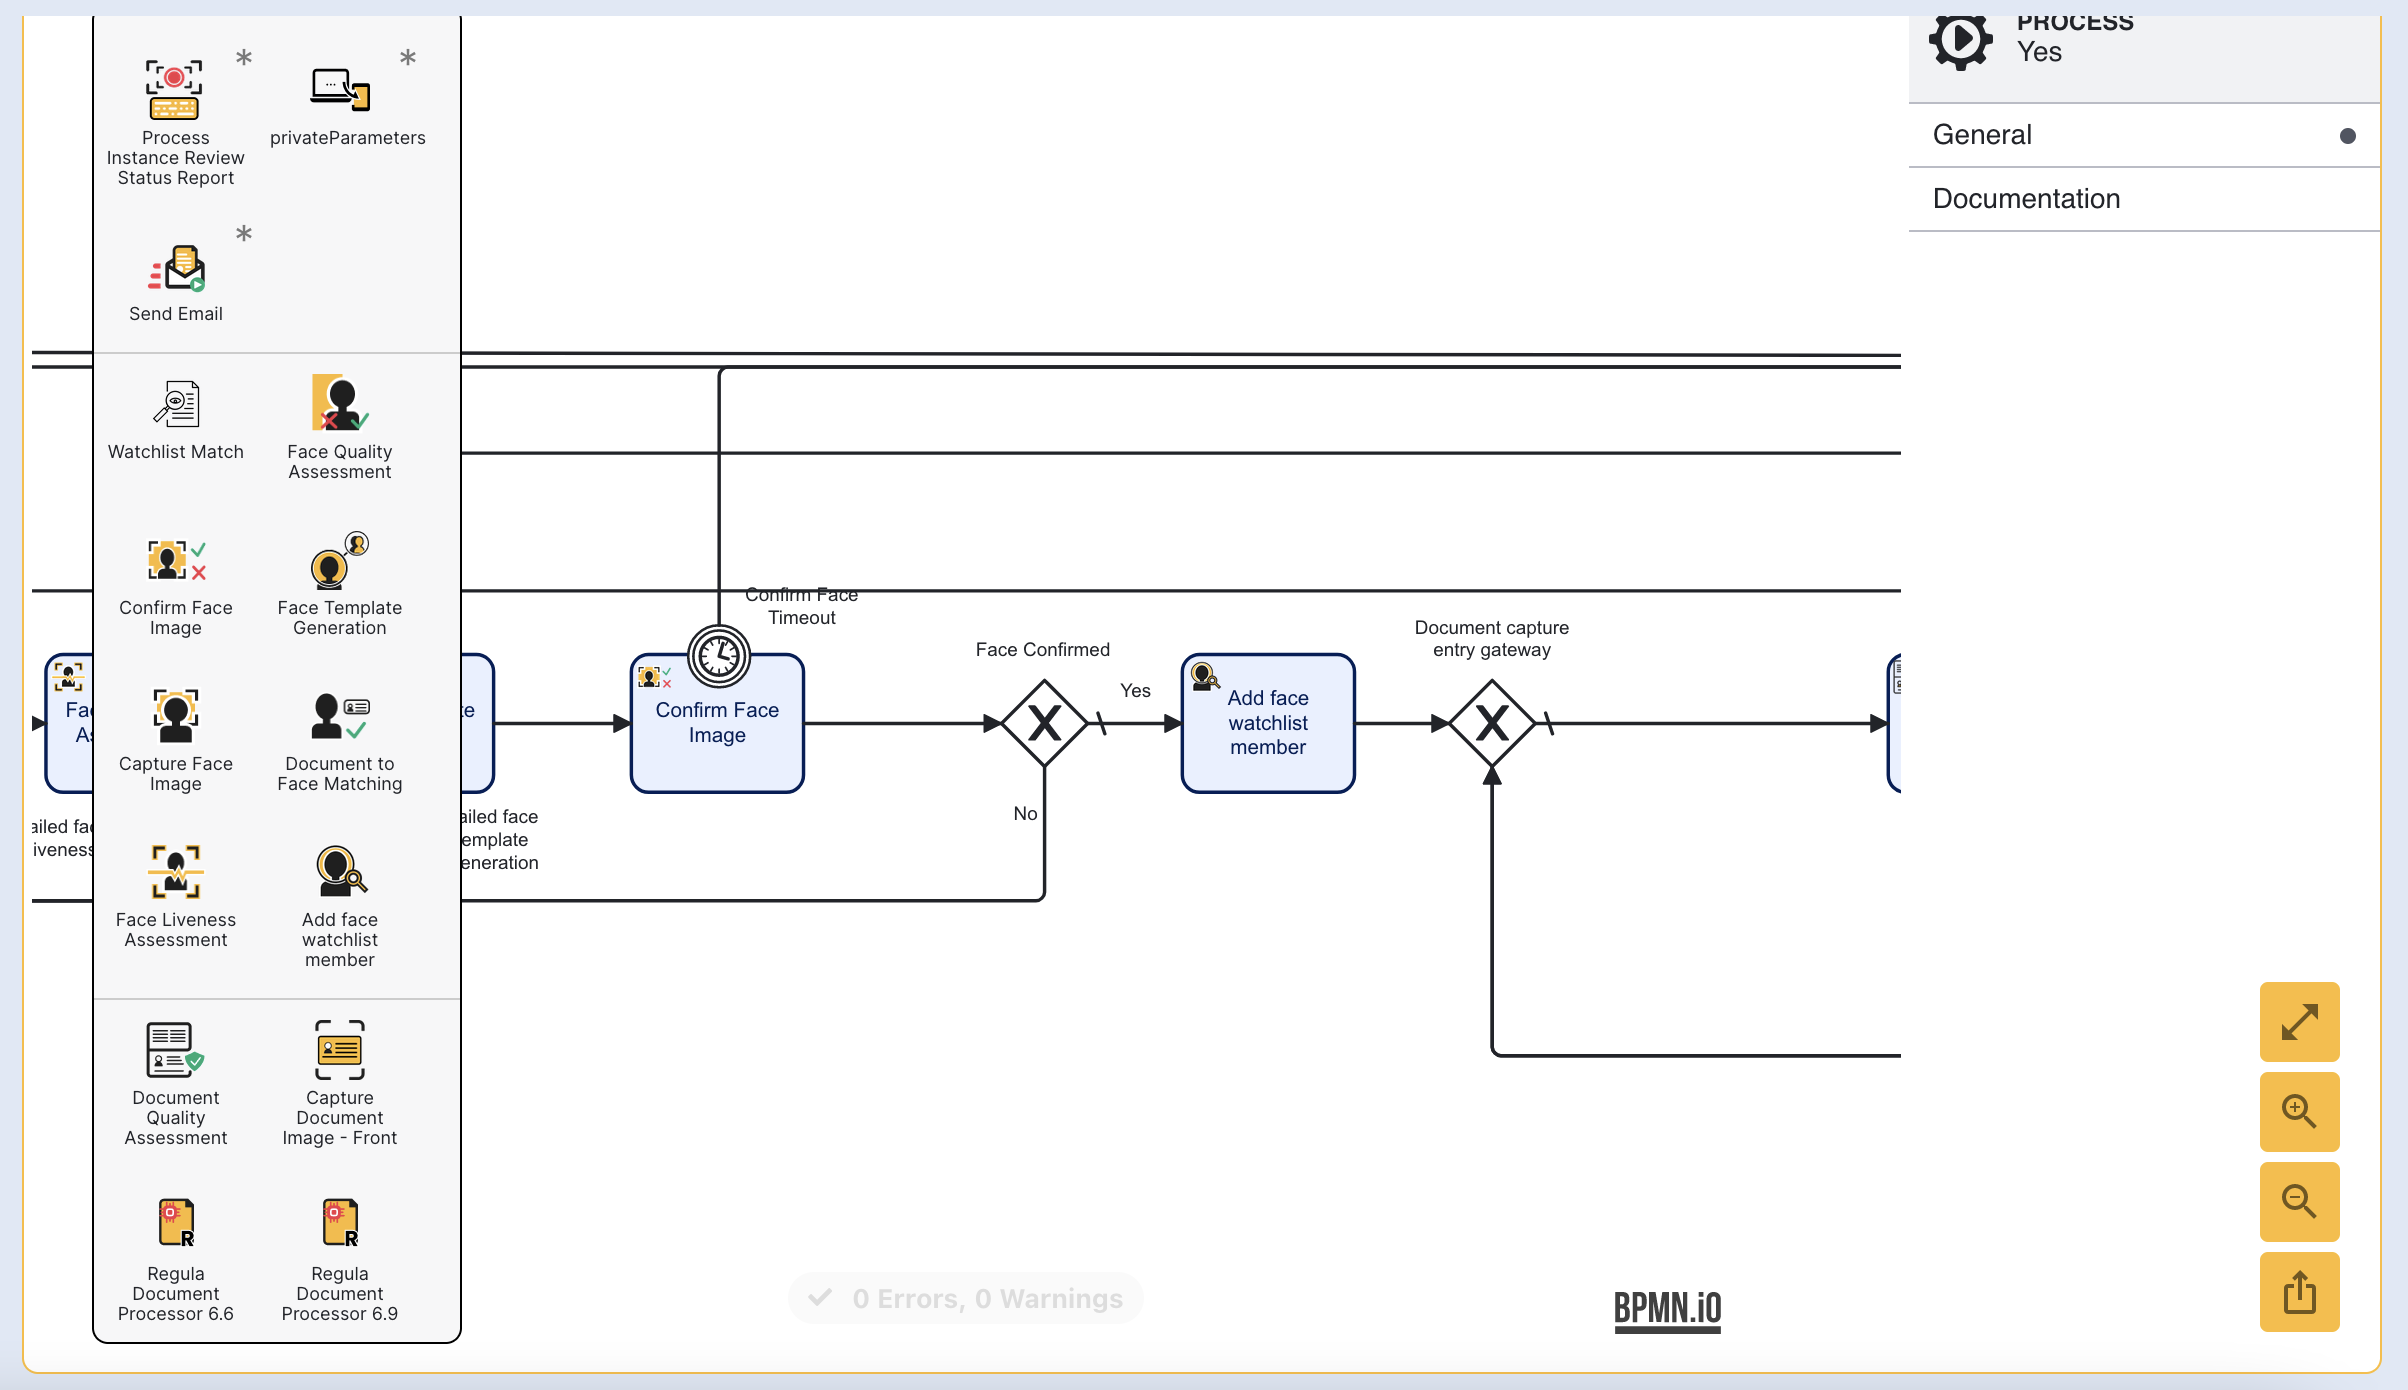
Click and drag the activity and add it after the 'Face Confirmed' gateway. Additionally, connect the new activity to the 'Document capture entry' gateway using a new sequence arrow. It is important that the new watchlist member is added after the face image has been successfully captured as this will be used to populate the face image of the new watchlist member.
For a complete list and explanation of all input parameters for this activity, see the Activity Parameters guide.
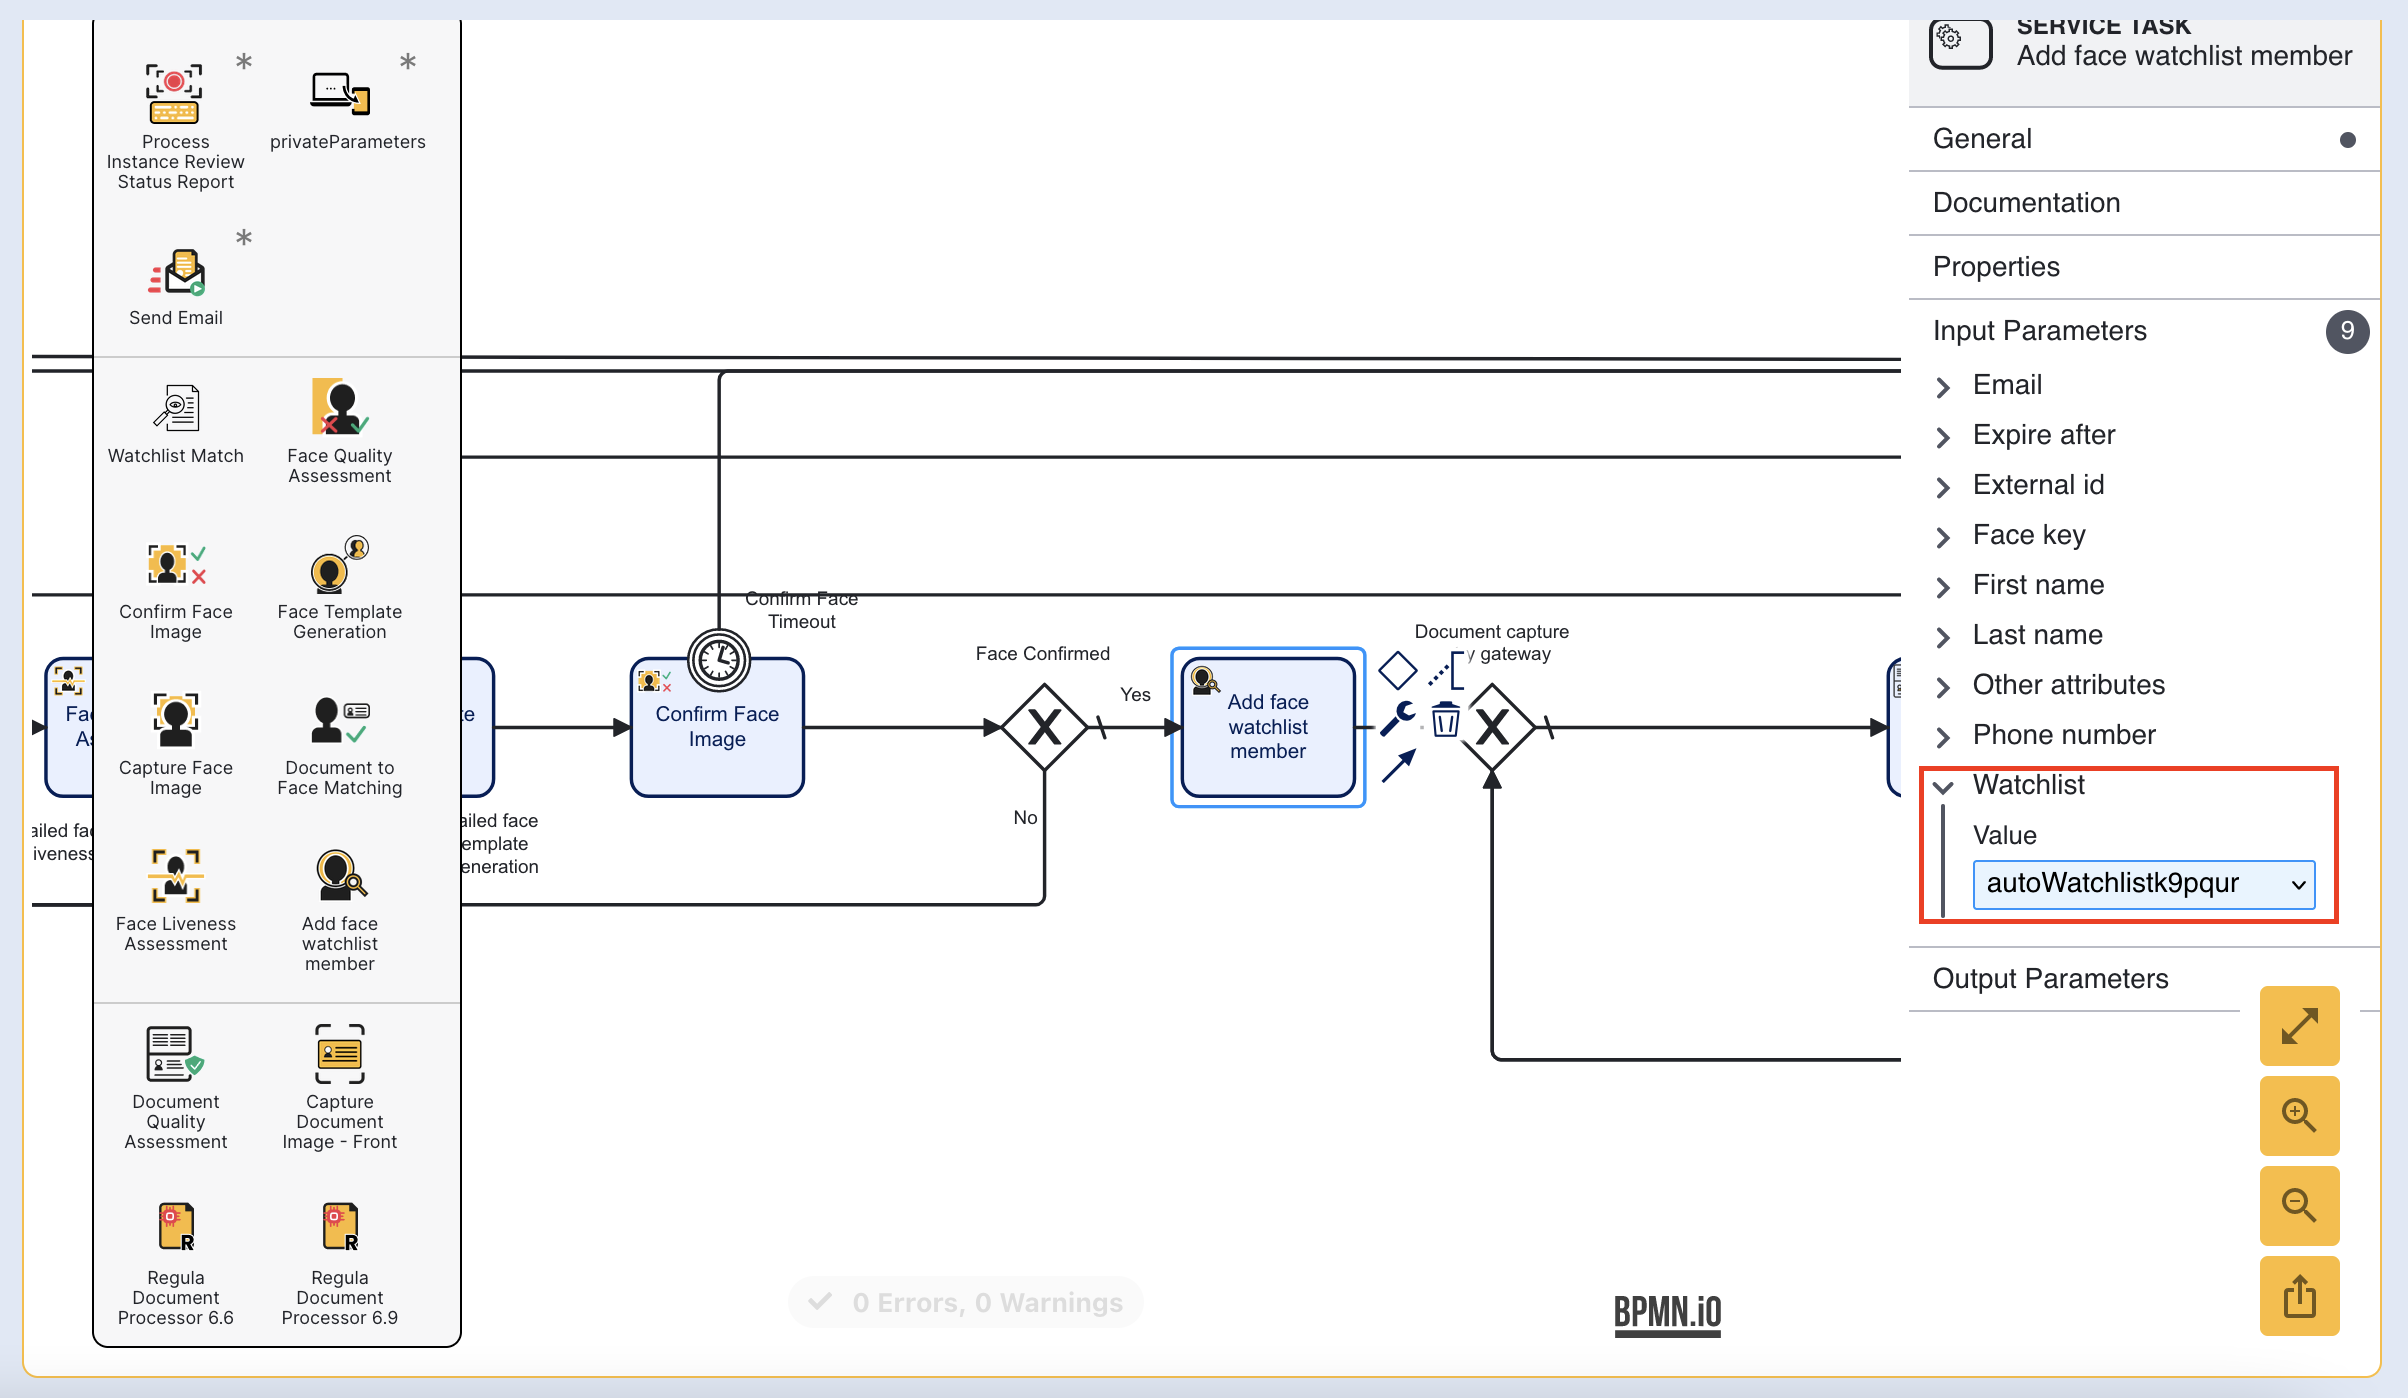
Step 3 - Select the Watchlist
To select which watchlist will be used in the Process Definition, click the 'Add face watchlist member' activity.
From the right-side contextual menu, expand the 'Input Parameters' and find the 'Watchlist' parameter. A drop-down list of all watchlists created in TrustX will be presented. Choose the desired watchlist from the list.
A full list of Input Parameters and their descriptions can be found in the Activity Parameters guide.
Setting this parameter is required for the activity to work as expected.
Once all settings are configured, click 'Save & Deploy' to complete the Process Definition.
Step 4 - Create Process Definition Token
Create a new Process Instance by navigating to the Process Definitions landing page and finding the newly created/ edited Process Definition.
Expand the additional options to reveal the 'Create new Token' option.
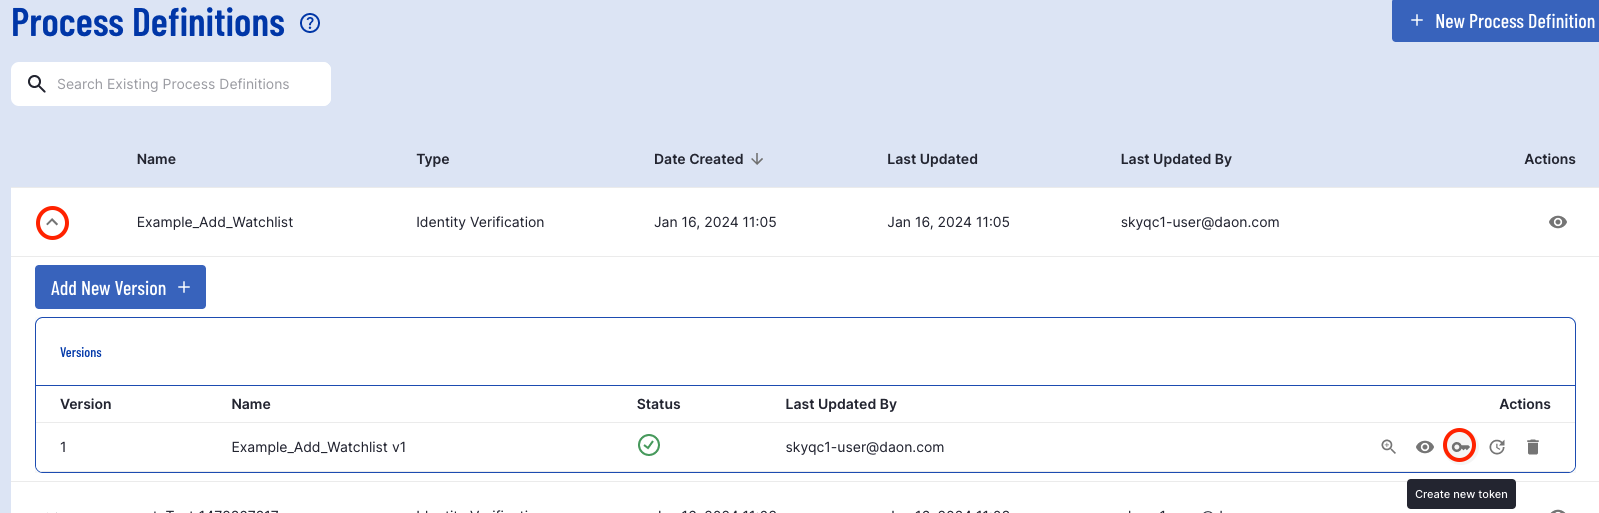
For more information on Process Definition Tokens, see the Process Definition Tokens Guide.
Matching Watchlists in a Process Definition
The 'Watchlist Match' activity is used to check whether the current end-user undergoing the ID&V process matches with any member of a selected watchlist.
Step 1 - Add the Watchlist Match Activity
First, create or edit a Process Definition by accessing the Process Designer. For more information, see the Process Definition Guide.
From the left-side activity palette, find the 'Watchlist Match' activity. Click and drag the activity into the Process Designer after the 'Confirm Face Image' activity.
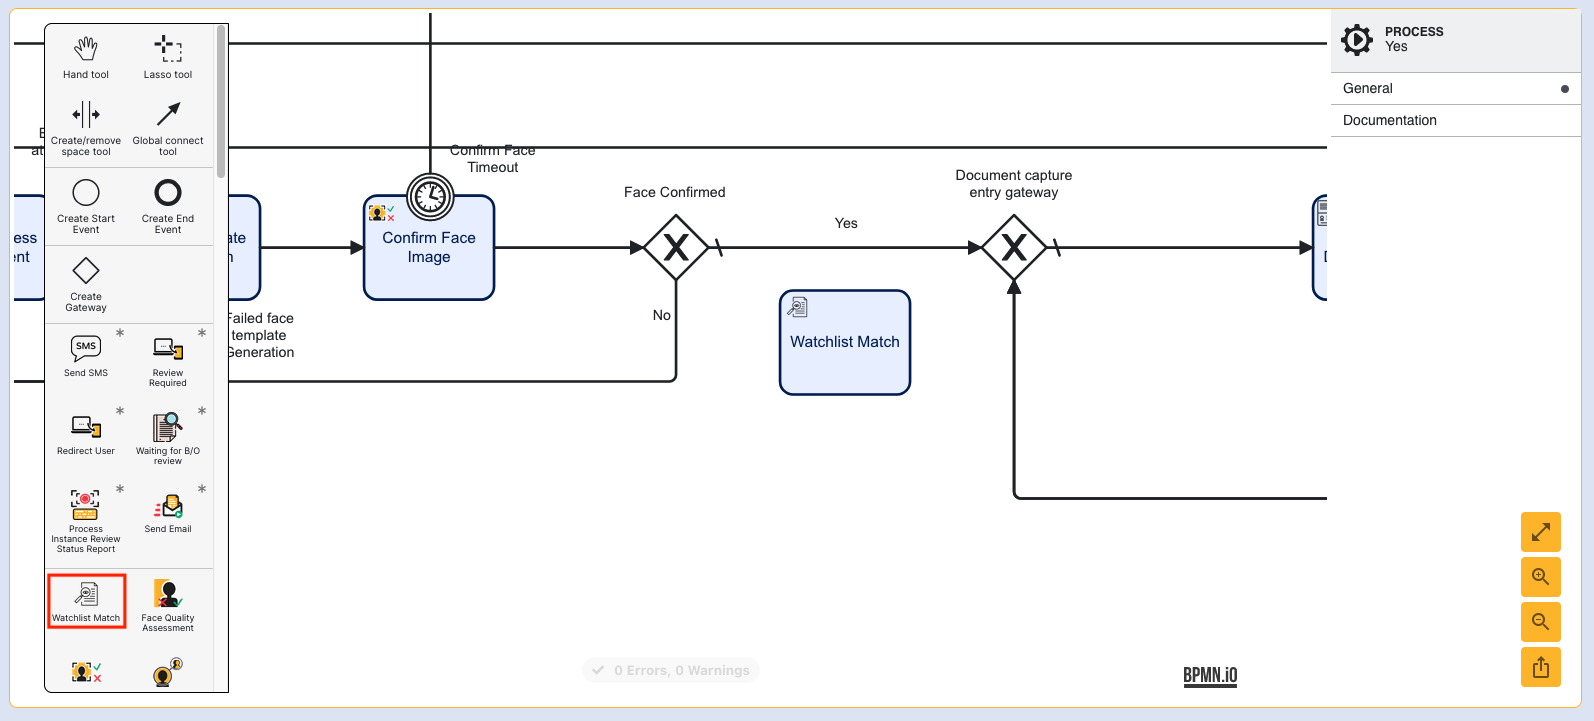
Connect the activity to the sequence flow by moving the 'Face Confirmed' sequence flow arrow to the beginning of the 'Watchlist Match' activity. Then, connect the end of the activity to the 'Document capture entry' gateway.

This activity should be placed after the face has been captured as a successfully captured face image is required to compare to the watchlist.
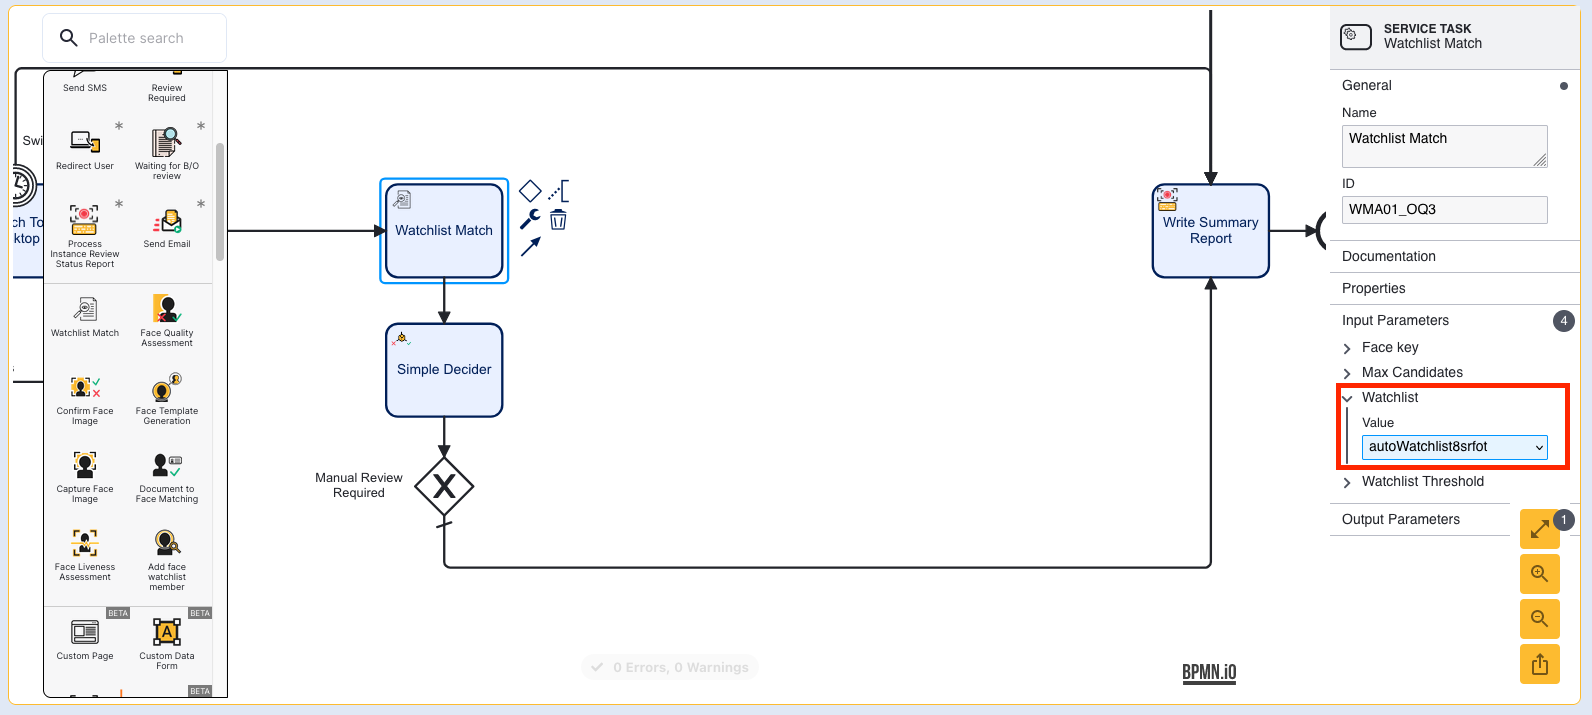
Step 2 - Select the Watchlist
Now that the activity has been added to the Process Designer, we will choose which watchlist to match against during the Process Instance.
Click the activity to open the right-side contextual menu. Expand the 'Input Parameters' option and find the 'Watchlist' parameter. This will provide a dropdown list of all watchlists created in TrustX. Select the desired watchlist among the list that will be used to match against.
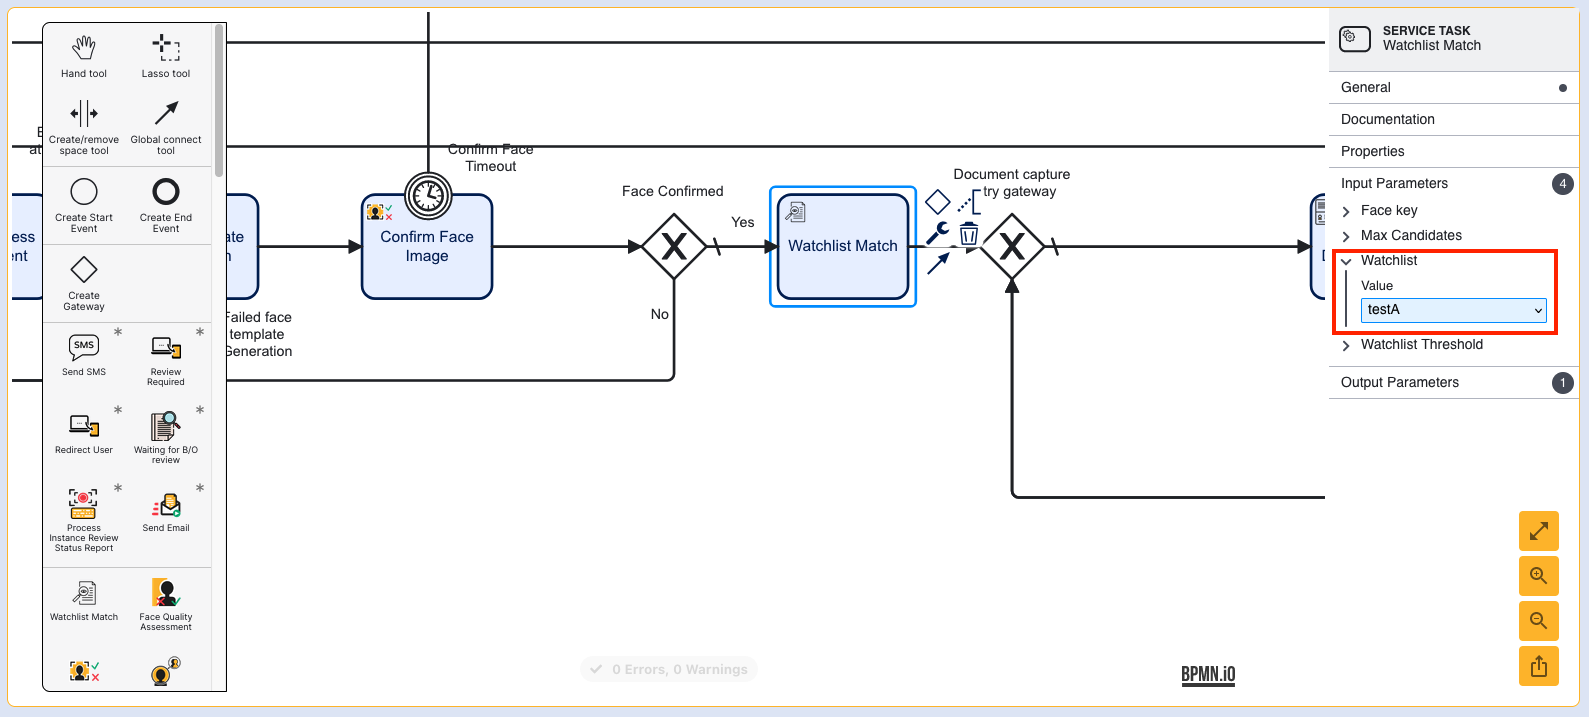
Step 3 - Configure Input Parameters
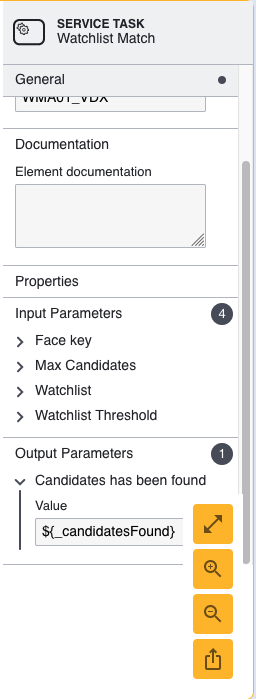
The 'Watchlist Match' activity includes various configurable input parameters that specify how the watchlist face will be matched against the selected watchlist.
Parameter Name | Type | Default Value | Description |
|---|---|---|---|
Face key | String | face1 | A unique identifier used to identify the face captured during the Process Instance. |
Max Candidates | Integer | ${10} | The maximum number of match candidates to return after comparing the face image to the list of watchlist members. |
Watchlist | String | null | A drop-down list of all watchlists created by the tenant in TrustX. The end-user will be matched against the selected watchlist. Only one watchlist is supported per Watchlist Match activity. Note: This parameter is required. |
Watchlist Threshold | Double | ${0.205245} | Threshold value used by the algorithm to determine how strict or relaxed the face matching will be. |
Step 4 - Viewing Watchlist Match Results
Process Instances that contain a watchlist match activity will include a section that displays results that represent the outcome of the watchlist match activity.
To find this information, first navigate to the Process Instance page found on the left-side navigation bar. Find the Process Instance among the table displayed on the landing page. Click the magnifying glass to show further details under the Actions column.
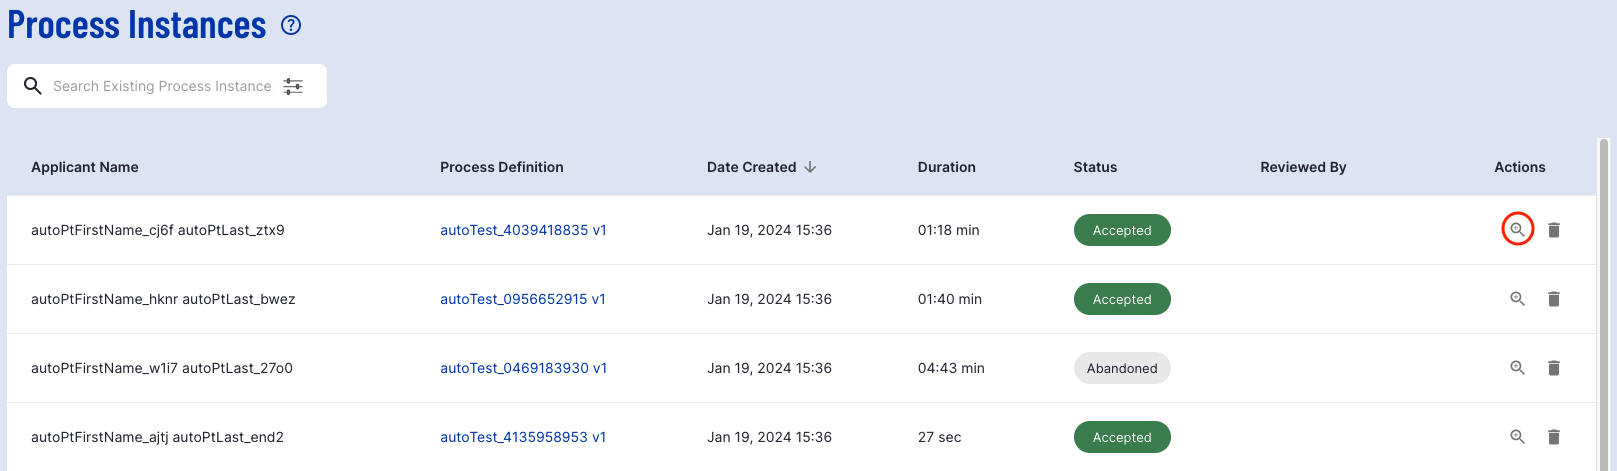
From the individual Process Instance page, scroll down to find the 'Watchlist' section where results of the face match activity can be found.

Results list the watchlist members that matched the face image captured during the ID&V flow. The following information is available:
Image - The face image of the watchlist member.
Name - The name of the watchlist member.
Score - The match rate between the captured face image and watchlist member.
Responding to Watchlist Match
Users may want to control the ID&V flow depending on the result of a watchlist match. For example, if a face match is found, the user can be directed to a manual review activity where further investigation can be conducted before the flow is completed.
This can be accomplished by using the output parameter associated with the watchlist match activity and creating conditional logic.
Prerequisite: Follow the instructions outlined above in the Matching Watchlists in a Process Definition section to configure the watchlist match activity.
Step 1 - Create a Simple Decider and Manual Review Gateway
The manual review flow can be used to perform a review of end user flows that require additional documents/ information to complete the ID&V flow successfully.
Steps to configure this process can be found in the Manual Review Guide, the details of which will be covered briefly in this document.
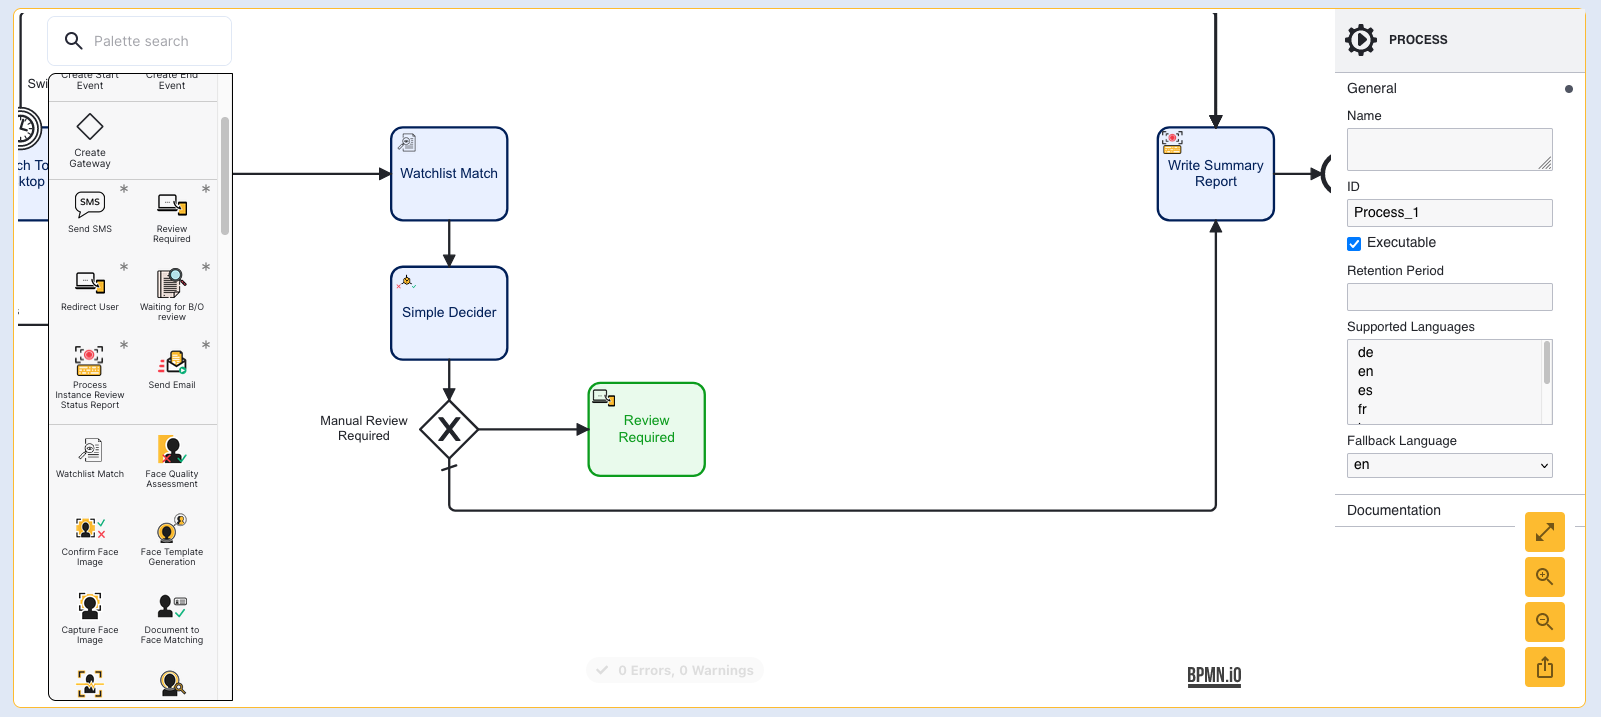
First, create add the Simple Decider activity and create a new gateway that will determine whether a review is required. Connect the Simple Decider activity and gateway to the watchlist match activity using a sequence flow arrow.

Click the new gateway to open the right-side contextual menu. Under name, enter: "Manual Review Required"
The default flow will need to be set before continuing. Create a new sequence flow arrow connecting the Manual Review Required gateway to the 'Write Summary Report' gateway and click the 'Change Type' spanner. Set the type to 'Default Flow'
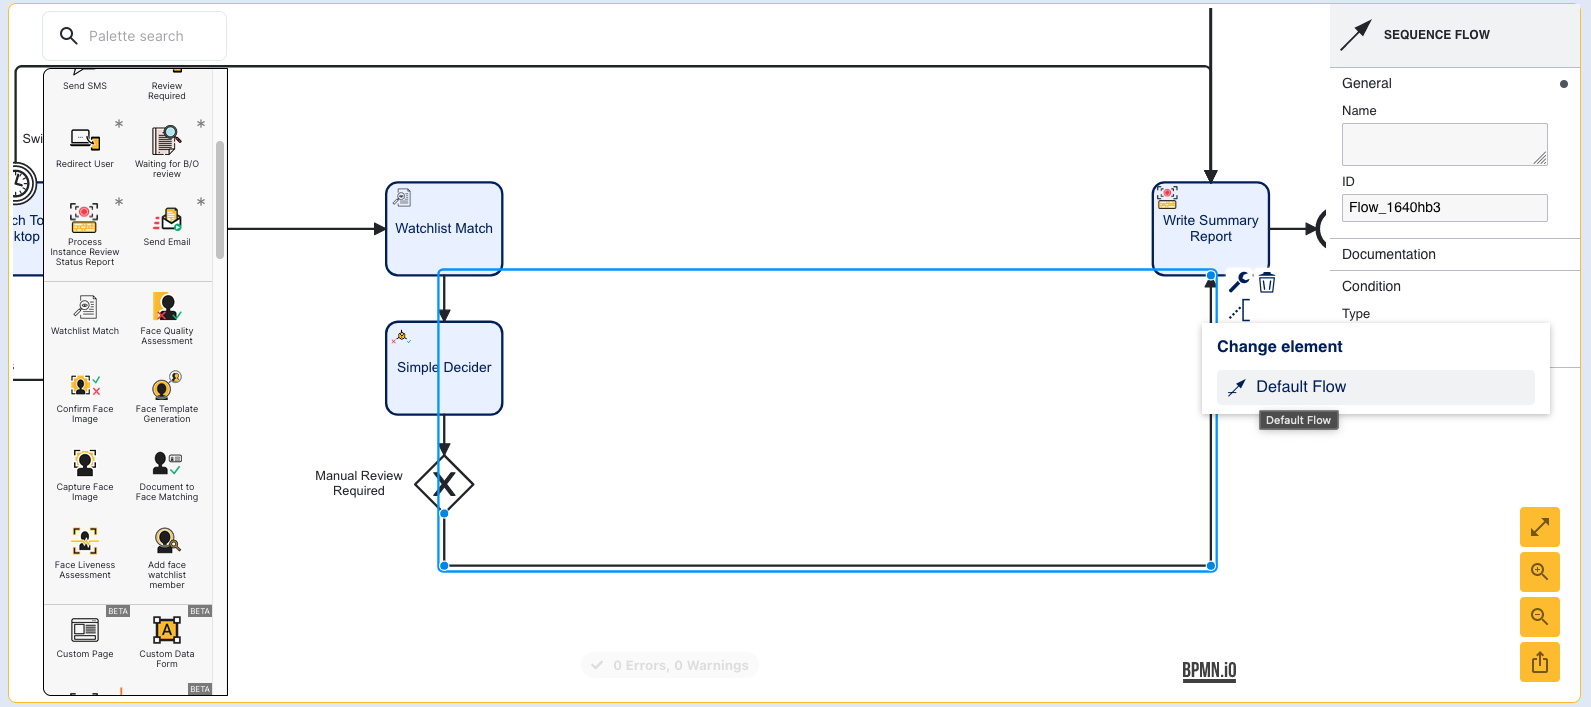
Finally, select the watchlist match activity and set the watchlist to be used.
Step 2 - Define Conditional Logic
In this example, a manual review will be required if at least one match is found when performing the watchlist match.
First, add a 'Review Required' activity to the flow and connect the activity to the 'Manual Review Required' gateway.
Select the sequence arrow connecting the gateway to the 'Review Required' activity. This will open the right-side contextual menu.
Under the Condition section, select 'Expression' to create a new condition expression. This is where the watchlist match output parameter can be used to determine whether a manual review is required.
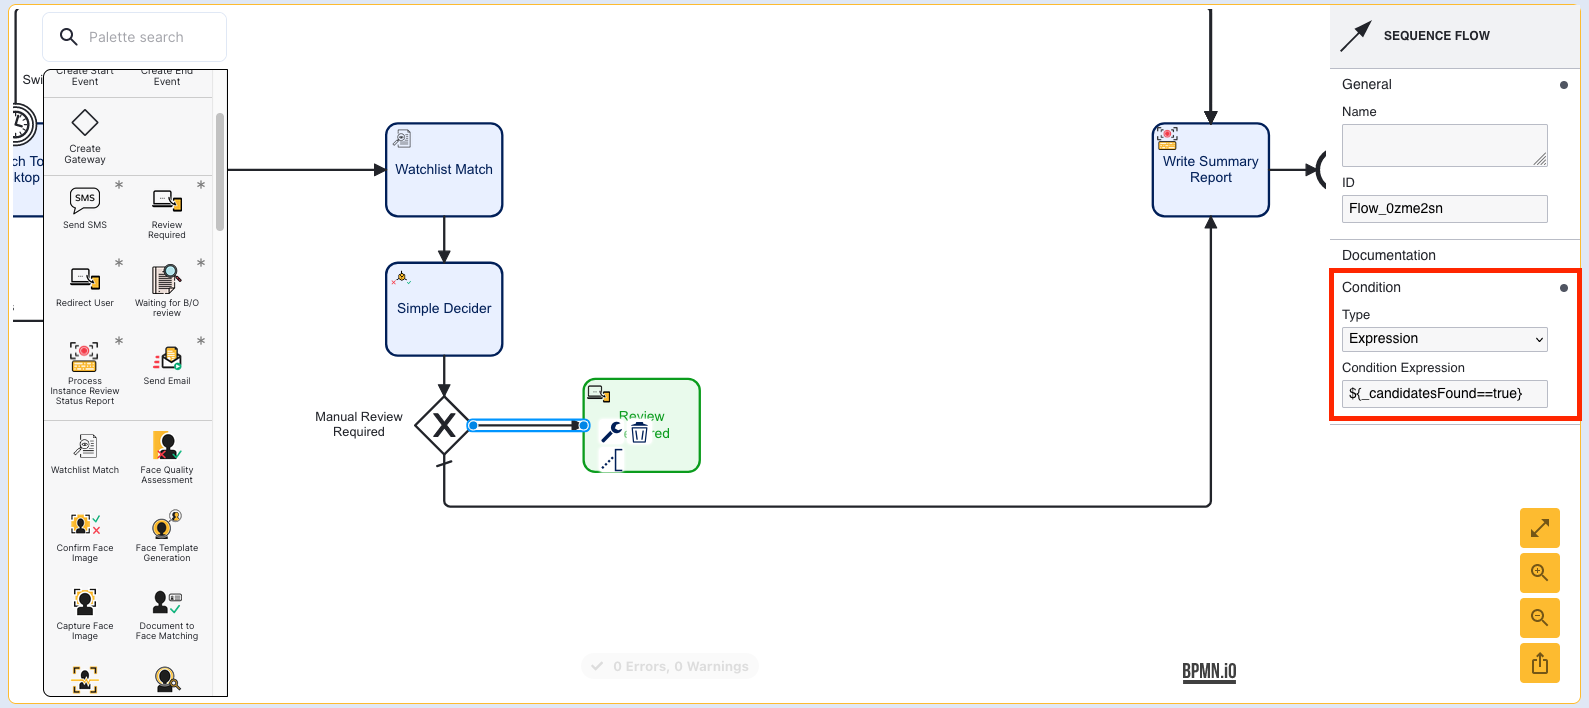
The watchlist match output parameter is as follows:$(_candidatesFound)
Enter the following into the Condition Expression field:${_candidatesFound==true}
The Process Designer will now look accordingly:
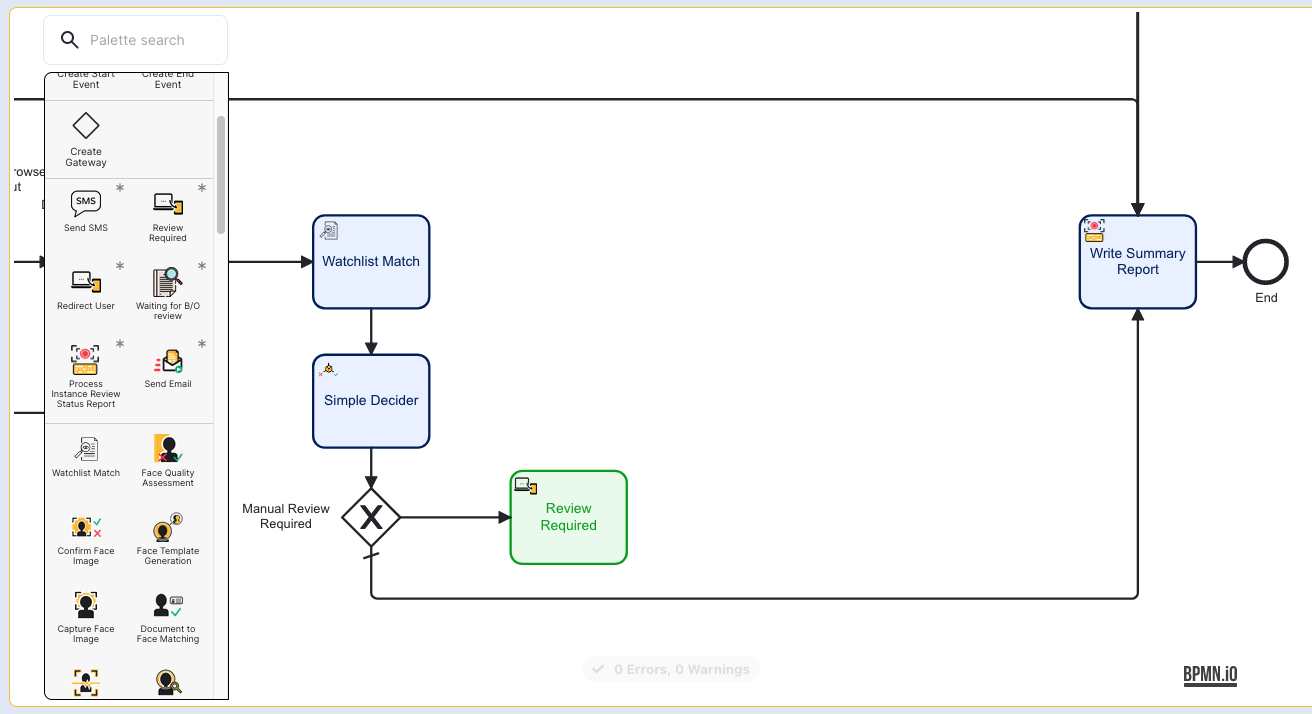
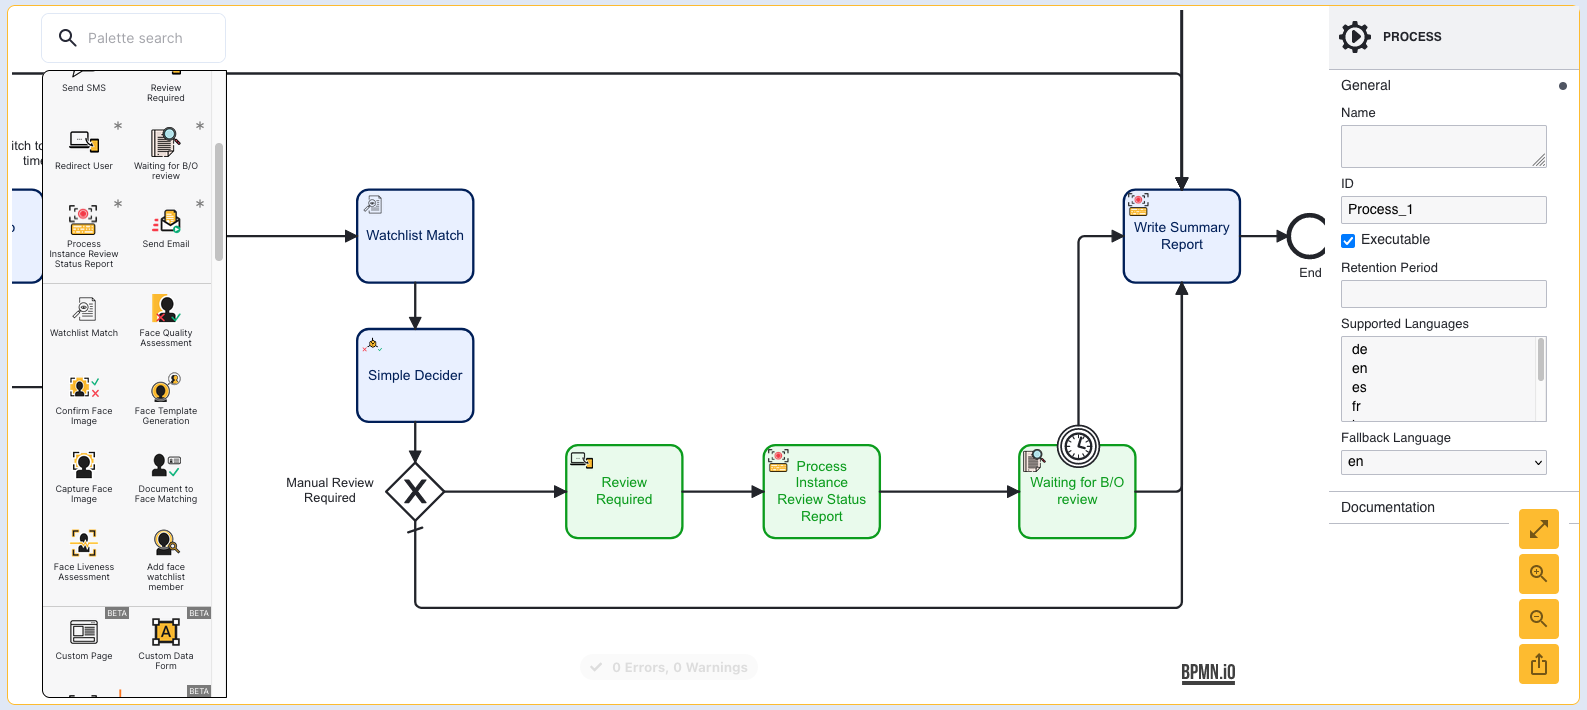
Step 3 - Add the Review Flow
The Manual Review flow, as outlined in the Manual Review Guide can now be added to the 'Manual Review Required' gateway.
Step 4 - Save and Test
Once the configuration is completed, click the Save & Deploy button. When the end user proceeds through the ID&V flow, if the face matches one found on the selected watchlist, the flow will be redirected to the Manual Review process.