Introduction
The face capture activity provides two built-in screens to support capturing a face; the instructions page and the capture page.
It is possible to disable the default instructions page and present a custom instructions screen using either a custom data form or a custom page. However, there are two points to consider when implementing this approach:
It may be desired to display errors that can occur later in the process related to the face such as a face quality or face liveness failure to the end-user via the custom instructions screen.
The errors which may occur later in the process related to the face, such as a face quality or a face liveness failure, will appear on the “capture” screen by default, and this may not be the desired behaviour.
This guide provides details on implementing a custom instructions screen using a Custom Page while addressing the points listed above.
Step 1 - Set up the Custom Instructions Screen
Create a Custom Page
This step will define the contents of the Custom Page that will be used to create the new instructions screen.
First, create a local directory and begin the design of the custom instructions screen with associated html, javascript, images, css etc.
Within the Custom Instructions screen, the “faceError” will be accessed via session data through event.data.variables.sessionData.faceError where the event is the inter-frame communications object that is received . It is an object containing a number of attributes, the most important are the code and message fields.
The code and message correspond to the code and message errors for the Face Capture process.
The following code demonstrates a method for displaying the error to the end-user.
index.html
script.js
Once the custom instruction screen has been designed, create a zip archive of the contents. Next, create a new Custom Page within TrustX, give it a name and upload the archive. For more information on creating a Custom Page, see the Custom Pages Guide.
Step 2 - Set up the Cloud Function
To prevent the face error variable from being shown to the end-user on the Face Capture screen, the face error must be removed from the session data. To do this, a Cloud Function is required.
This code checks to see if the current face capture contains an error. If it does, it is removed.
Create a Cloud Function within TrustX, give it a name and add the Python code above. For more information on creating Cloud Functions, see the Cloud Functions Guide.
Step 3 - Create the Process Definition
With the Custom Page and Cloud Function defined, the next step involves creating the Process Definition. In this step, the Capture Face Image, Custom Page, and Cloud Function activities will be configured to utilise the Custom Page and Cloud Functions created thus far. For more information on creating Process Definitions, see the Process Definition Guide.
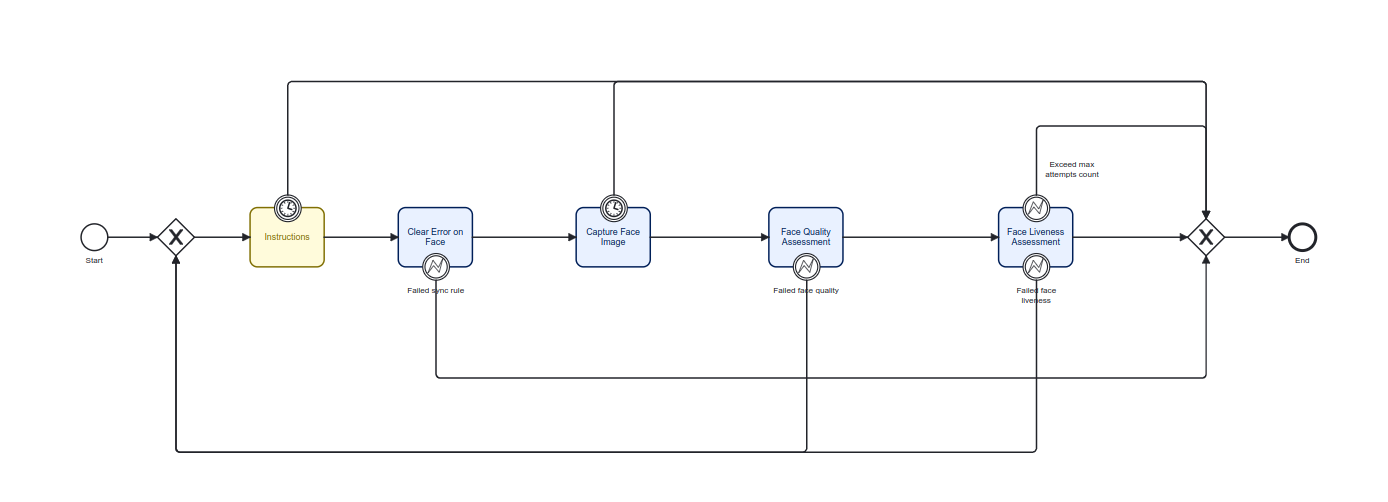
Configuring Capture Face Image Activity
The instructions screen should be disabled on the Face Capture activity. To do this, edit the activity and remove from the List of Screens property the “instructions” entry.
On the UI Component Id property, change the value from “instructions” to “capture”.
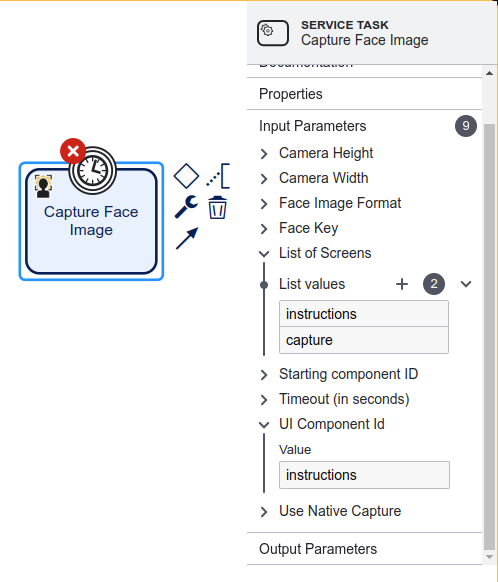
This will direct the activity to not show the “instructions” screen.
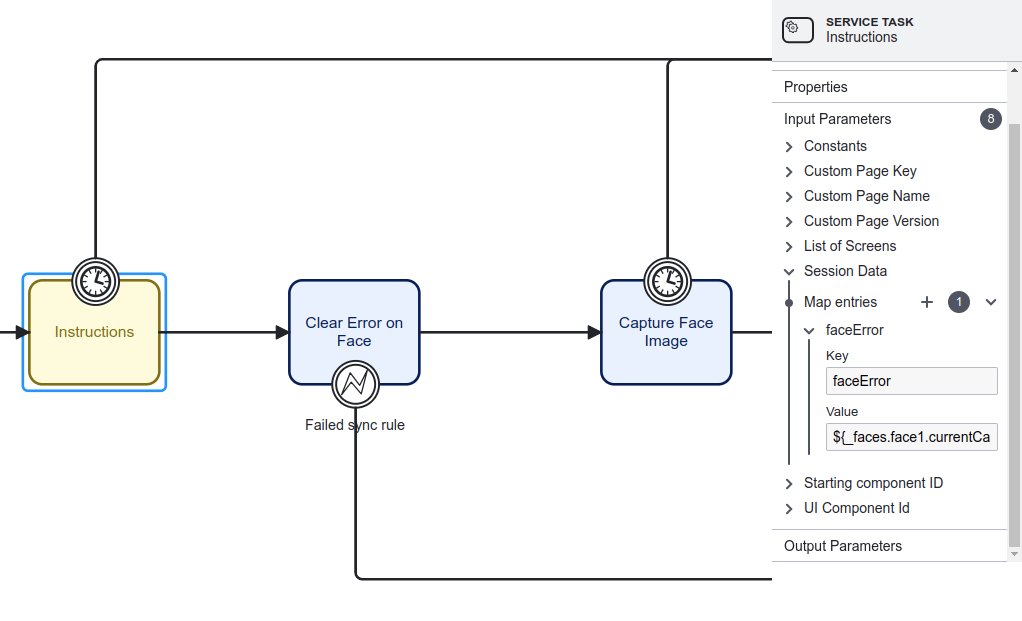
Configure the Custom Page Activity
To provide the “face error” to the Custom Page activity (Instructions), edit the Session Data property of the Custom Page and add an entry. Set the key to “faceError” and the value to “_${faces.face1.currentCapture.error}” as shown below.
Configure the Cloud Function Activity
For the Cloud Function to work, the _face session data must be send to the Cloud Function. To do this, select the Cloud Function (Clear Error on Face) and add ${__faces} to the list of Process Variables as shown in the diagram below.
