Introduction
TrustX enables users to match live face images against an uploaded face image by utilizing External Source Face Matching. The user will be able to generate an upload URL from a start process instance invocation that can be used by an external application to upload a face image. Alternatively, this can be completed by generating the face upload URL from the 'External Source Face Upload v1' activity and preforming the upload in a custom page or cloud function.
This document will describe both use cases to implement this flow:
External Upload Via Process Definition
This section will discuss configuring a Process Definition where the external face image is uploaded from a cloud function before performing a face match against the live image captured during the Process Instance.
Step One - Create a Cloud Function
Before creating the Process Definition, a custom page will be configured that handles the upload process of the external image.
A new custom page can be created by navigating to Cloud Functions in the Backoffice.
For more information, see the Cloud Functions Guide.
This example will demonstrate a simple implementation of a cloud function.
Example Cloud Function:
In the example above, the
presigned_urlvariable is populated with the 'Output Variable' input parameter value of the 'External Source Face Upload v1' activity, which will be configured within Step Two of this document.The image is uploaded to the presigned URL using the URL and headers of the activity:
requests.put(presigned_url_,_data=image_data.getvalue(), headers=headers)``
Step Two - Configure External Source Upload Activity
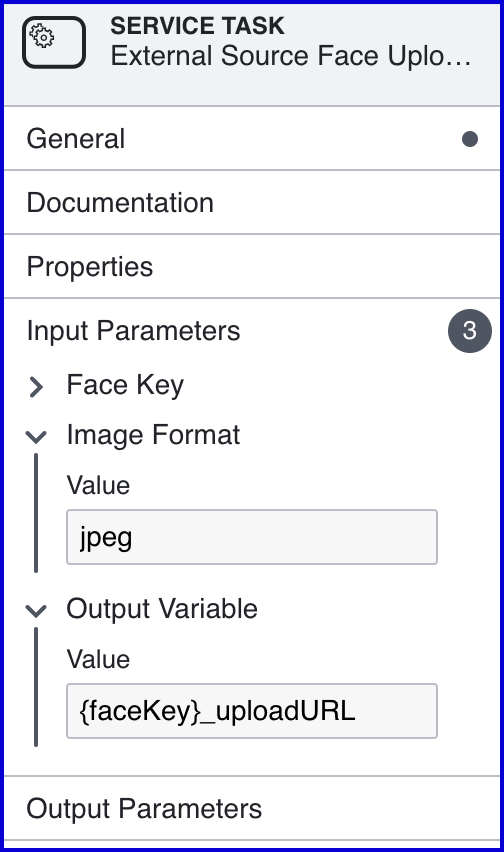
In a new Process Definition, add an 'External Source Face Upload v1' activity at the beginning of the Process Definition. The 'Output Variable' input parameter will be used as the upload URL of the external face image within the custom page.
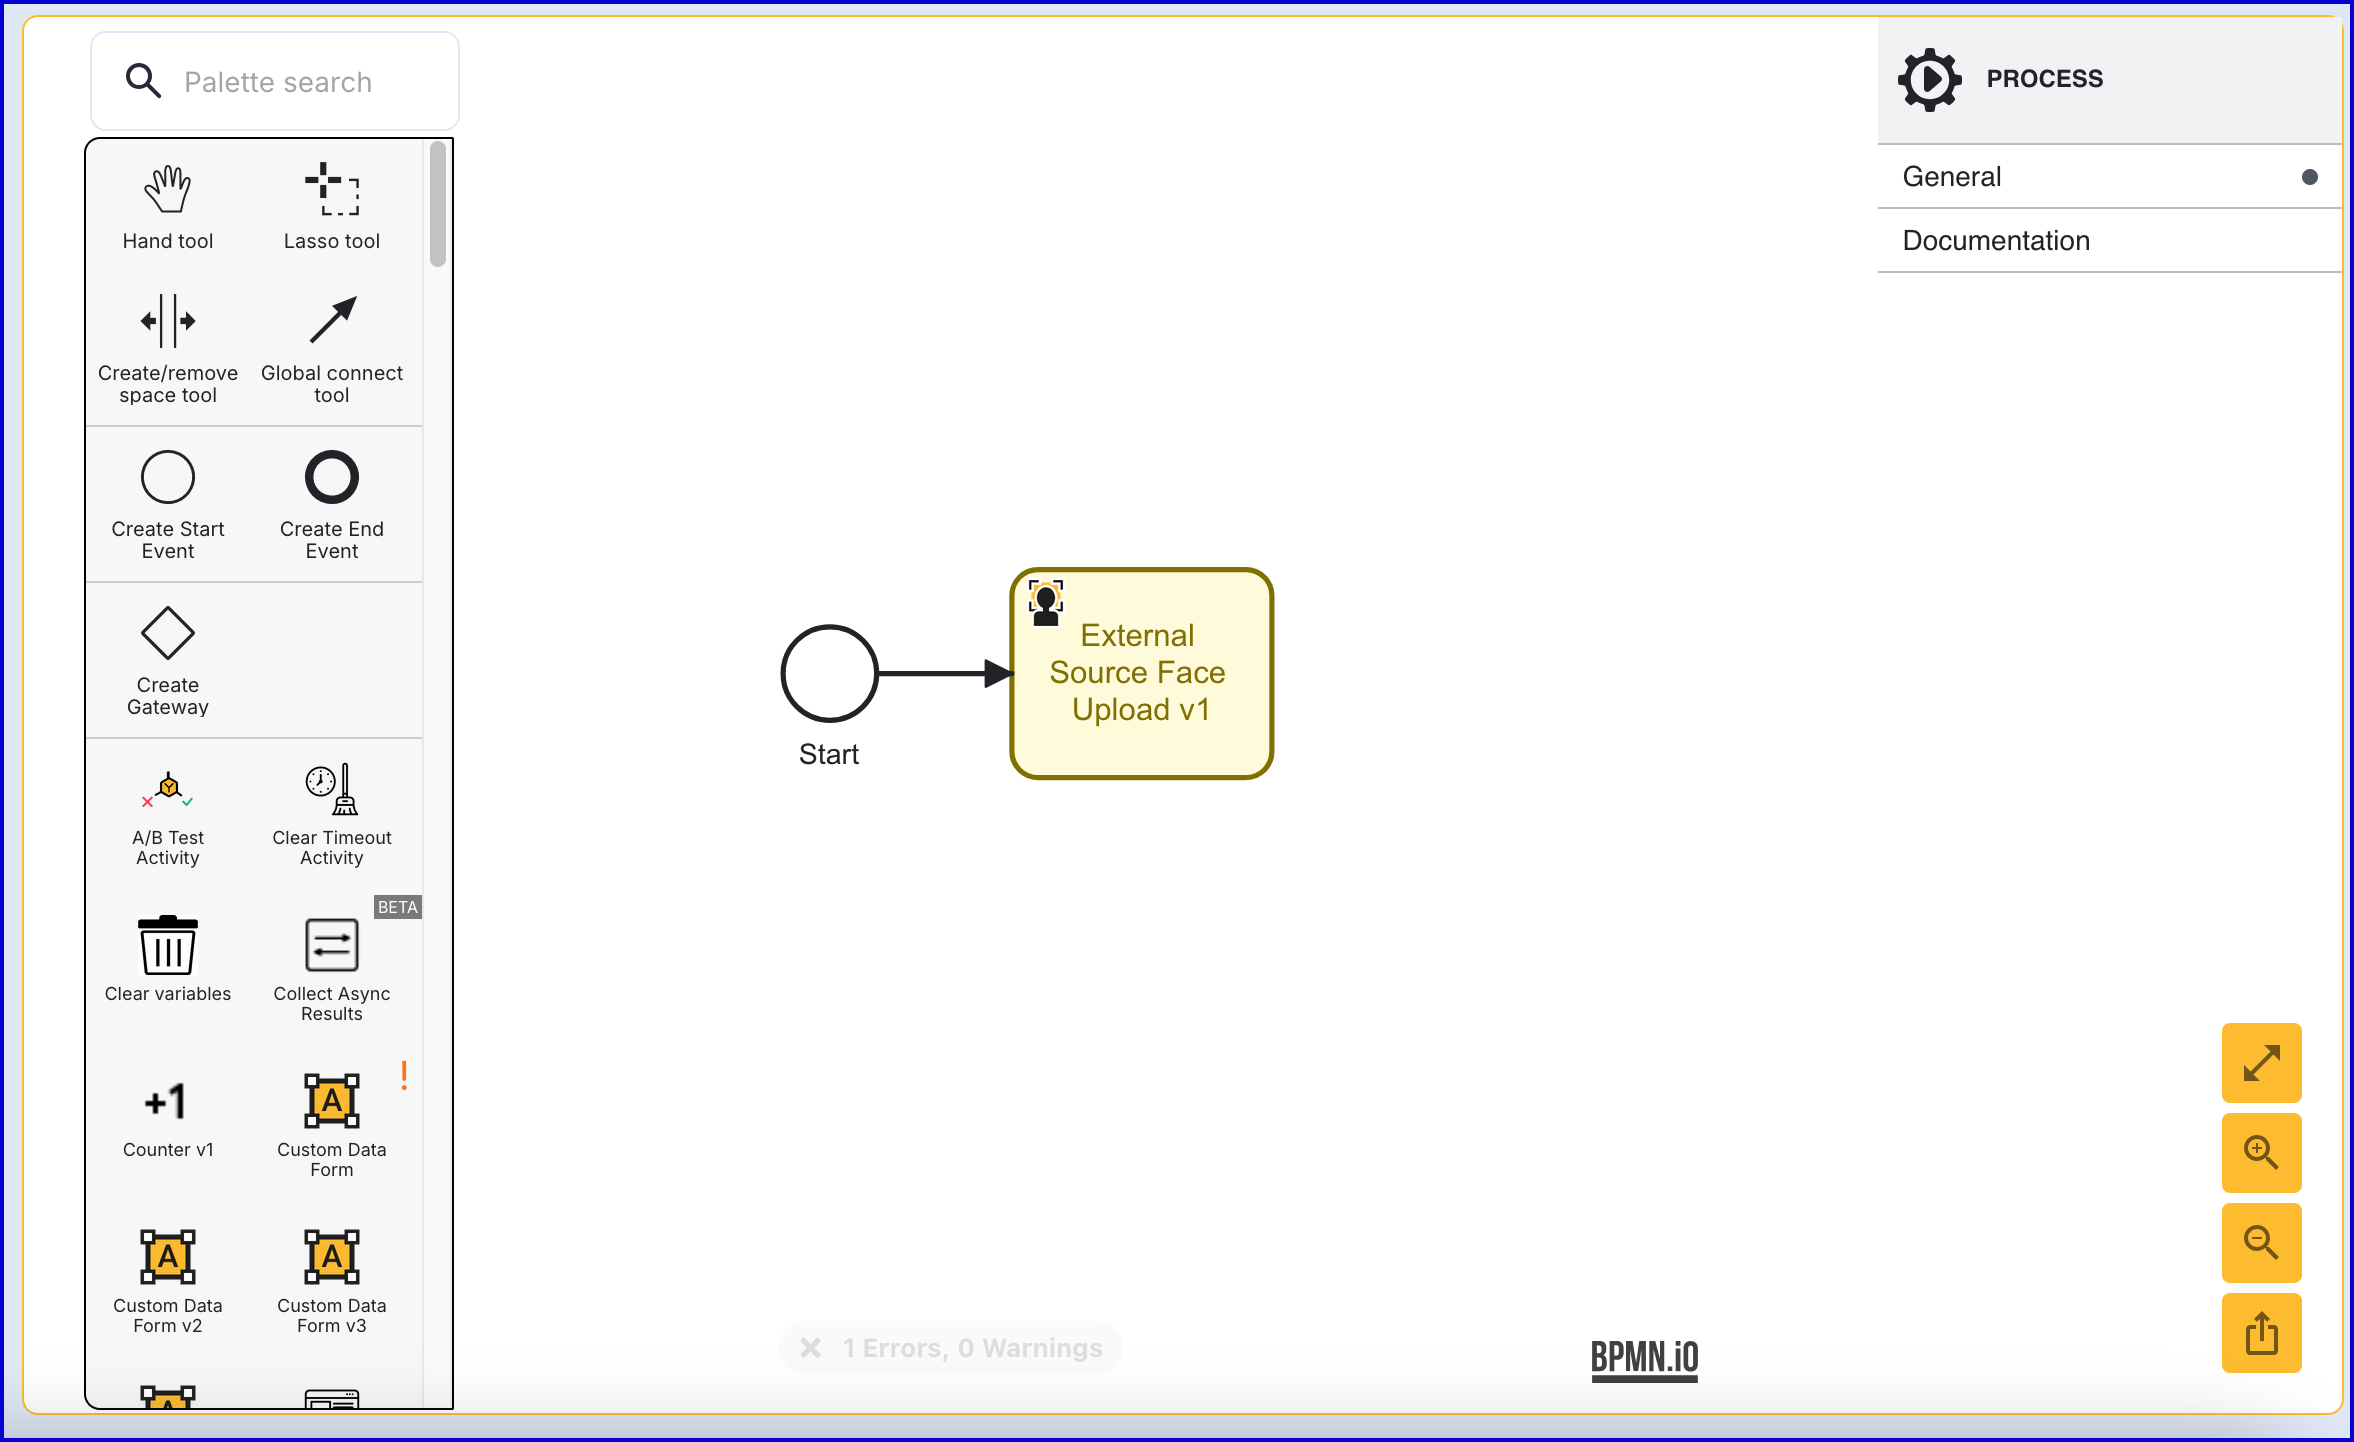
Click the 'External Source Face Upload v1' activity to open the right-most contextual menu and expand the Input Parameters to see the available 'Output Variable'.
For more information on the available input parameters, see Face Activity Parameters guide.
Step Three - Configure Cloud Function Activity
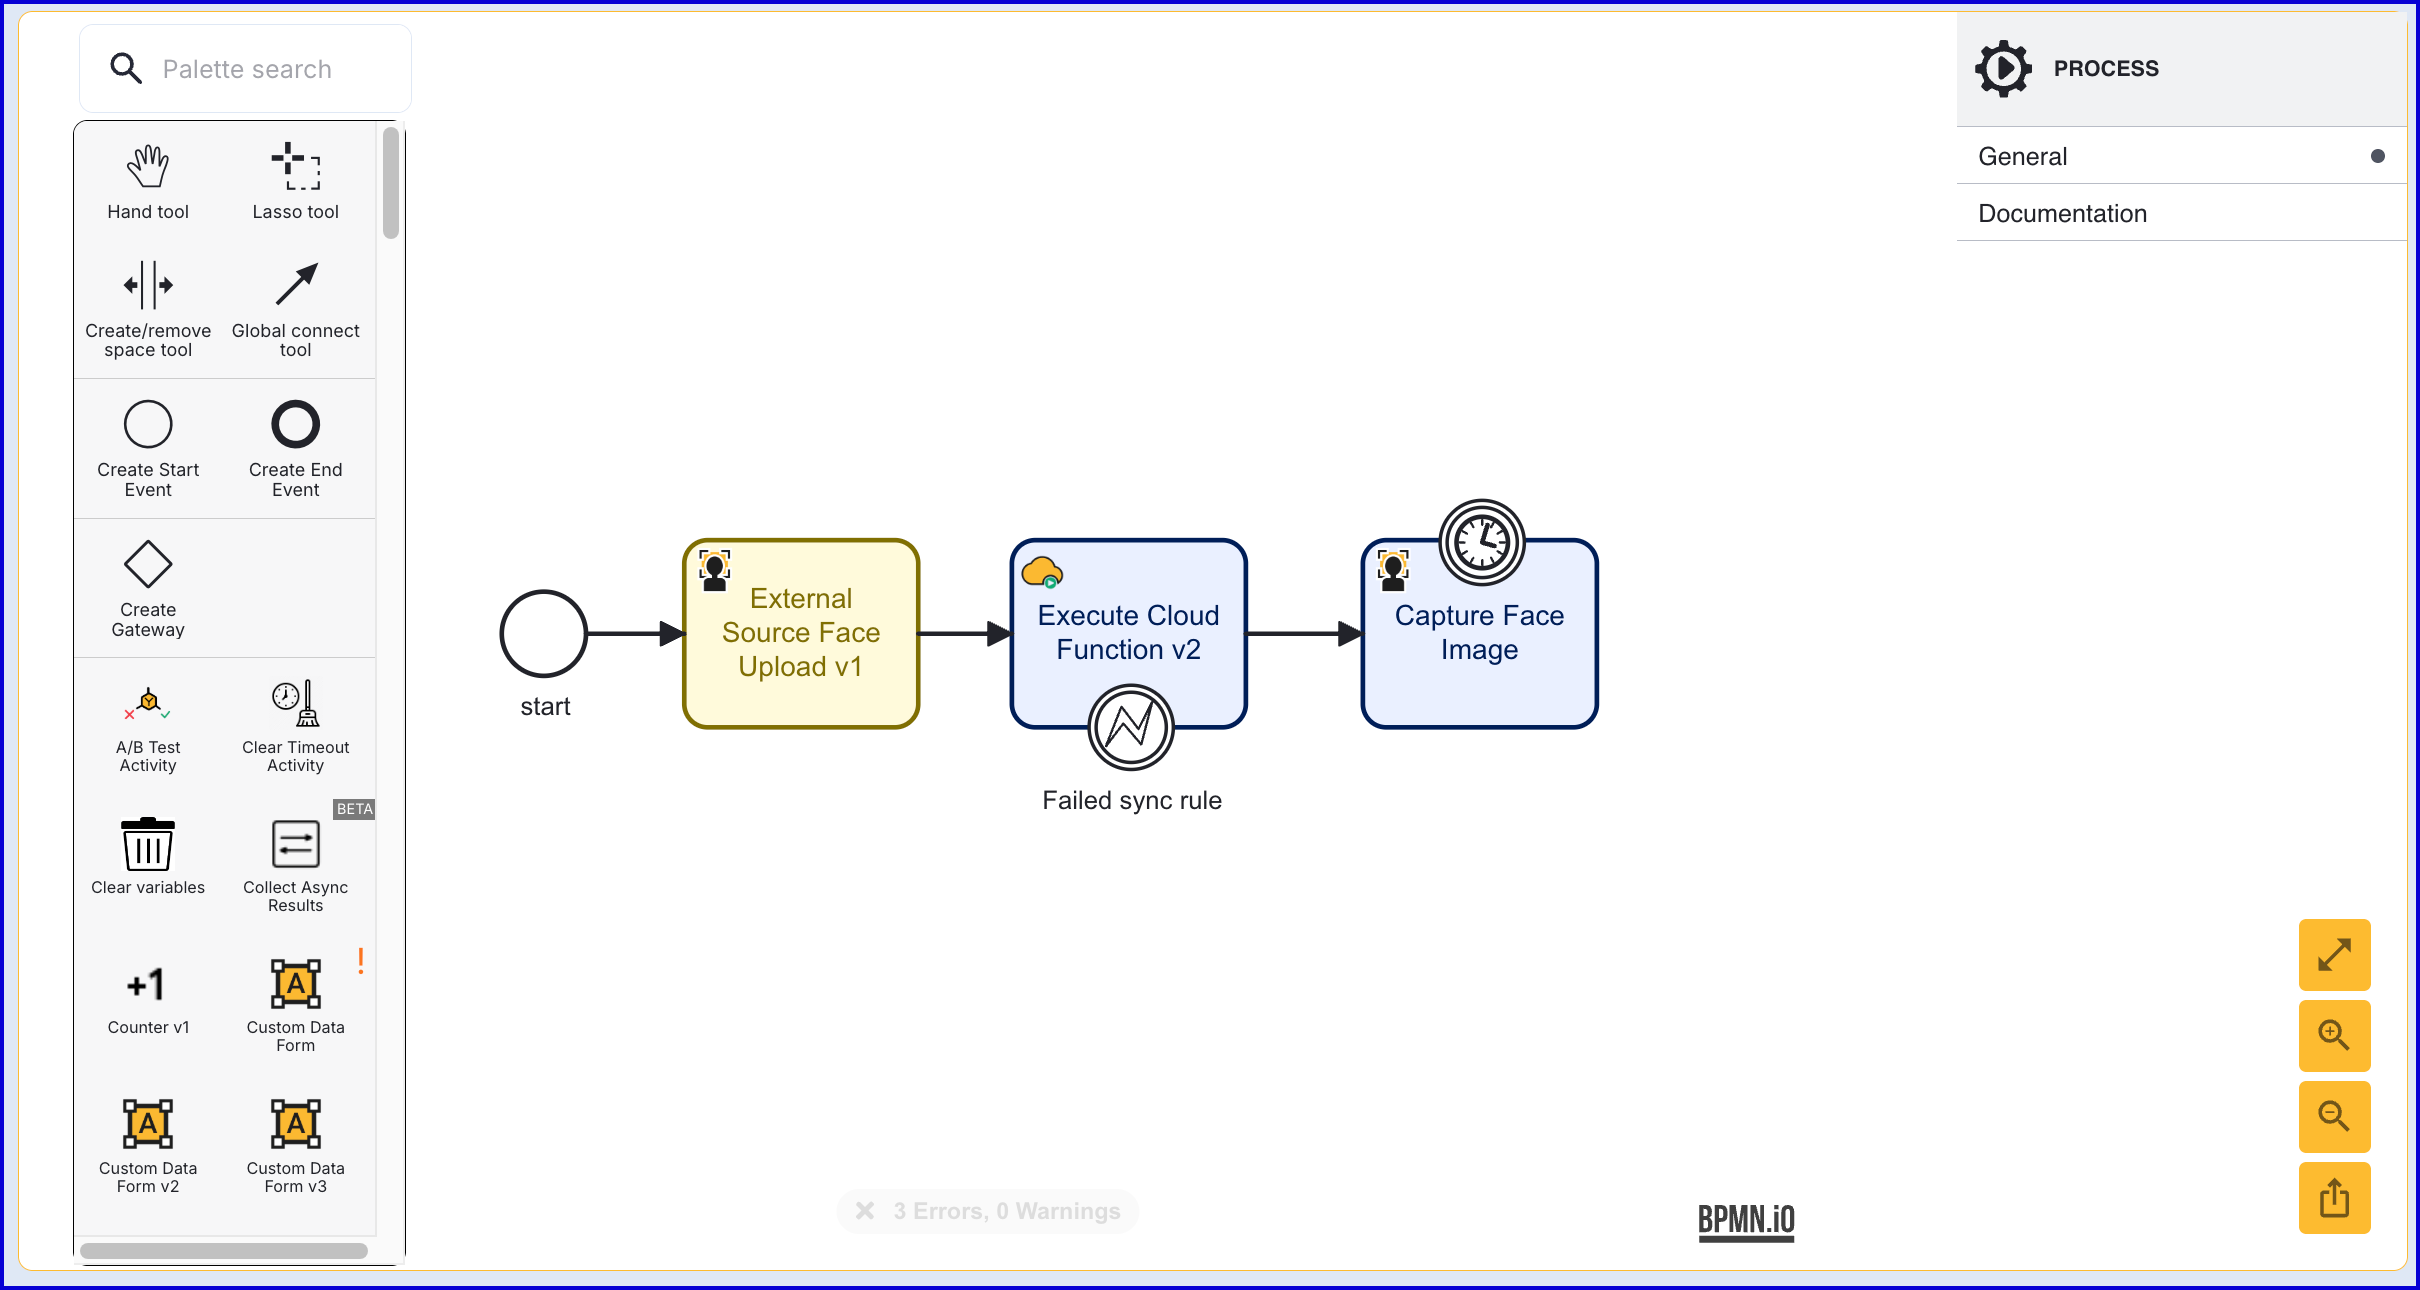
After the 'External Source Face Upload v1' activity, add a 'Cloud Function V2' activity and connect them using a sequence flow arrow.
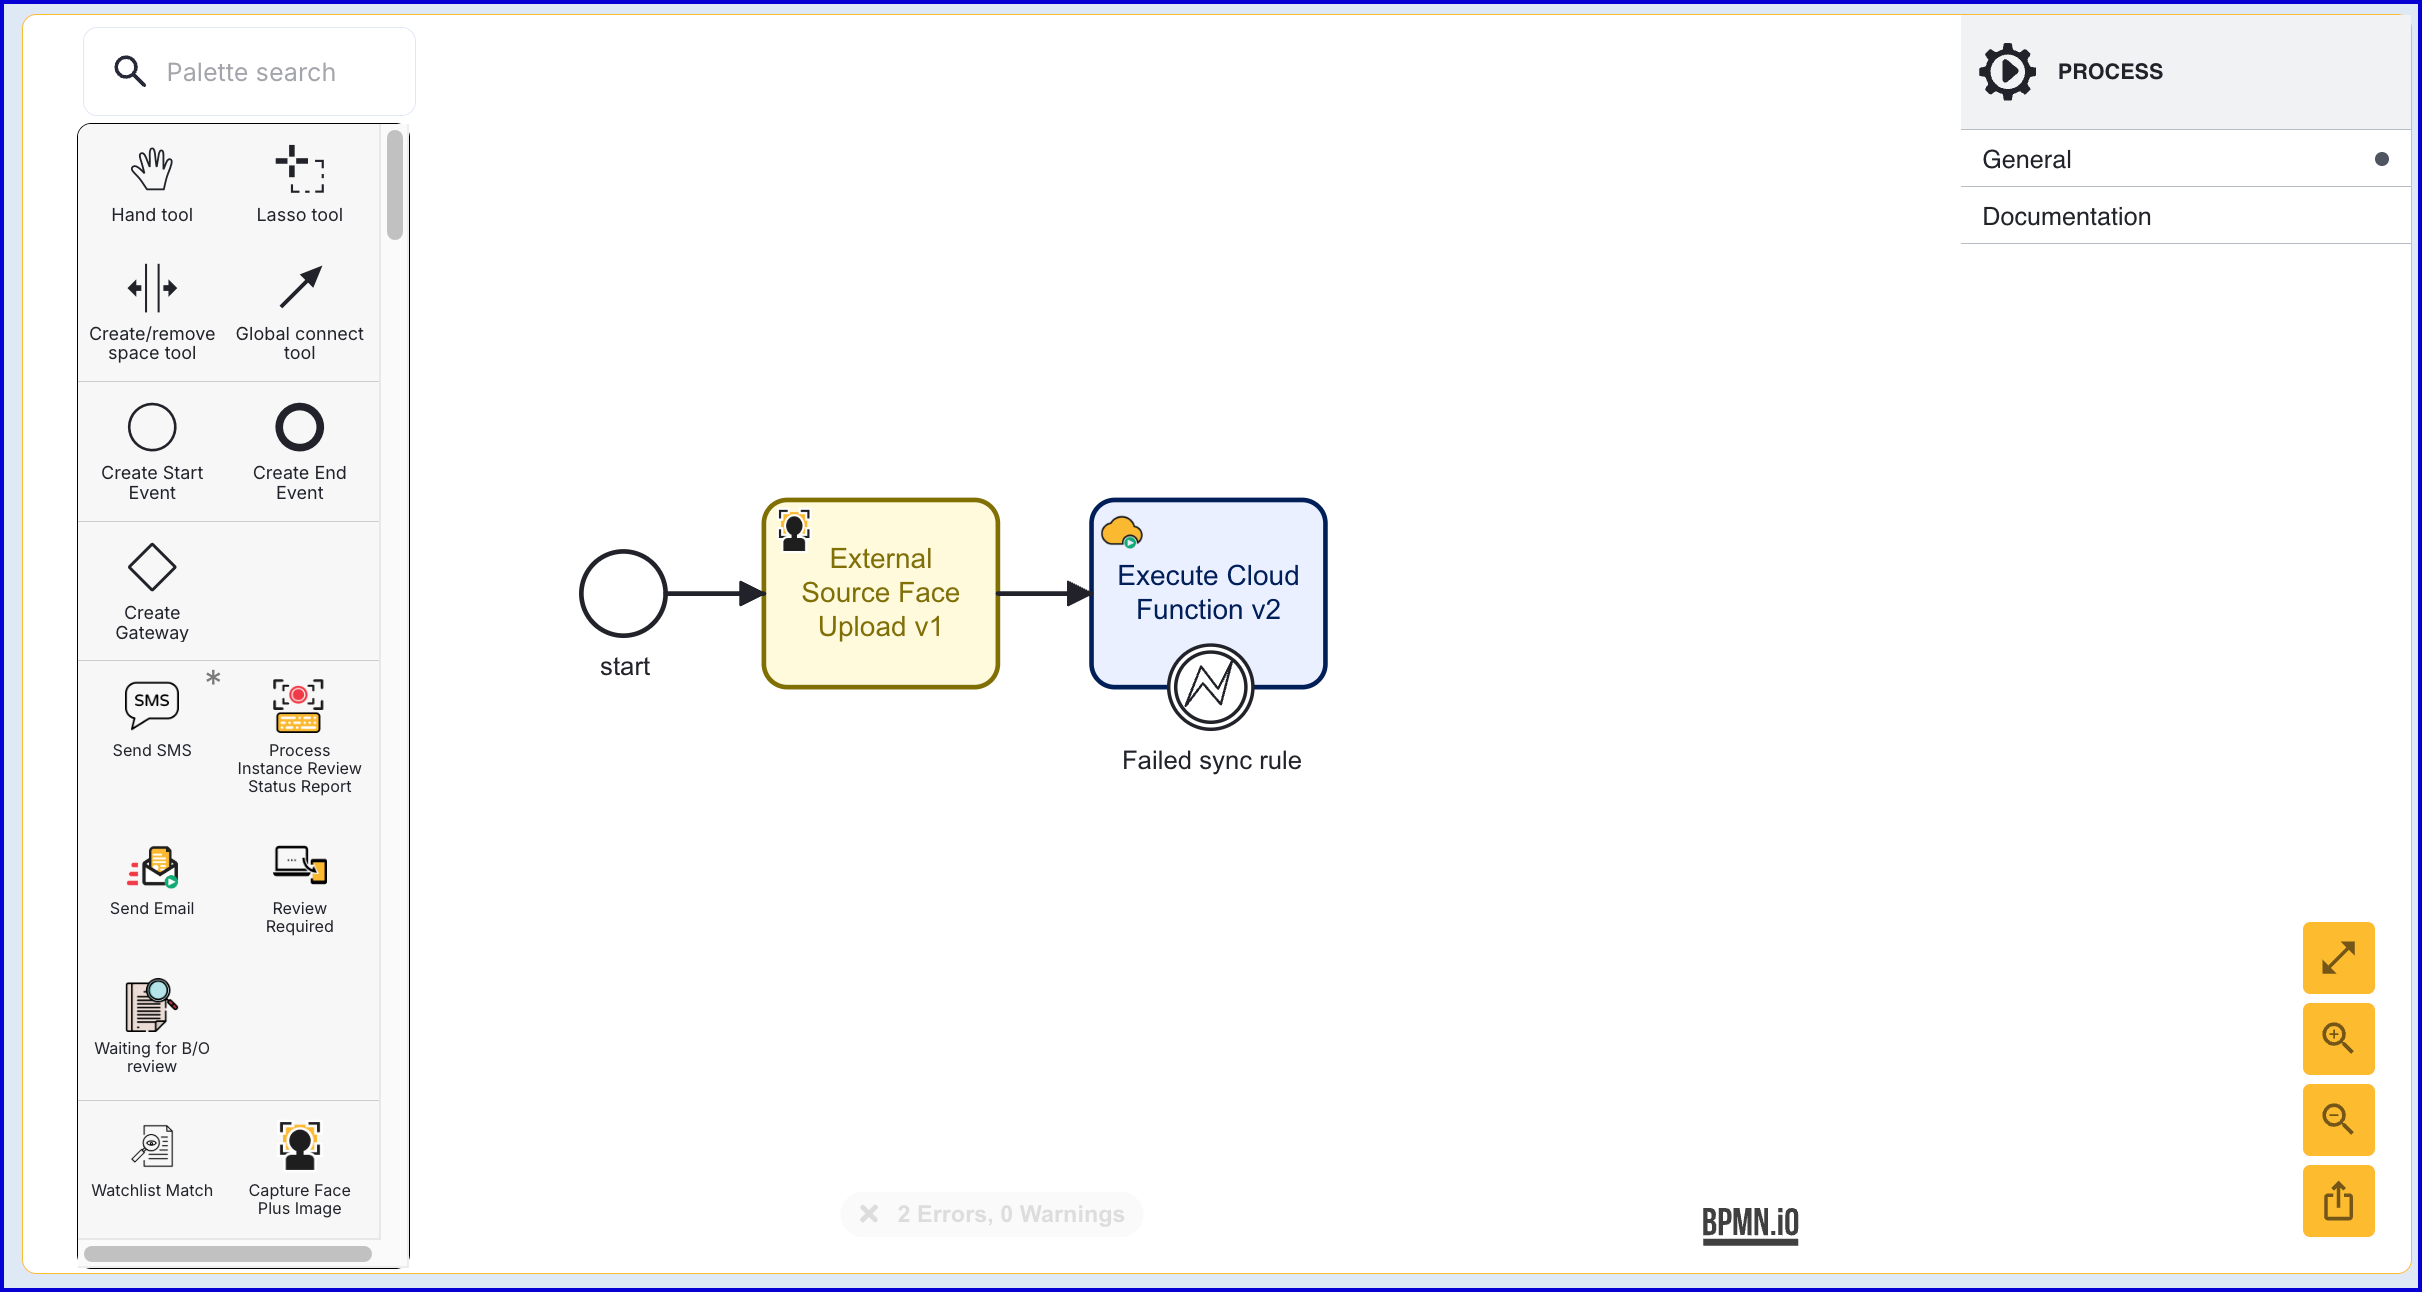
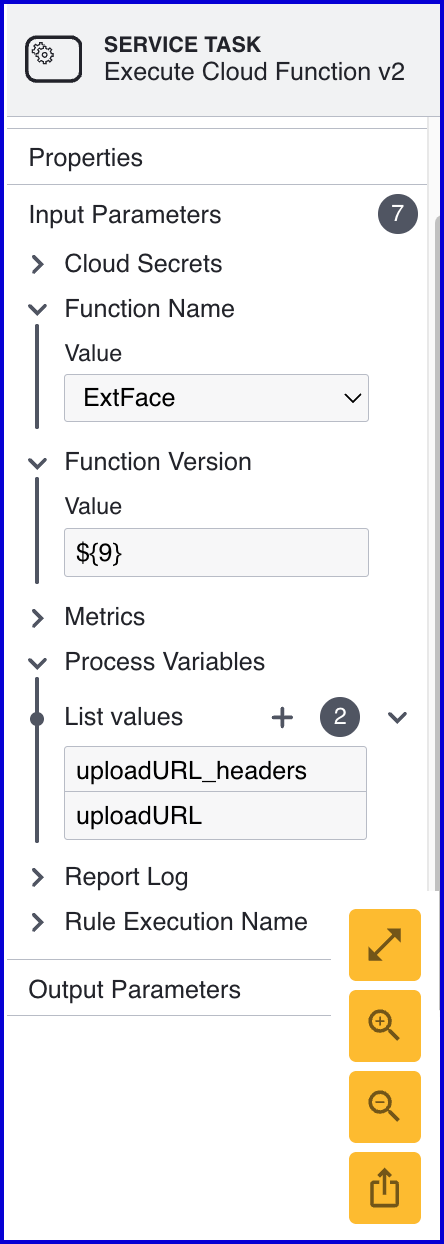
Select the 'Execute Cloud Function v2' activity to open the right-most contextual menu and configure the activity to use the custom page created in Step One.
Set the following input parameters:
Function Name - Represents the name of the cloud function created in Step One.
Function Version - The version of the cloud function.
Process Variables - Add two process variables to the list:
uploadURL_headersanduploadURL
Step Four - Capture Face Image
This step will handle capturing a live face image that will be used to compare to the uploaded face.
Add a 'Capture Face Image' activity to the Process Designer and connect the activity to the 'Execute Cloud Function v2' activity using a sequence flow arrow.
Step Five - Perform Match
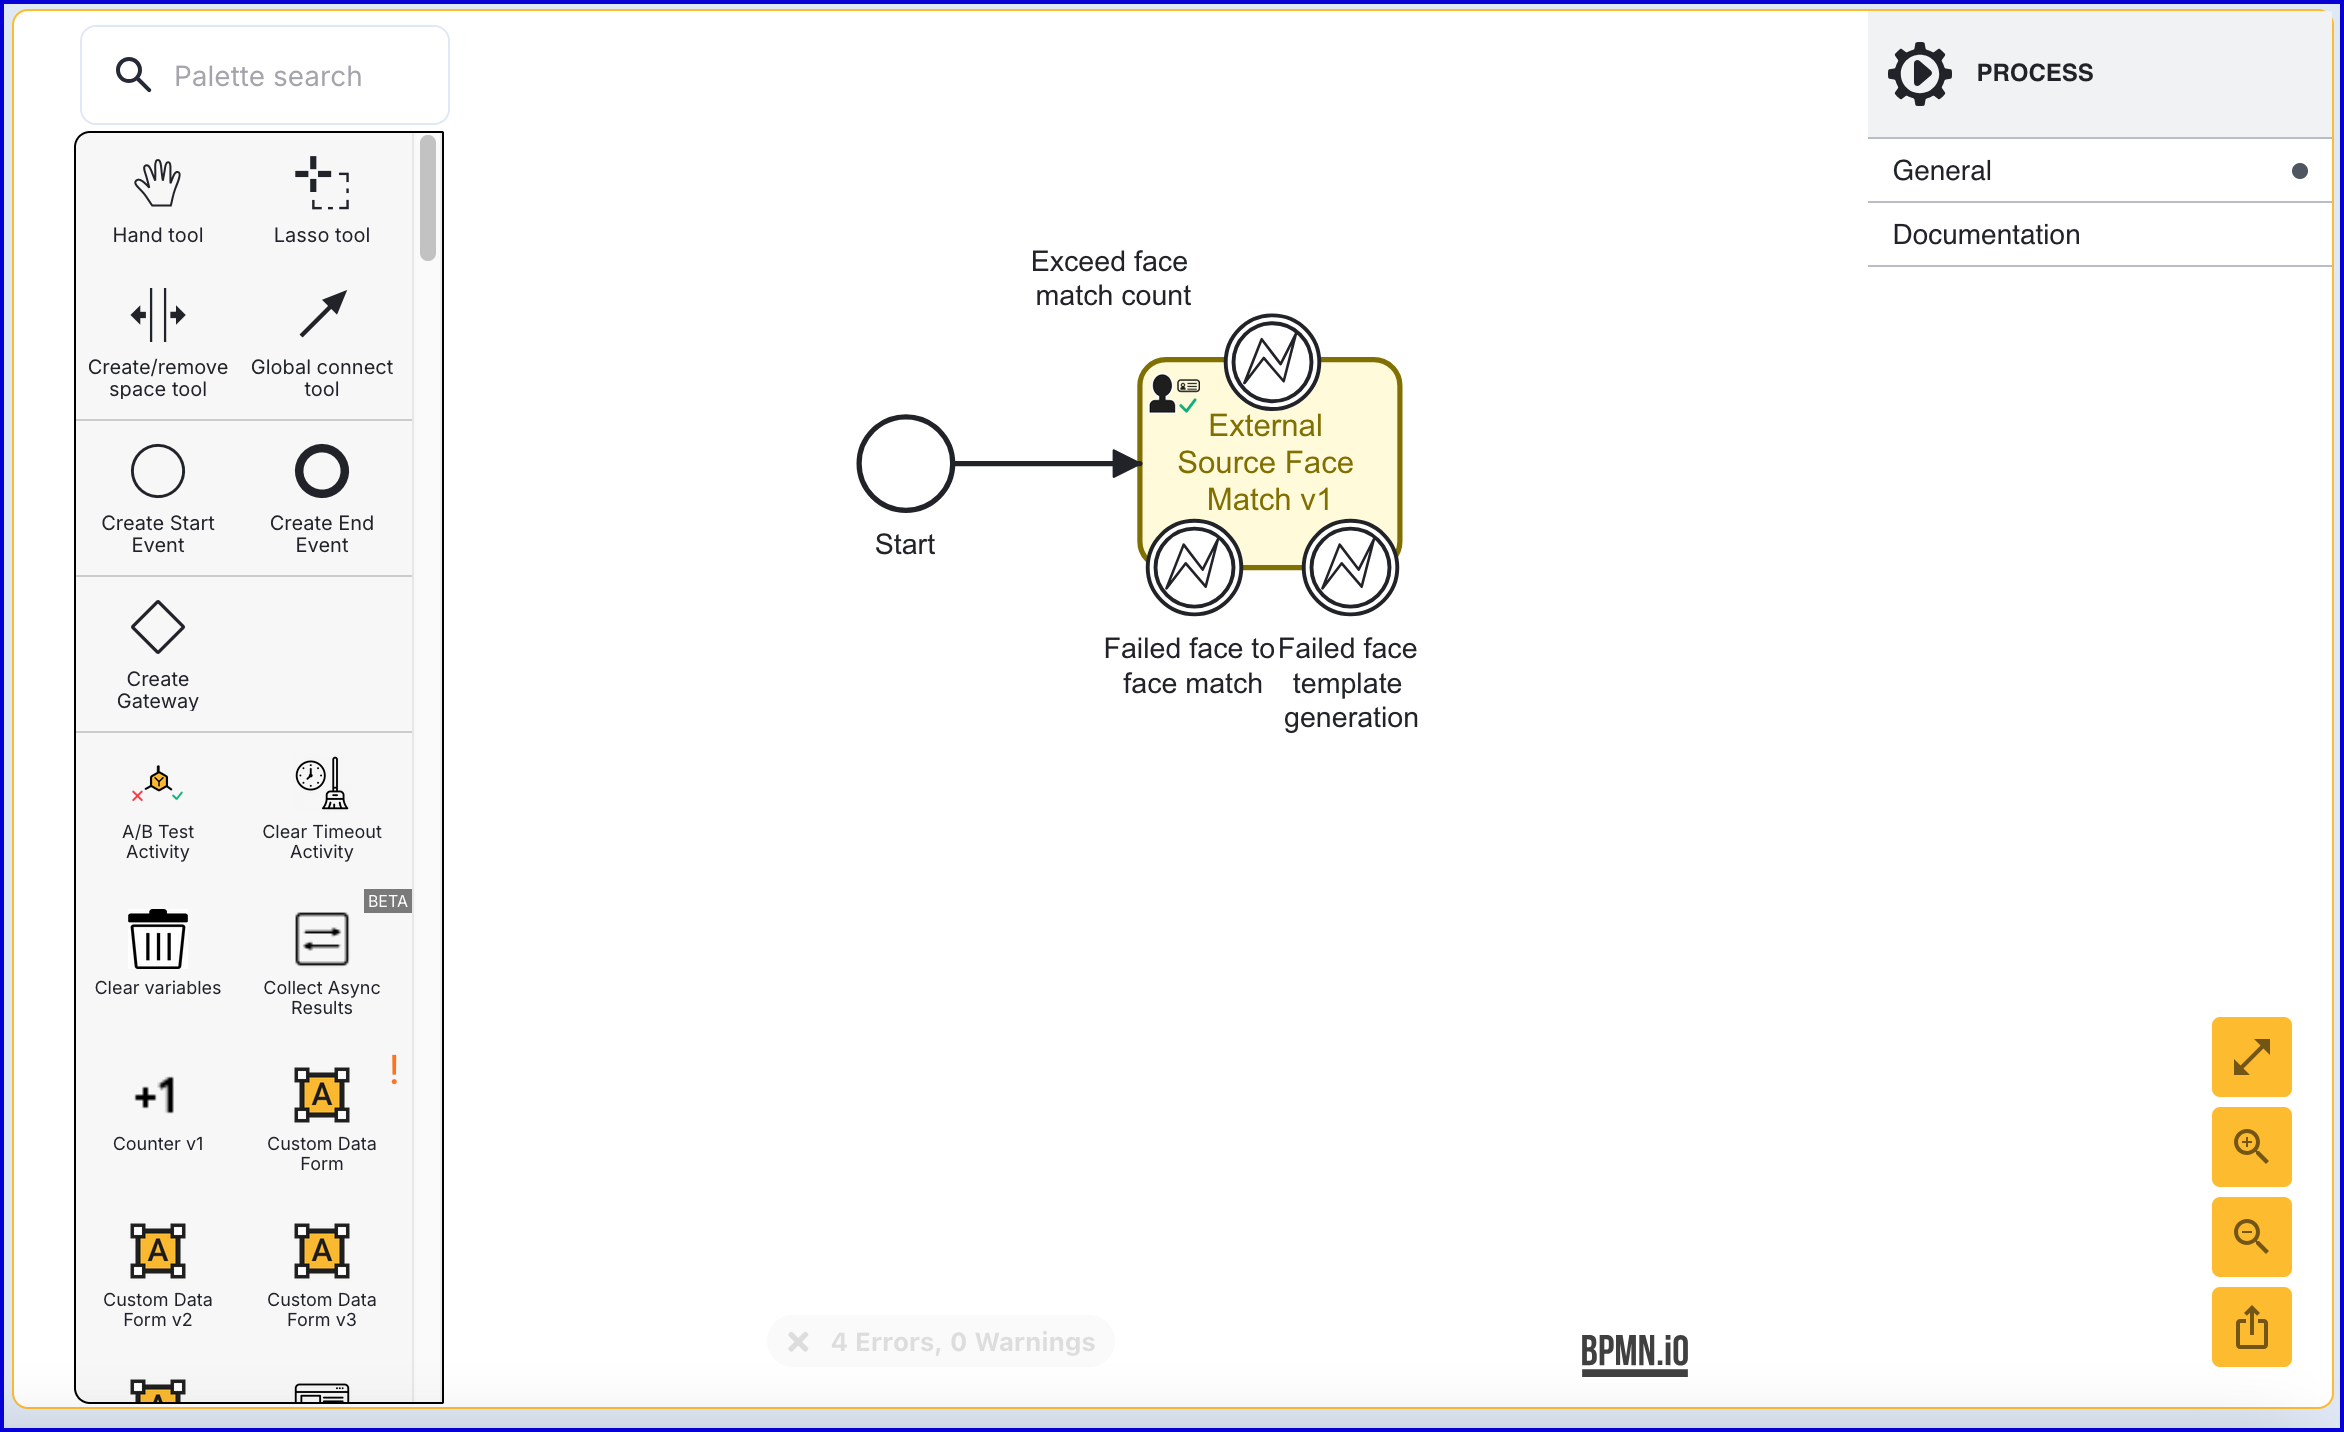
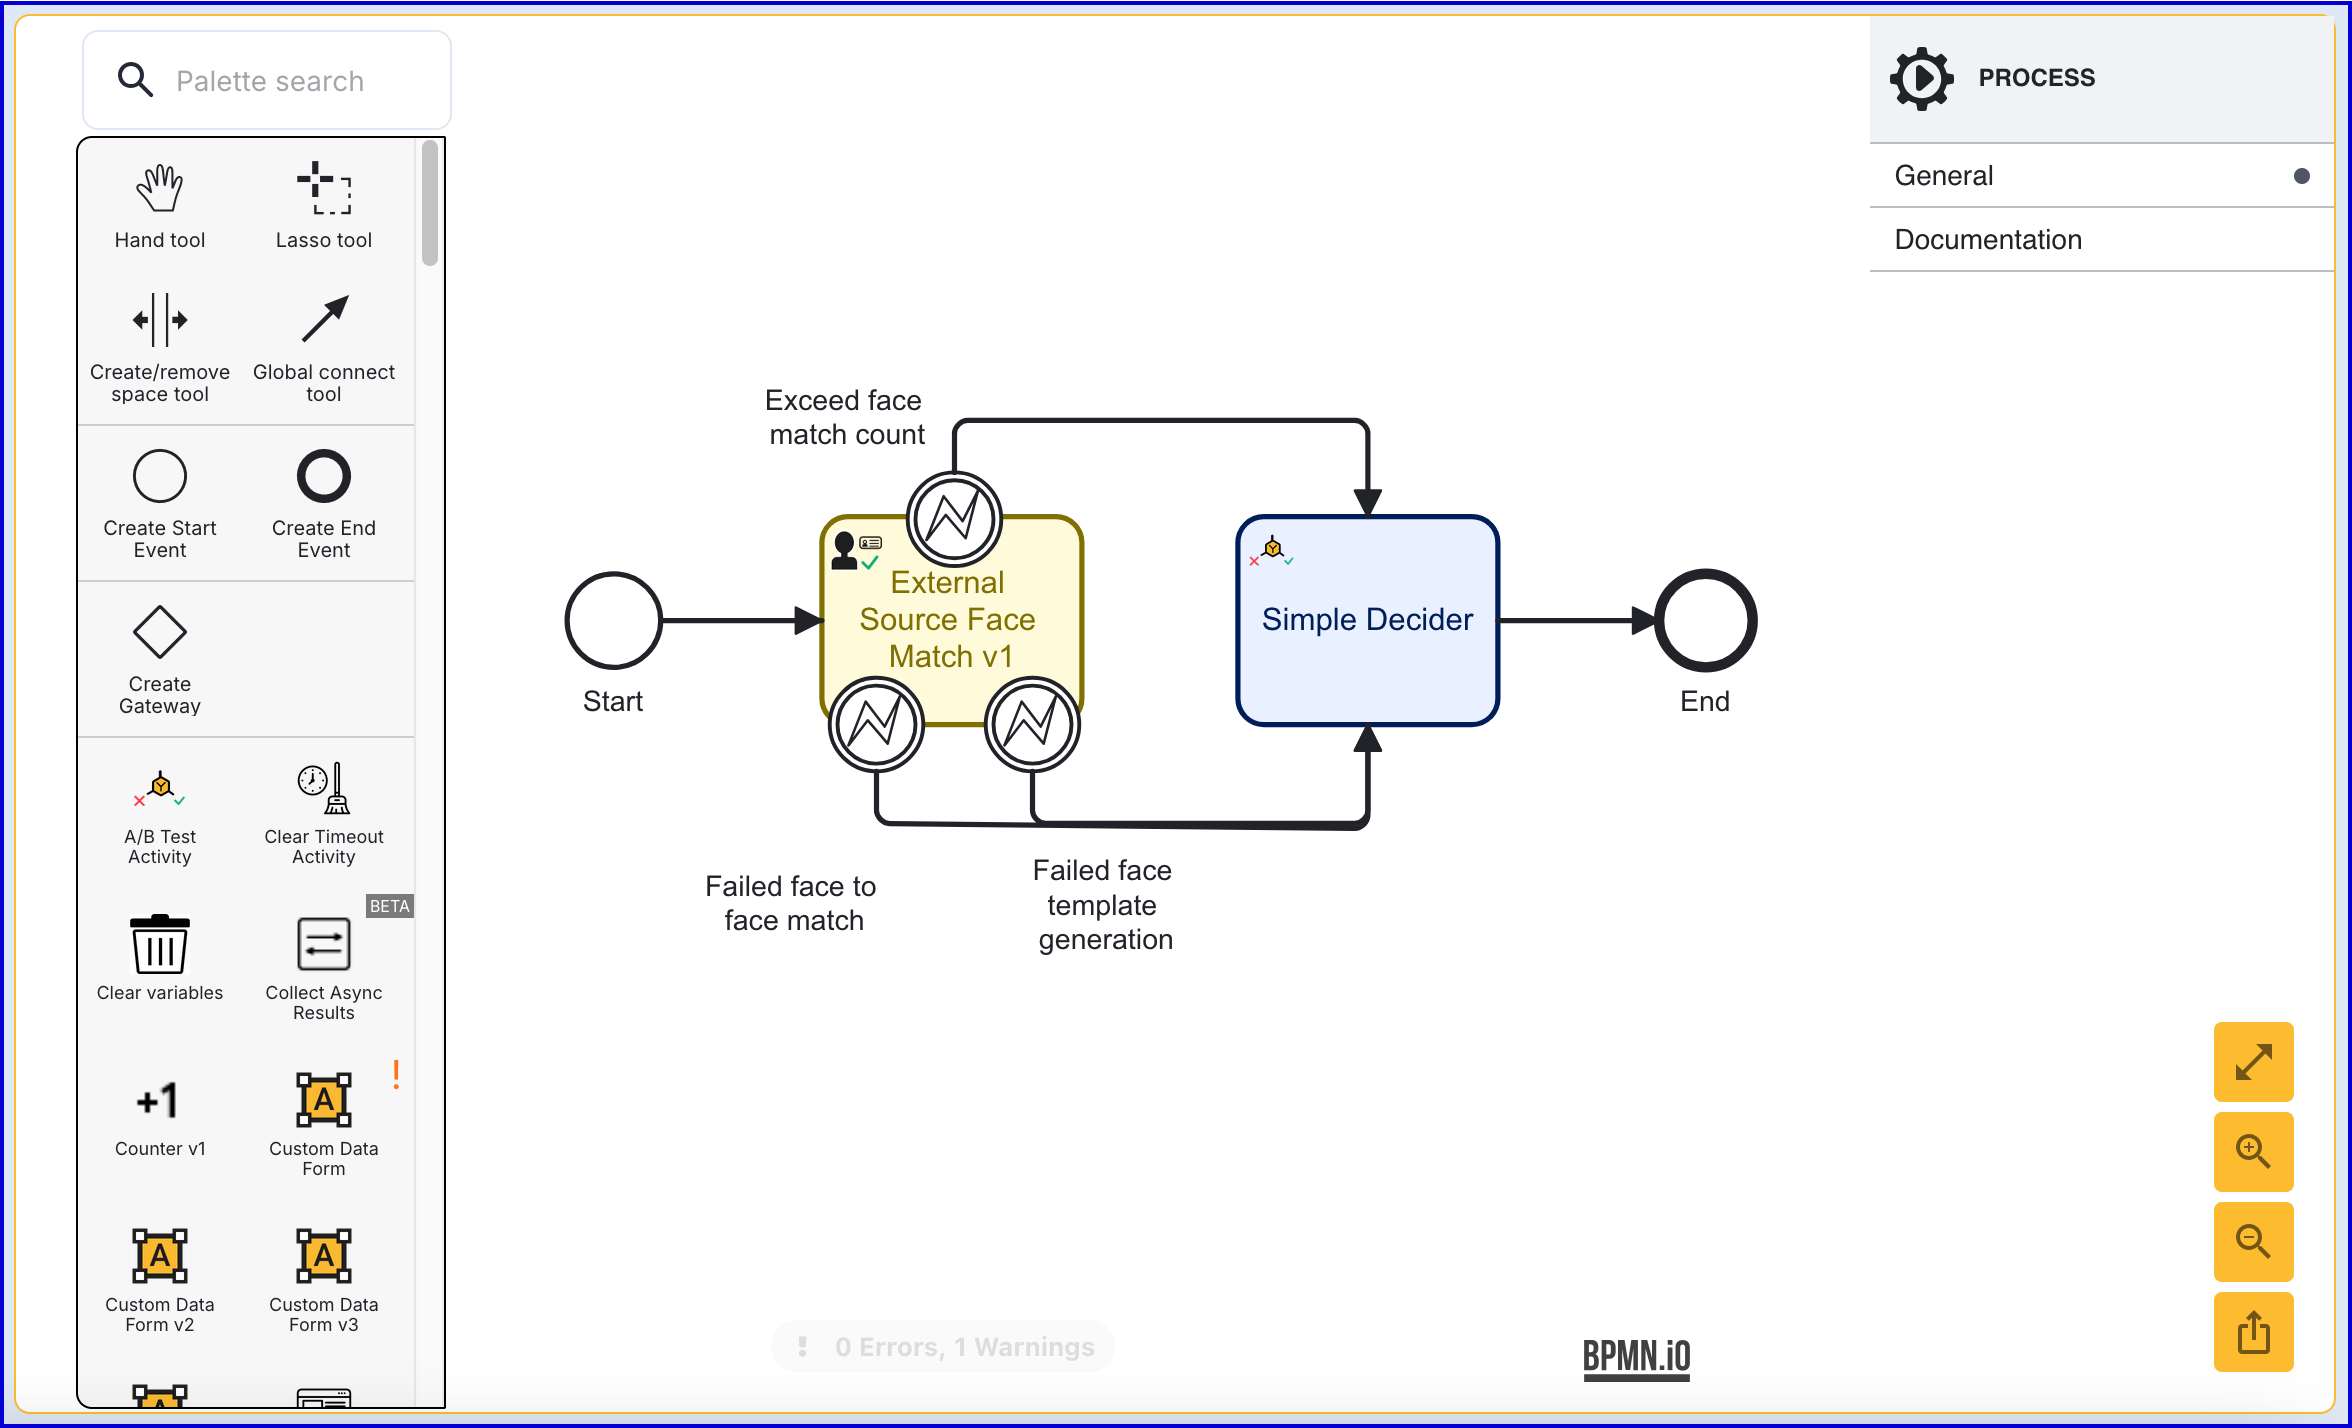
To match a live image against an external source, the 'External Source Face Match v1' activity can be added to the Process Definition after the 'Capture Face Image' activity.
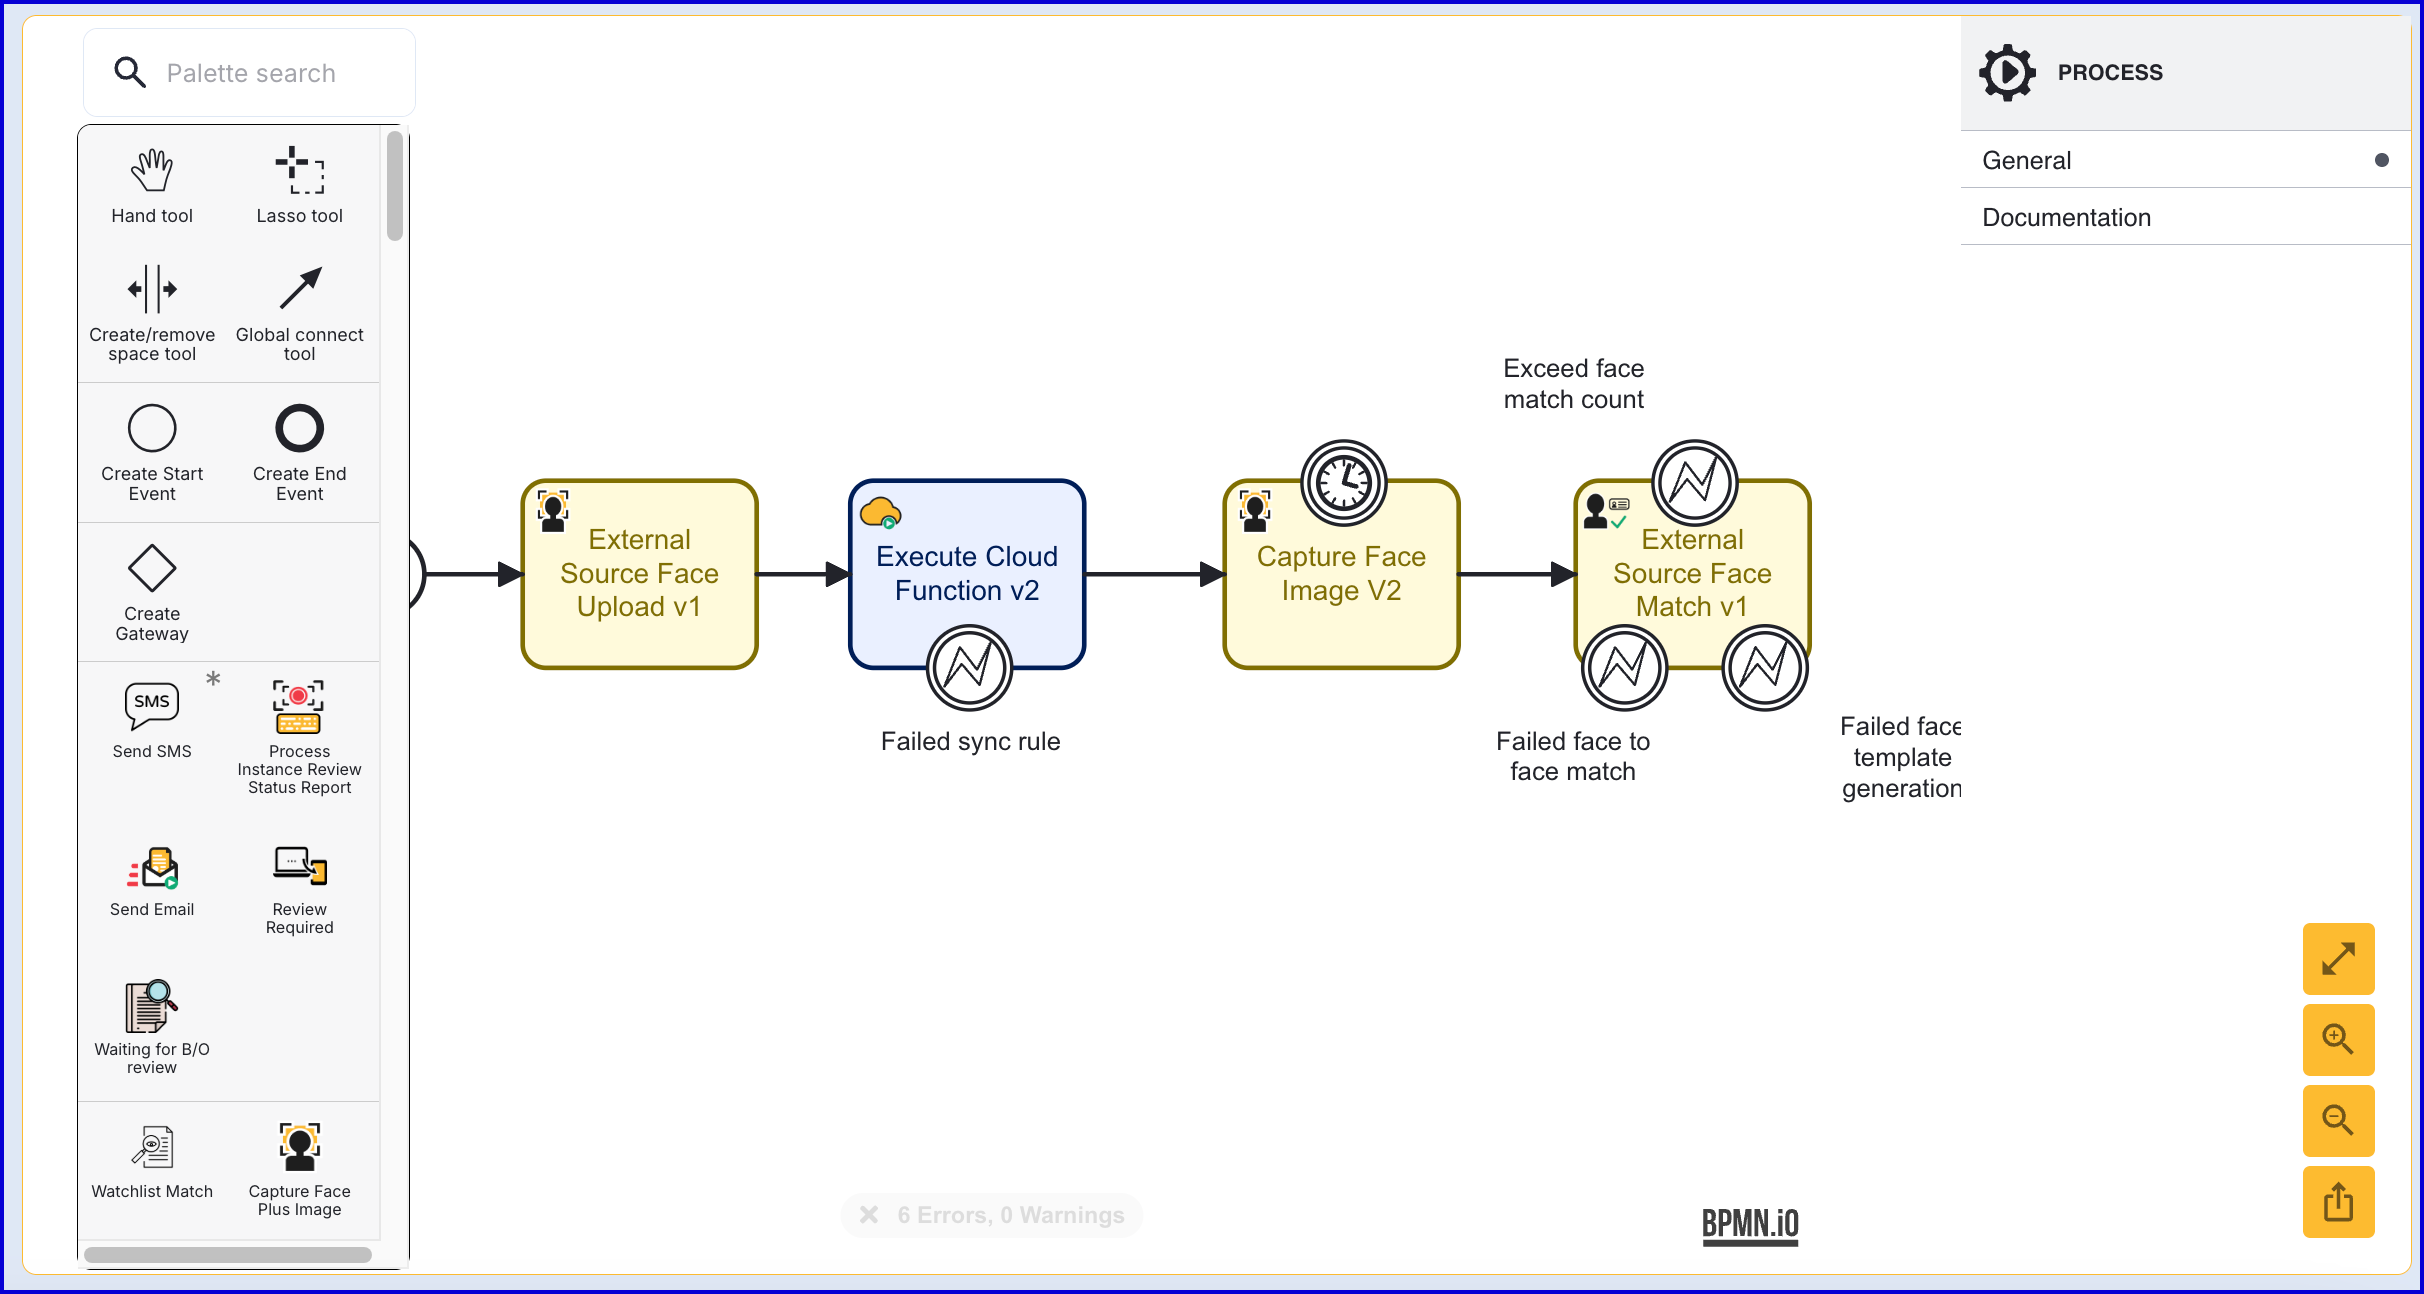
It is important that this activity is included after both the external source image and live image are available.
The activity provides three error boundary events for the following scenarios:
Exceed face match count - This error is thrown when the number of failed match attempts exceeds the value set within the 'Max Attempts' input parameter.
Failed face to face match - The error is thrown when the face matching has failed.
Failed face template generation - This error is thrown if the face template generation has failed.
Step Six - Add a Simple Decider
Add a 'Simple Decider' activity and connect to the 'External Source Face Match v1' activity using a sequence flow arrow. This will generate a final decision for the Process Instance based on the result of the external source face match.
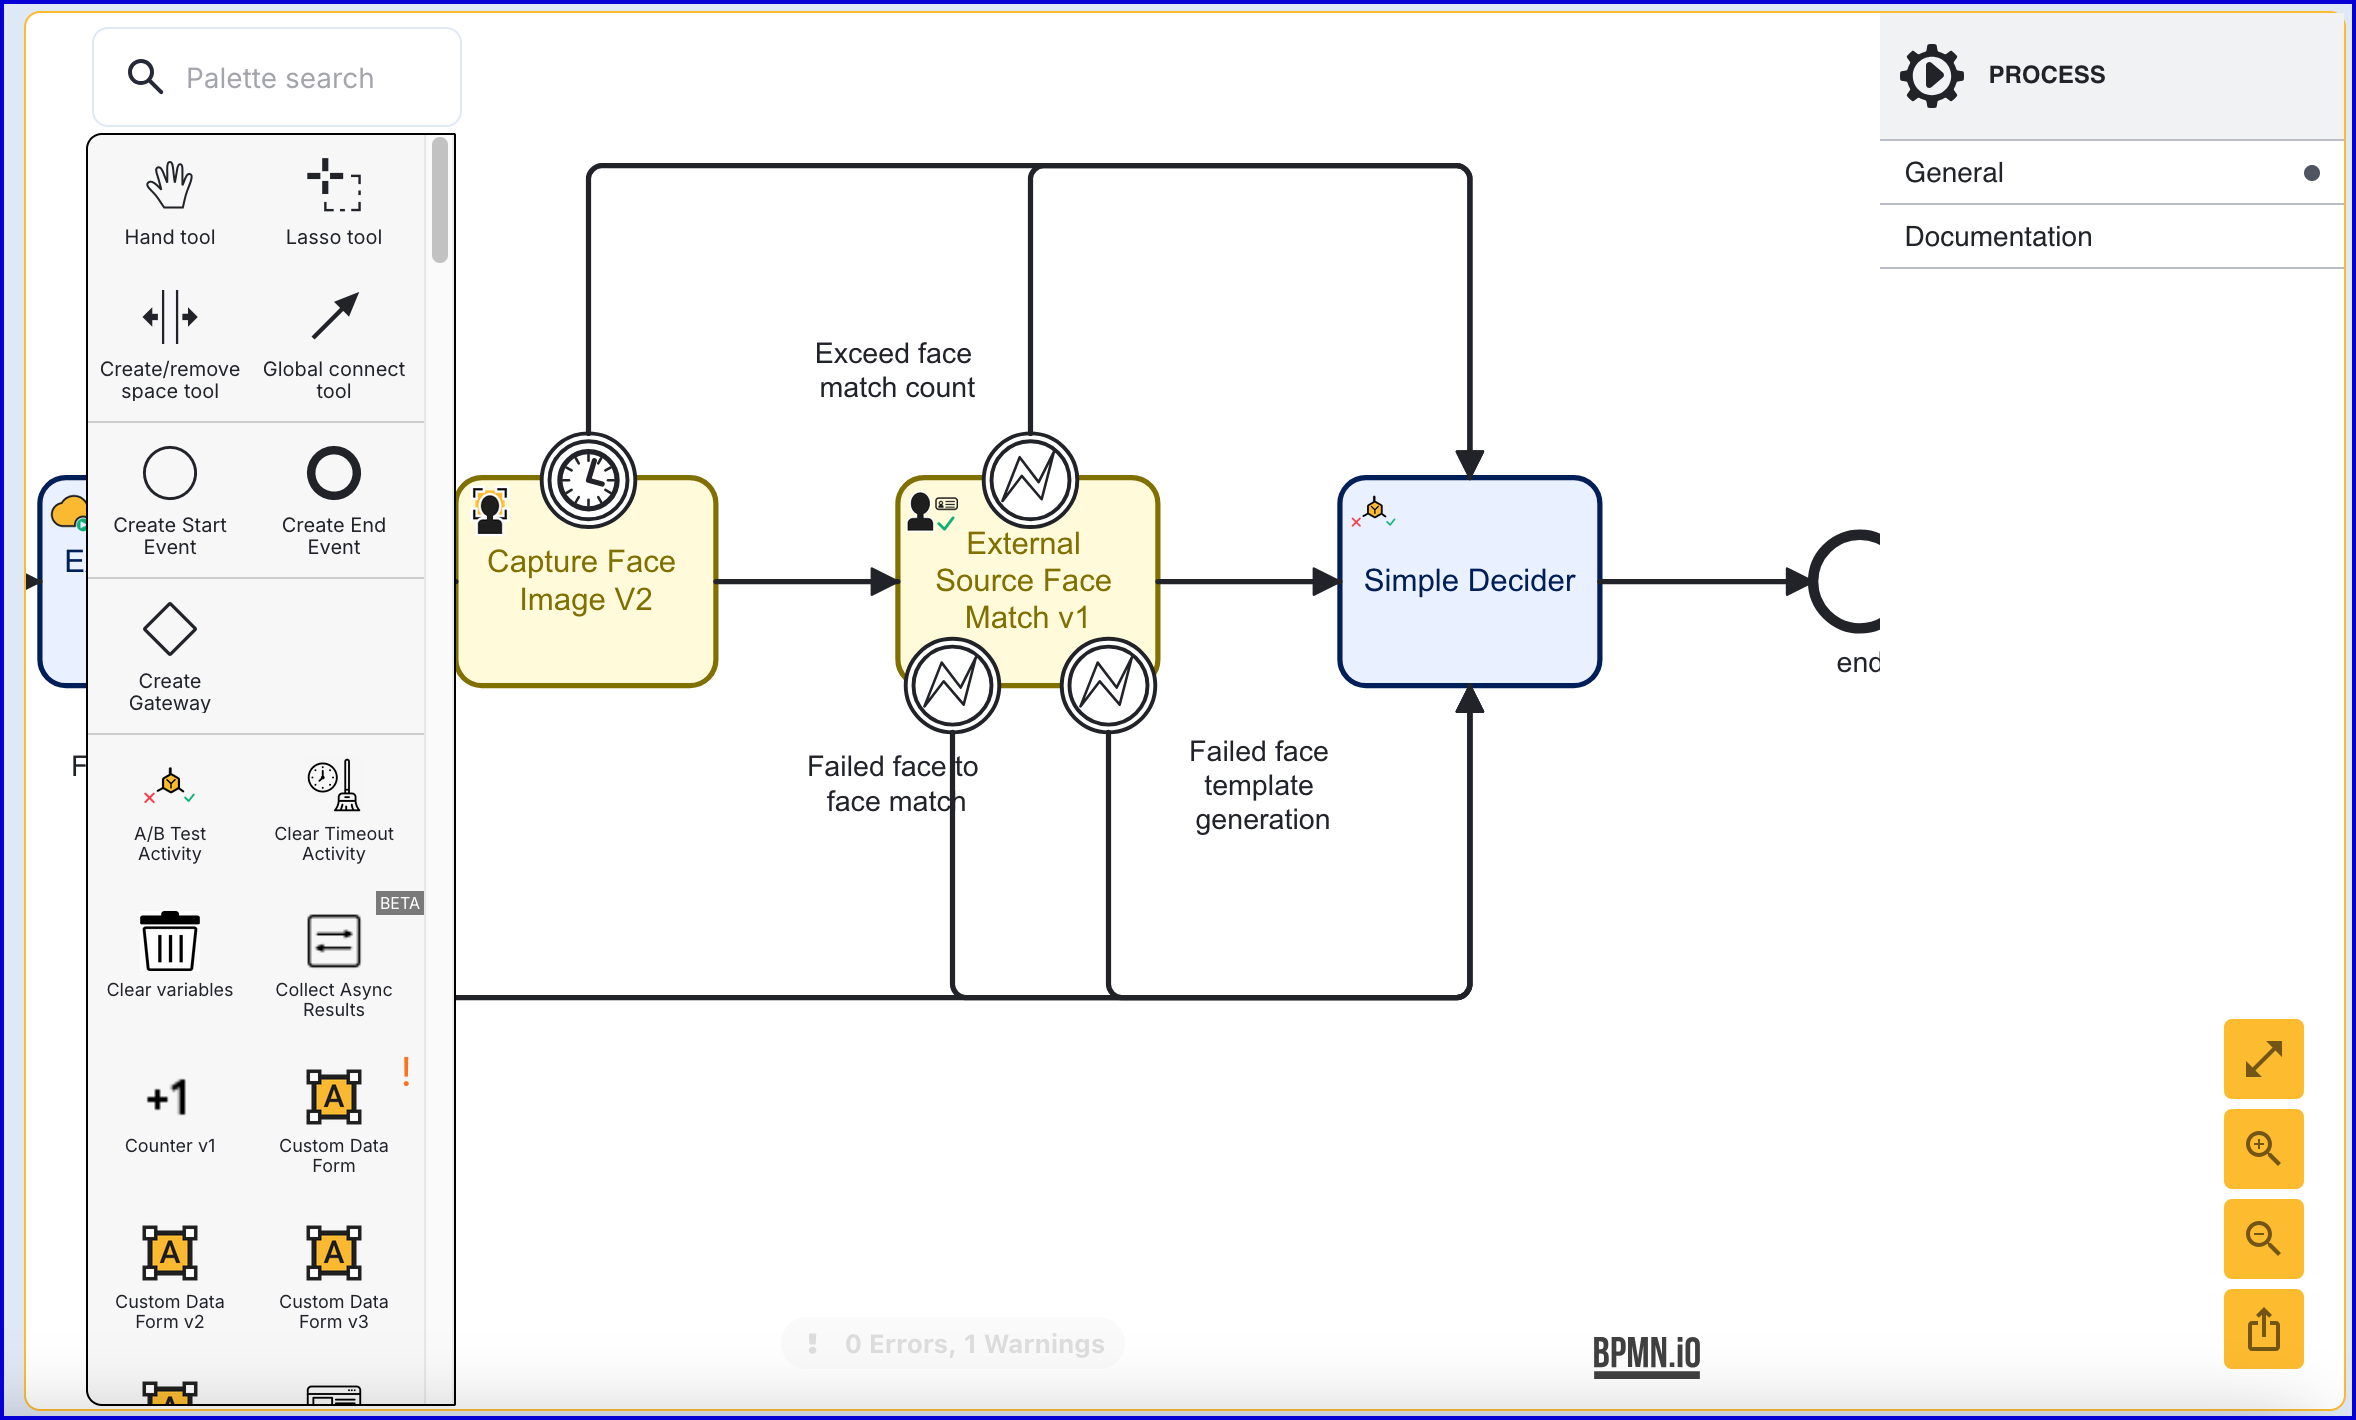
In the example above, all previous error boundary events have been connected to the 'Simple Decider' activity.
External Upload Via Starting Process Instance
This use case involves utilizing the TrustX API to generate a pre-signed URL upon creating the Process Instance. This pre-signed URL can then be used by an external application for handling face upload.
This use case can be achieved with minimal configuration of a Process Definition, only requiring an 'External Source Face Match v1' and 'Simple Decider' activity. Note that this example does not incorporate quality checks and is recommended for reporting purposes.
Step One - Configure Process Definition
For this Process Definition, an 'External Source Face Match v1' and 'Simple Decider' activity are all that is required to complete the configuration. Optional face quality checks can be performed if required.
Create a new Process Definition and include a 'Start' activity.
From the 'Start' activity, add an 'External Source Face Match v1' activity and connect them using a sequence flow arrow.
Add the 'Simple Decider' activity and connect the activity to the 'External Source Face Match v1' activity using a sequence flow arrow.
Finally, end the process by adding an 'End' event activity.
Step Two - Create a Process Token
When creating a Process Token, a processInstanceInit parameter can be specified, which includes the external source to be uploaded. Currently, only faceUploads are supported.
In the example below, two face images are added as parameters to the token. The xface1 can be used as an external face image, while the face1 can be used for capturing a live image.
Example:
Step Three - Create Process Instance
Creating the Process Instance utilizing the token created in Step Two will generate an uploadUrl as part of the response. This can be used in an external application to handle uploading the external source image.
Example Request:
Example Response:
Viewing Results
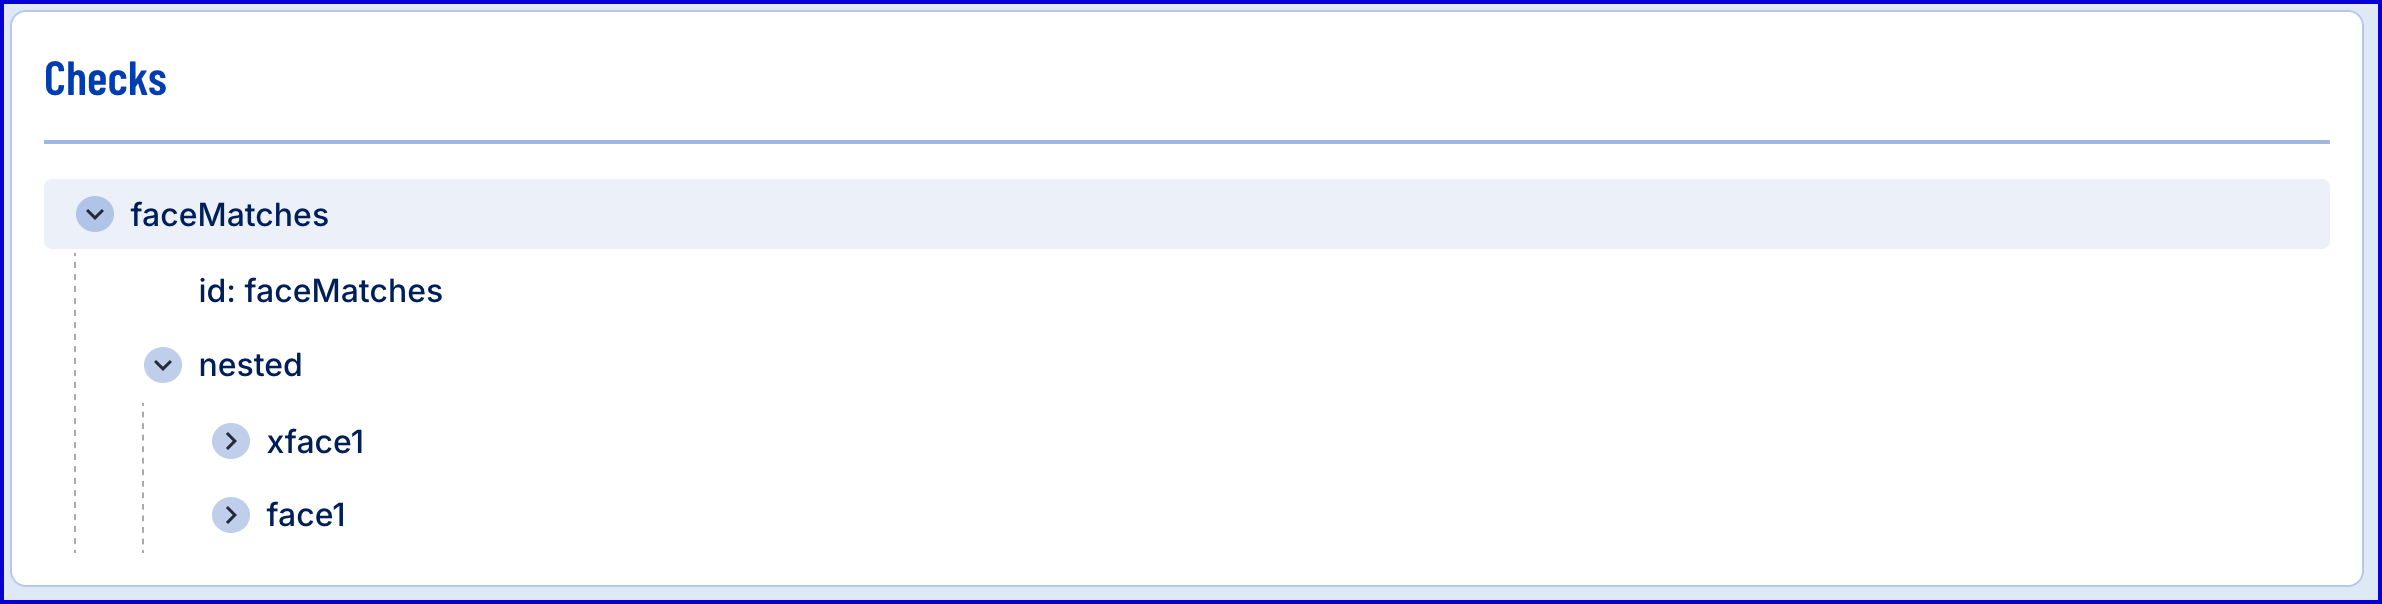
Results of a face match can be viewed from the individual Process Instance page in the Backoffice. When two face images have been provided as part of a Process Instance, each image will have its own set of checks displayed under the 'Verification' section.

In the example above, 'xface1' represents the ID of the external face that was uploaded during the Process Instance. This face image was matched against the live face image, 'face2'.
In the 'External Face Match...', the live image will be shown on the left, while the external image will appear on the right.
In the 'Checks' section, quality checks for each face image can be found under 'faceMatches'.