Early Access
Introduction
To construct a simple experience, registration is controlled using a Custom Form or Custom Page within TrustX. This document will describe the steps in configuring a solution using the Process Designer and TrustX API to register a new User using passkey registration.
This guide will use a Custom Form that requests a User name and User display name to register a User in an Identity Store.
Before a User can be registered a passkey policy must be configured. See the Managing Policies guide for more information on configuring a passkey policy.
Registering via Process Definition
The example Process Definition in this guide will utilize a Custom Data Form to handle the registration of a passkey.
Step 1 - Create a Process Definition
Create a new Process Definition by navigating to Process Definitions > New Process Definition in the Backoffice application.
Add a 'Create Start Event' to the Process Designer.
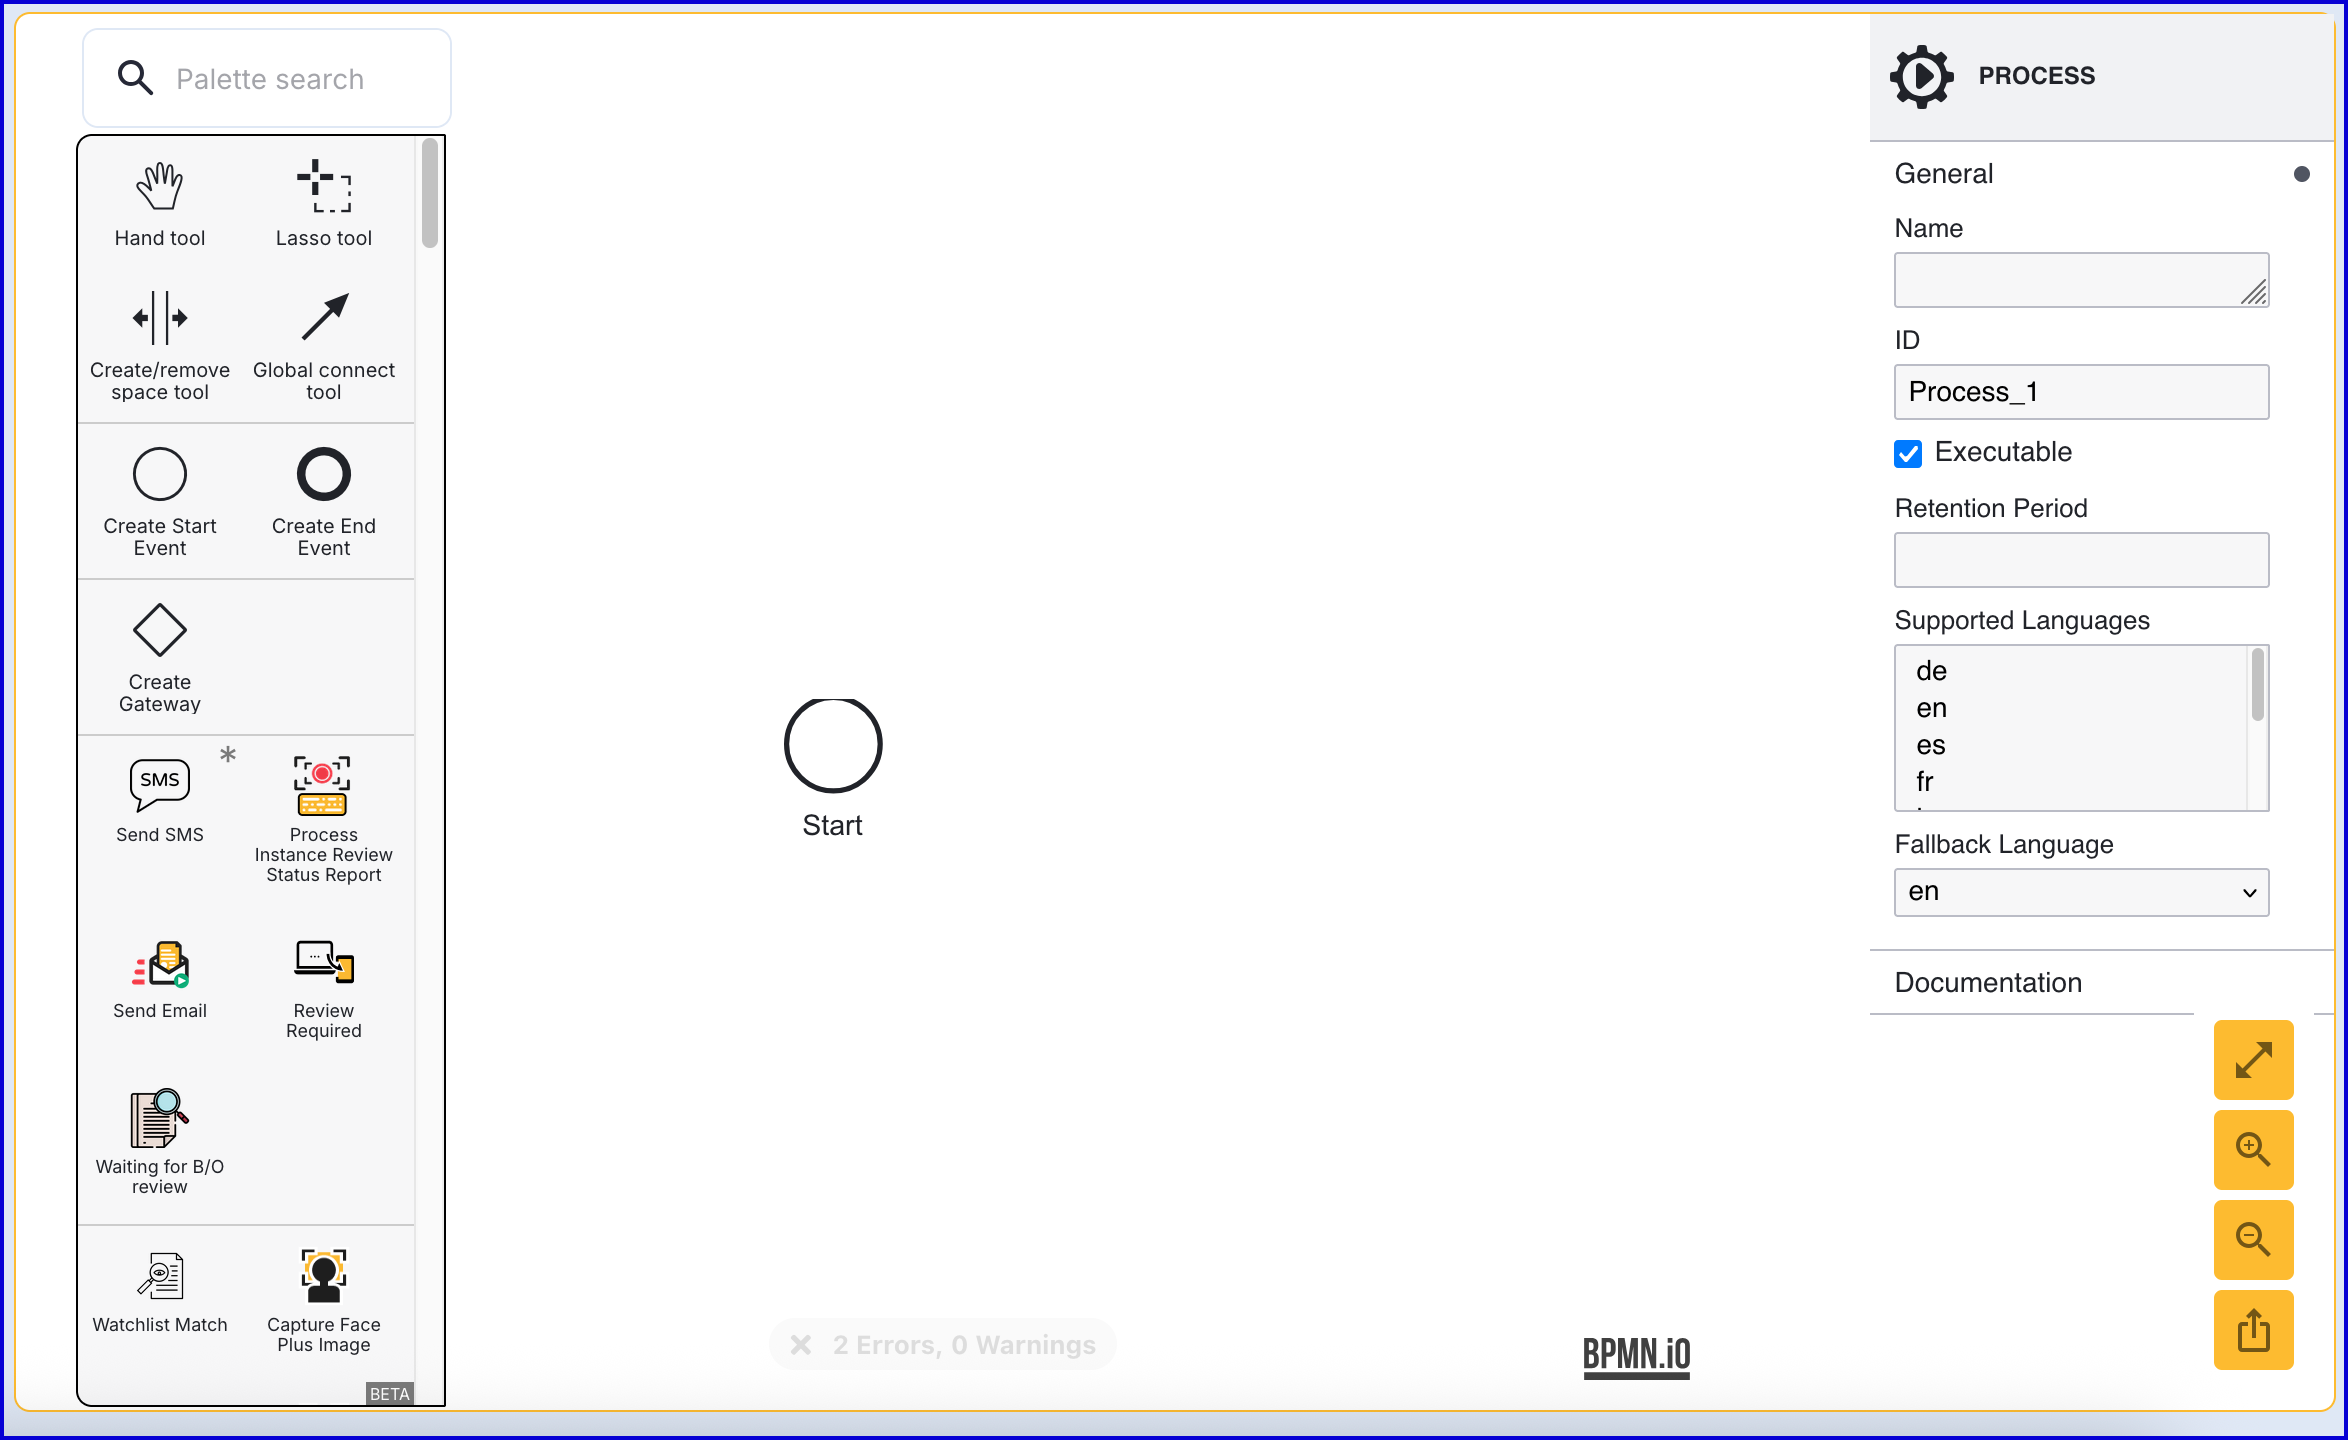
Click the 'Start' event to open the right-side contextual menu and enter a name for the 'Name' input parameter.
Add a 'Create End Event' to the Process Designer and connect it to the 'Start' event using a sequence flow arrow.
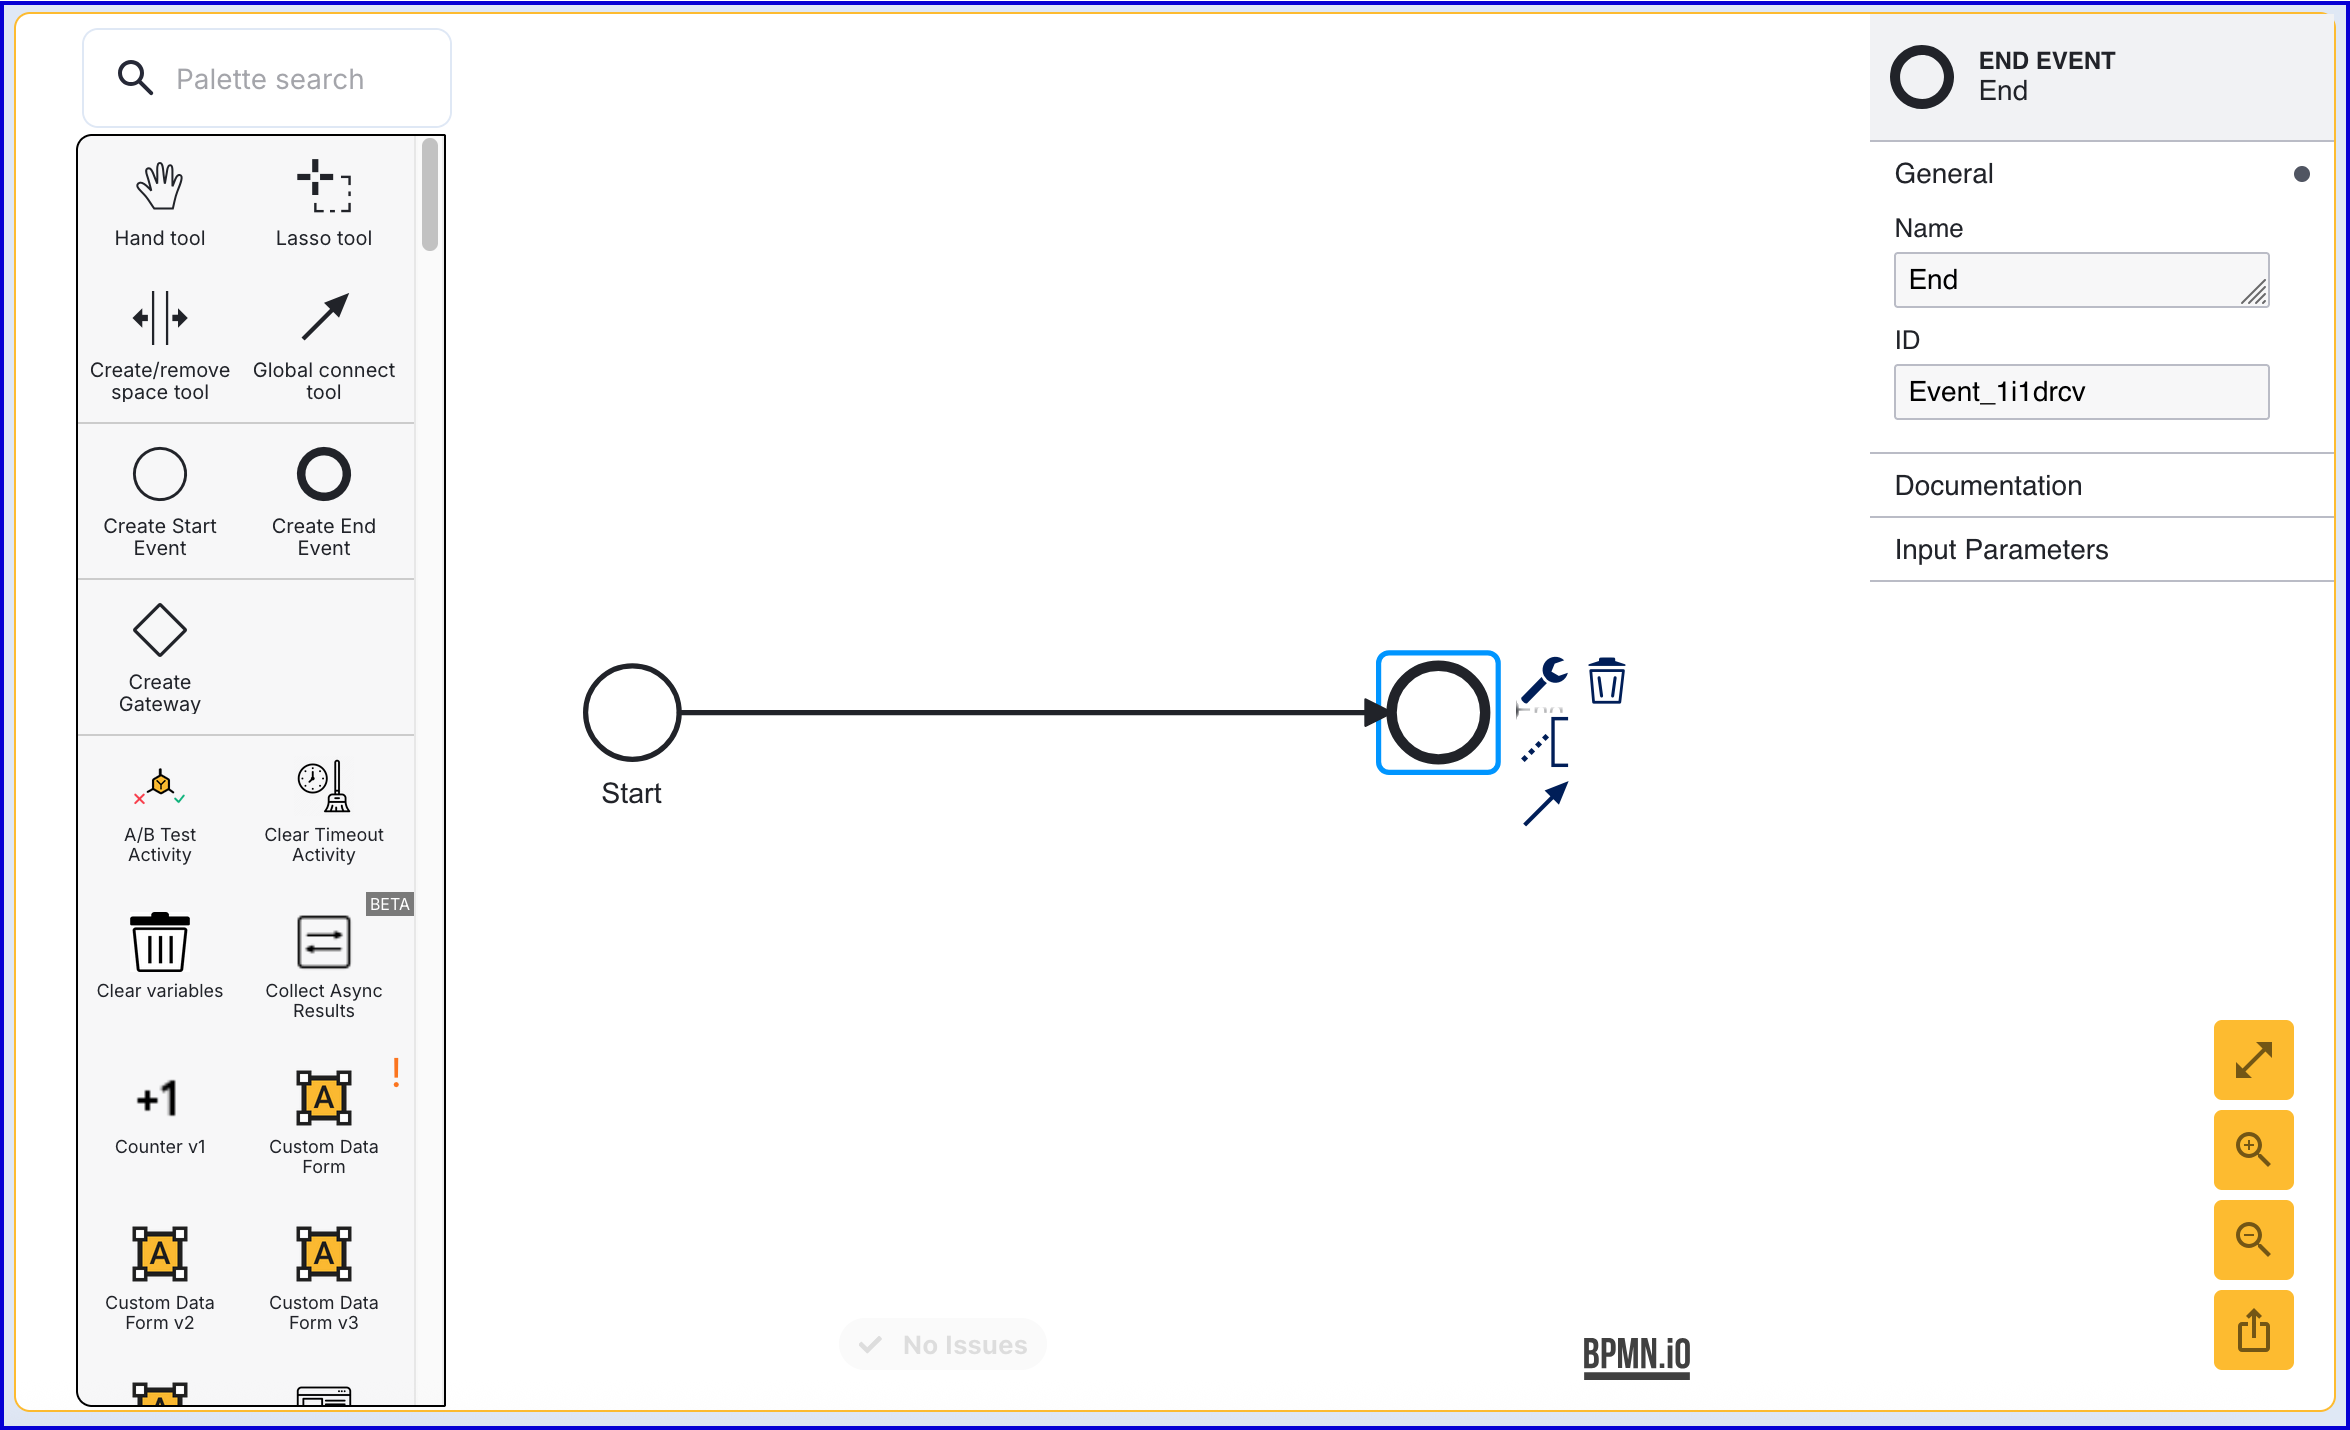
Click the 'End' event to open the right-side contextual menu and enter a name for the 'Name' input parameter.
Step 2 - Add a User (Optional)
This step is only required if the User has not been added to the Identity Store. See Managing Users for more information on adding a User.
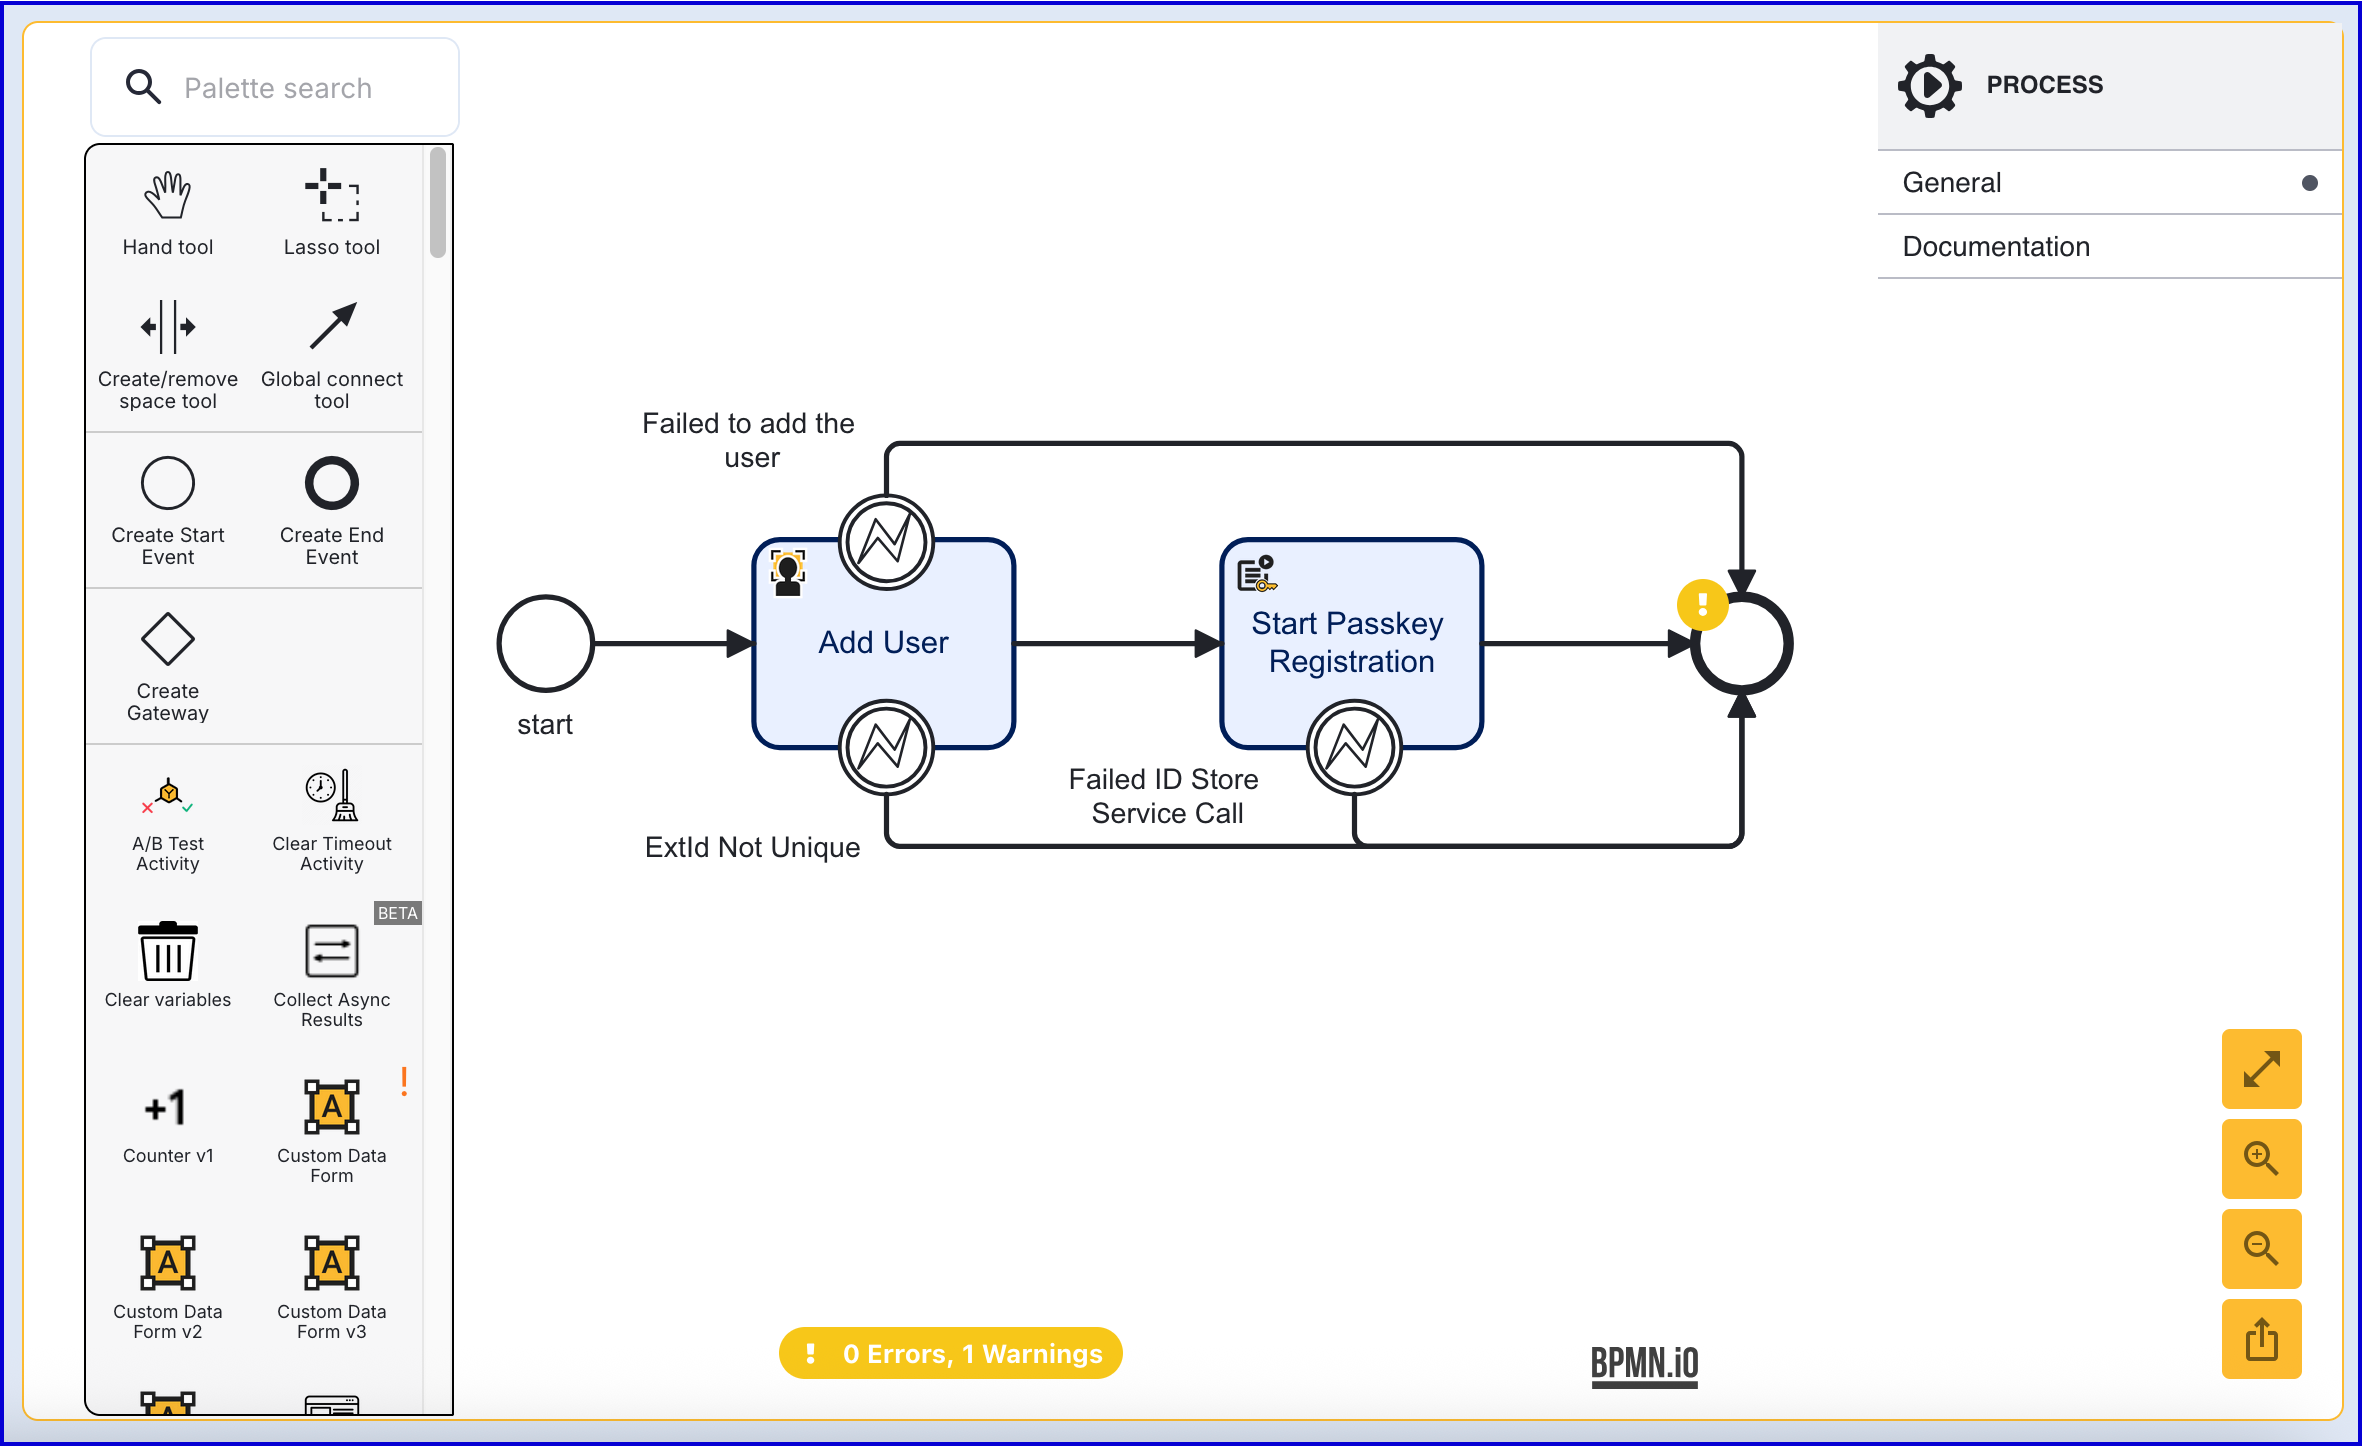
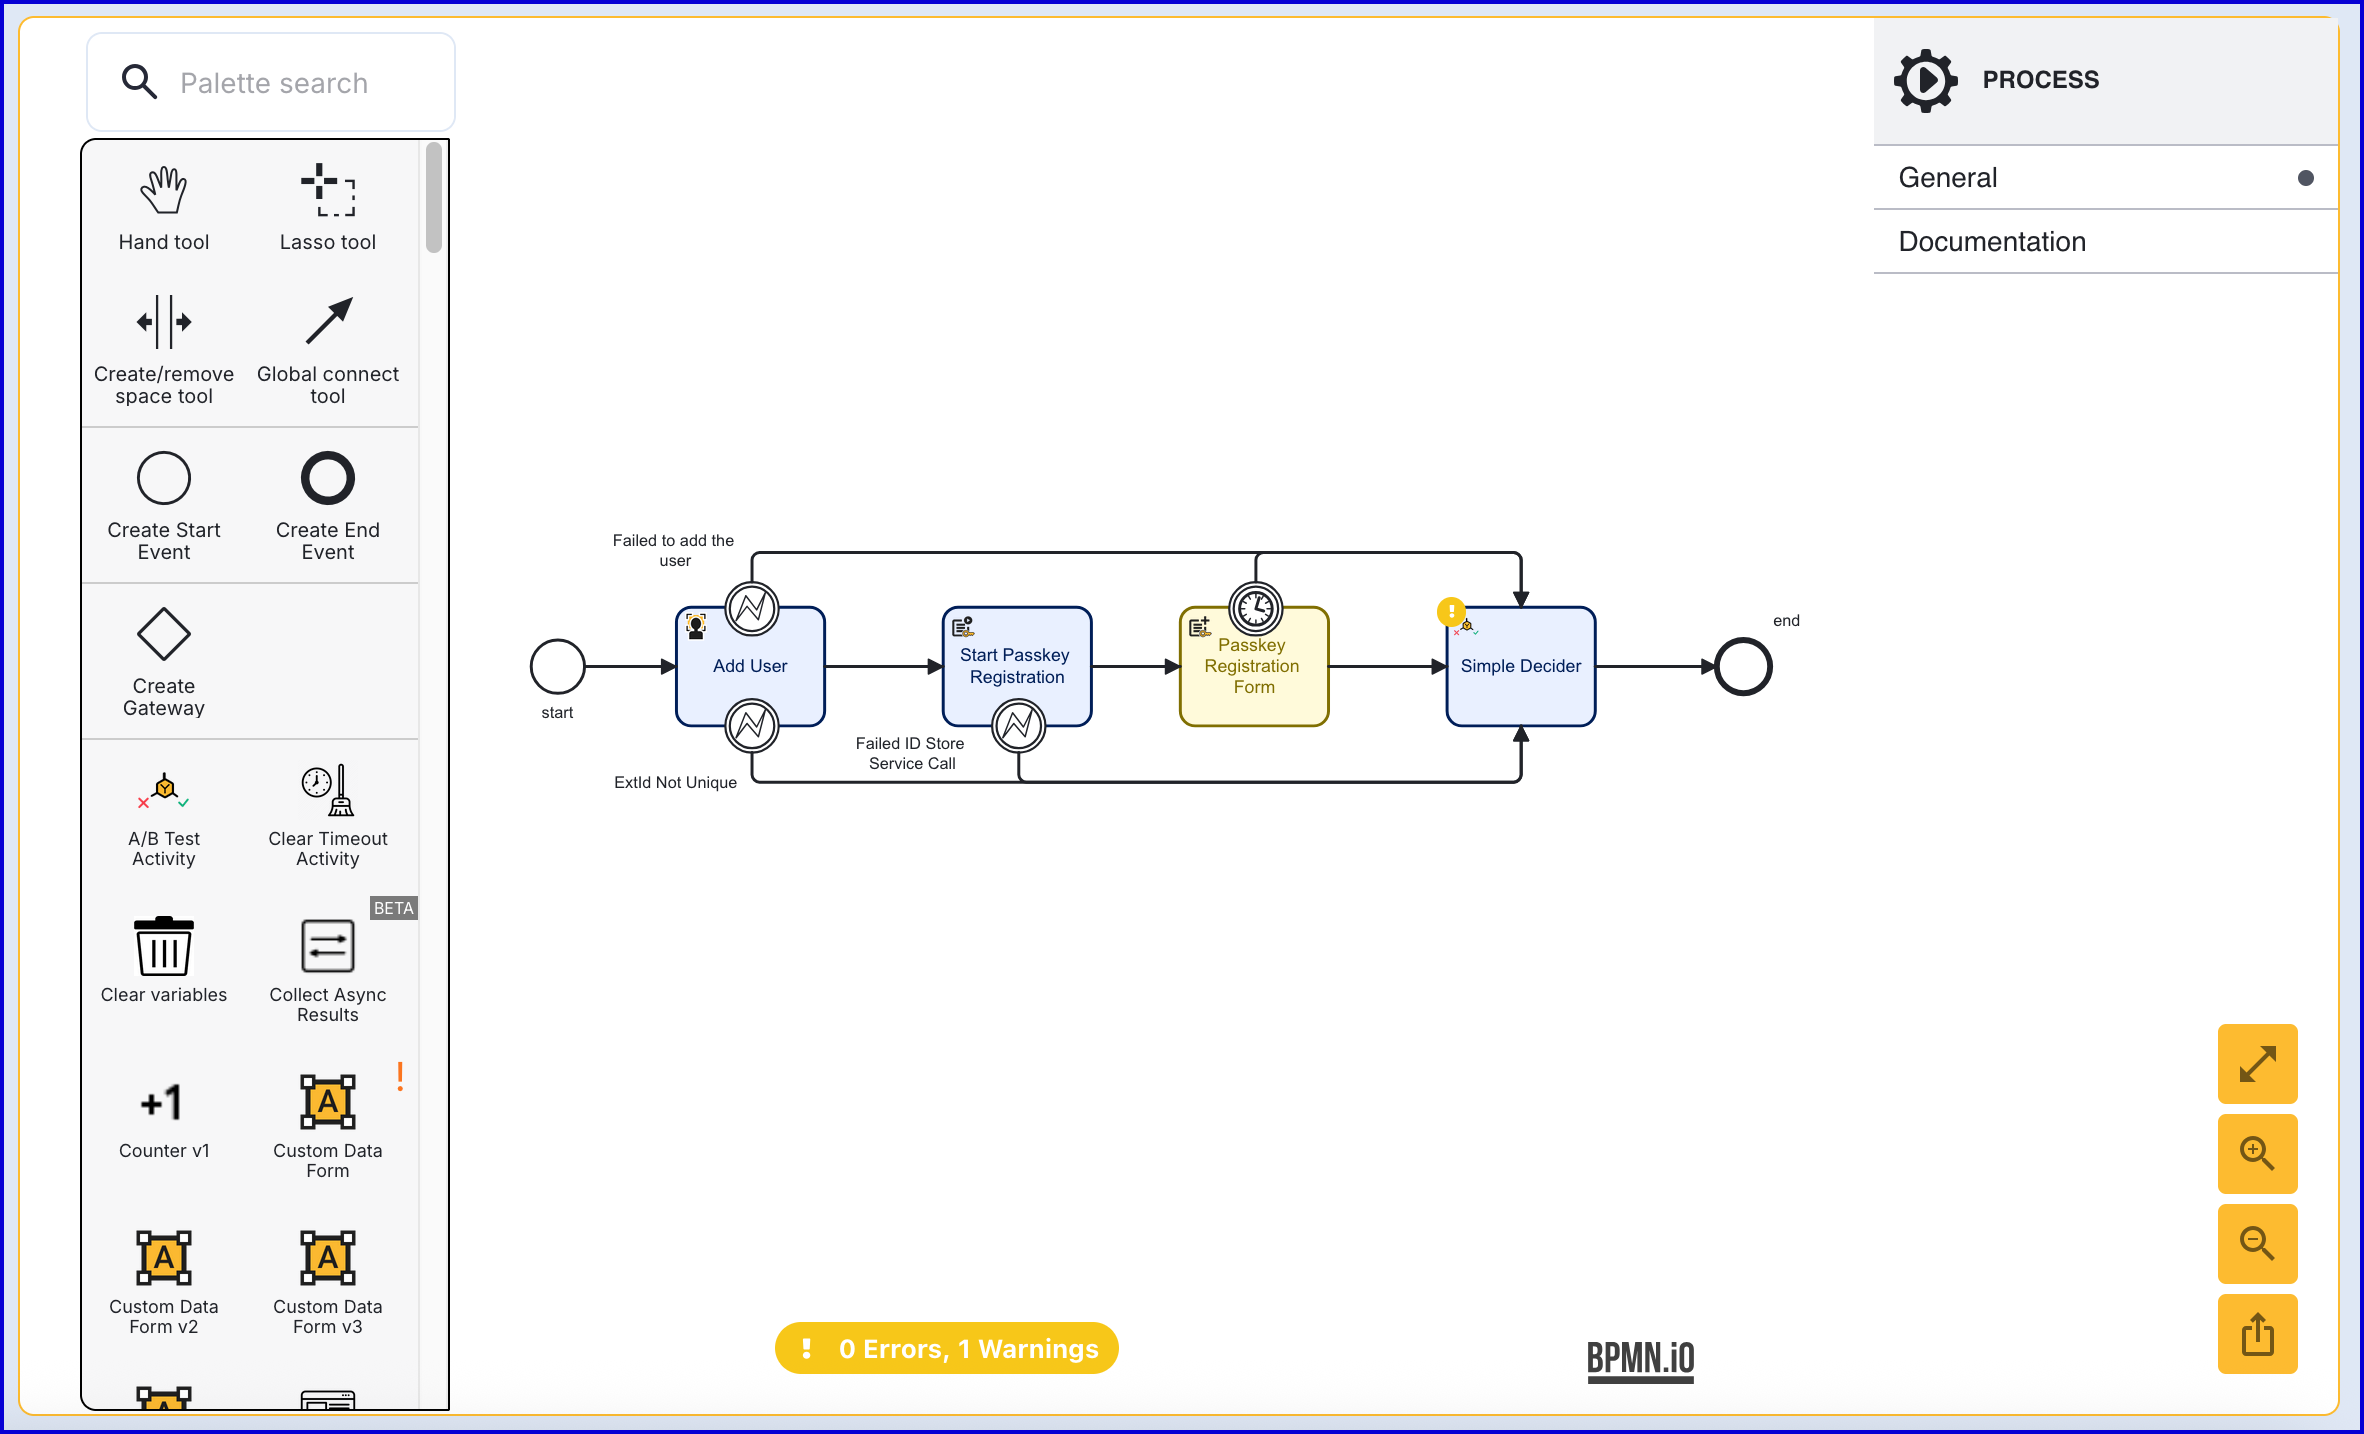
The 'Add User' activity is used to add a new User to an Identity Store. Find the activity and connect it to the 'Start' and 'End' events using a sequence flow arrow.
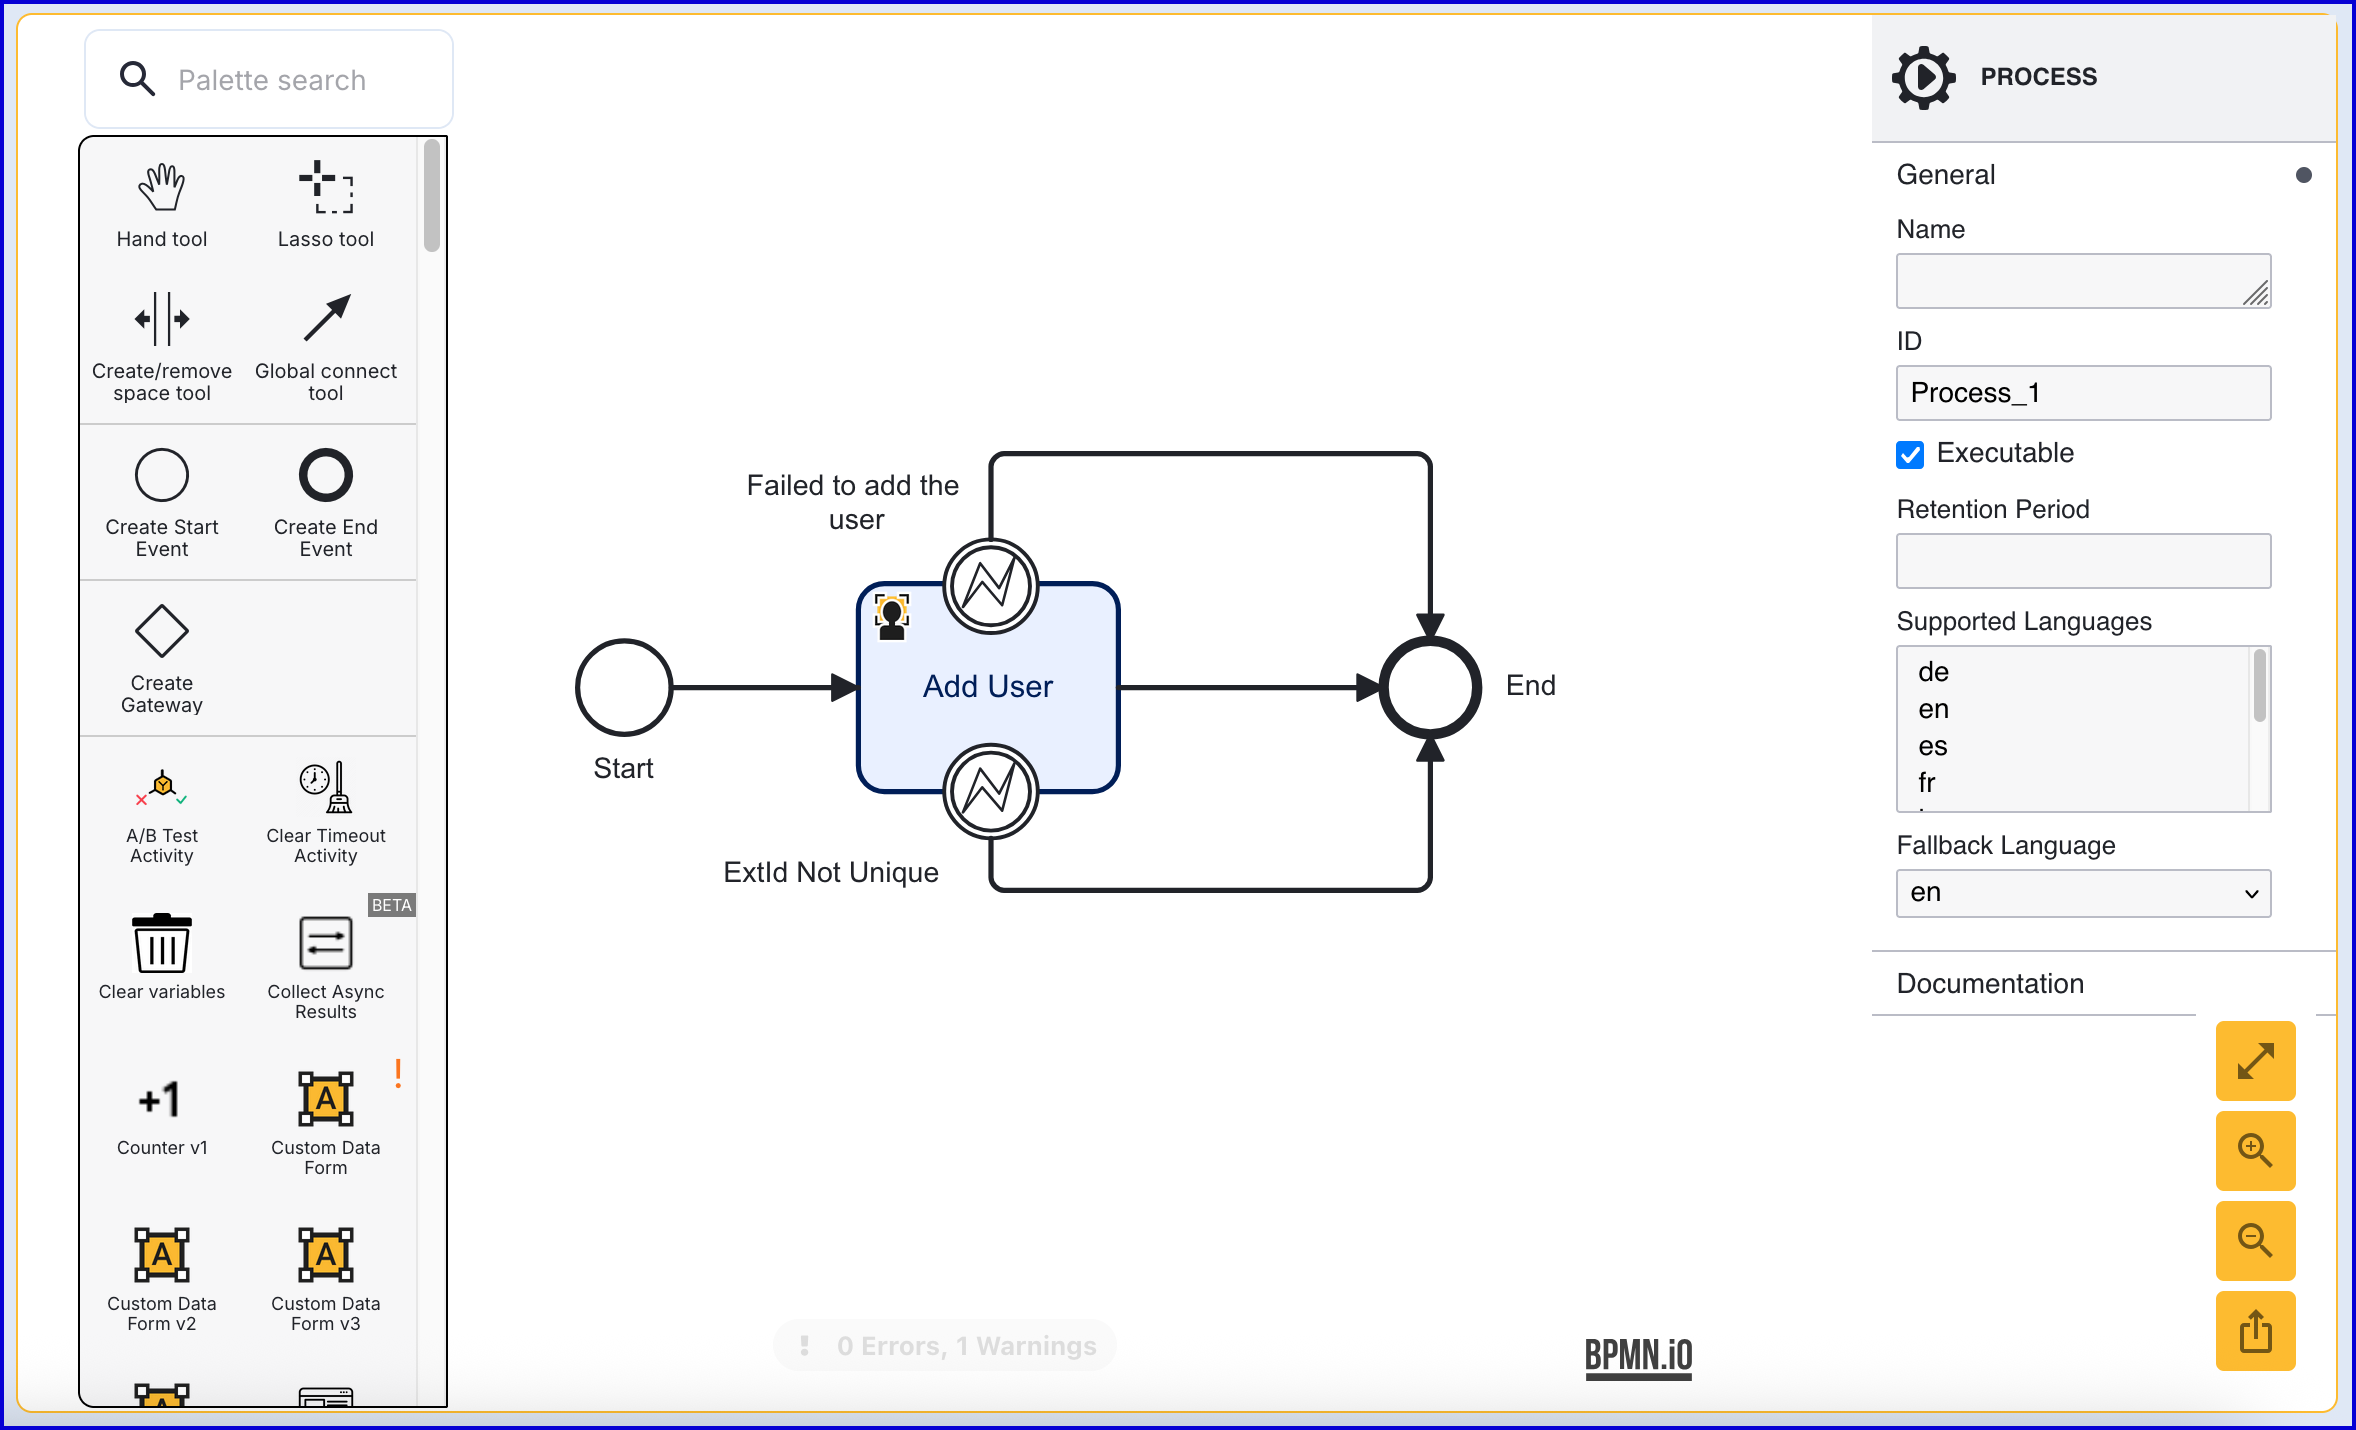
The 'Add User' activity includes two error events. In this example, the error events have been connected to the 'End' event.
Failed to add the user - This event is triggered when an error occurs adding the User to the Identity Store.
ExtId Not Unique - This event occurs if the External ID provided is not unique.
Click the 'Add User' activity to open the right-side contextual menu. Using the available input parameters, information about the User can be defined, including the External ID and which Identity Store the user will be added to.
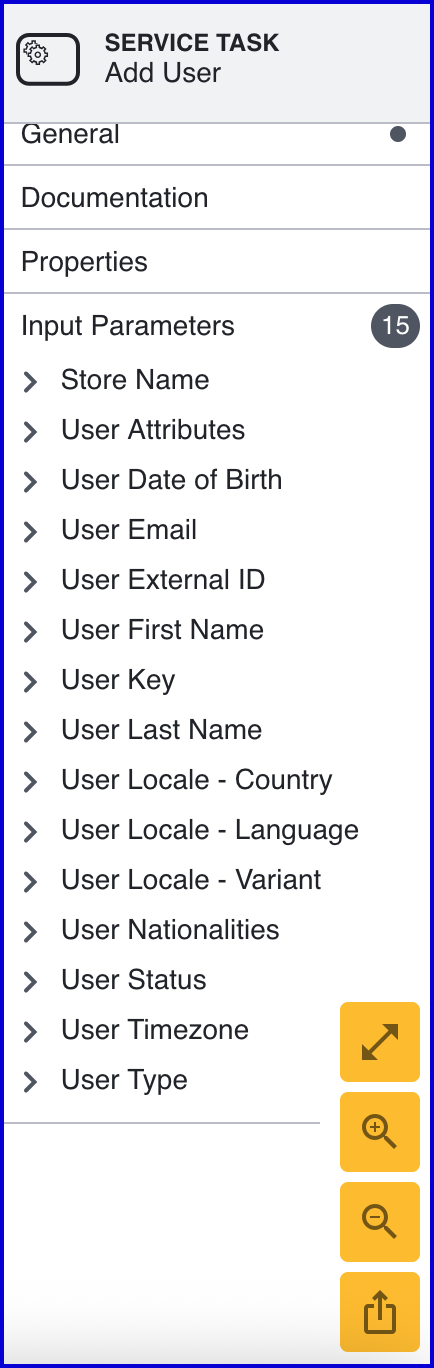
When creating a User, the following input parameters are available:
Input Parameter | Type | Description |
|---|---|---|
Store Name* | String | Required - Represents the Identity Store that the User will be added to. |
User Attributes | <String, String> | A key-value pair of additional optional attributes used to describe the User. |
User Date of Birth | Date | The User's date of birth in the format: "yyyy-mm-dd" |
User Email | String | The User's email address in the format: "example@domain.com" |
User External ID | String | A unique User ID. If no ID is required, an external ID will be generated automatically by TrustX. |
User First Name | String | The first name of the User. |
User Key | String | Required - A key used to identify the User. |
User Last Name | String | The last name of the User. |
User Locale - Country | String | The User country. |
User Locale - Language | String | A two-letter ISO-639 formatted language tag. |
User Locale - Variant | String | A variant subtag of the User country. 5-8 letters or 4 characters starting with a digit, separated by hyphens. |
User Nationalities | String | The nationality of the User. |
User Status | String | The User status indicates whether the User is in a pending, active, locked or disabled state. |
User Timezone | String | The timezone of the User Country. This value must be in line with TZDB code format. Example: EST. |
User Type | String | An optional parameter used for organizing Users into different types. A maximum of 64 characters is allowed. |
Step 3 - Start Passkey Registration
Add the 'Start Passkey Registration' activity to the Process Designer and connect the activity to the 'Add User' activity using a sequence flow arrow.
The 'Start Passkey Registration' activity contains 12 configurable input parameters. The table below describes each parameter, which is accessed by clicking the activity and opening the contextual menu on the right of the screen.
Input Parameter | Type | Description |
|---|---|---|
Challenge | String | The signed challenge is represented by a public key registered to the User. This value is auto-generated. |
Create User | Boolean | If enabled, a new User will be created as part of the passkey registration. Default behavior is disabled. |
Passkey Registration Key | String | Required - The unique ID associated with the passkey registration activity. |
Passkey User Display Name | String | An informal display name associated with the User. |
Passkey User Handle | String (Base-64) | A unique identifier that is used to identify the credentials of the User per relying party. This value is a base-64 encoded string of bytes with a maximum length of 64 bytes. |
Passkey User Name | String | A unique Username to identify the User. |
Registration Policy | String | Required - The name of the registration policy. |
Relying Party ID | String | Required - The ID of the relying party whose passkey registration configuration will be used. |
Store Name | String | Required - The name of the Identity Store. |
User External ID | String | Required - If the 'Create User' property is enabled, this property must be configured as a unique ID for the newly created User. Optional - If the 'Create User' property is disabled, this property can be used to identify the User that the passkey registration applies to. |
User ID | String | The unique ID automatically generated when the User is created. In the context of the 'Start Passkey Registration' activity, this ID can be used to identify the User that the passkey registration applies to. |
User Key | String | The User Key that can be used to identify the User that the passkey registration applies to. |
Start Passkey Registration via API
The passkey registration process can be started via the API by calling either:
/api/identity-store/stores/{storeName}/users/{userId}/passkeys/relyingParties/{rpId}/registrations/{regPolicyName}/api/identity-store/stores/{storeName}/users/{userExtId}/passkeys/relyingParties/{rpId}/registrations/{regPolicyName}/ext
Permissions: TNT#{tenant}#IdentityStore:createPasskeyRegistrationForUser, TNT#{tenant}#IdentityStore:createPasskeyRegistrationForUserByExtId , TNT#{tenant}#IdentityStore:createPasskeyRegistration
Example Request:
Example Response:
As seen above, the response will return a sessionID, which is used to complete the passkey registration in Step 6.
Step 4 - Configure the Registration Form
The example in this document will use a Custom Form that collects the 'Passkey User Display Name' and 'PassKey User Name' from the end-user. This Custom Form is then populated in the 'Passkey Registration Form' activity. This is a unique type of form activity that is used for the purpose of passkey registration.
Create a new Custom Form from the Integration Hub > Custom Forms section of the Backoffice. For more information using the Custom Form builder, see the Custom Data Forms guide.
The example below demonstrates a JSON form that requests the 'User Name' and 'Display Name'.
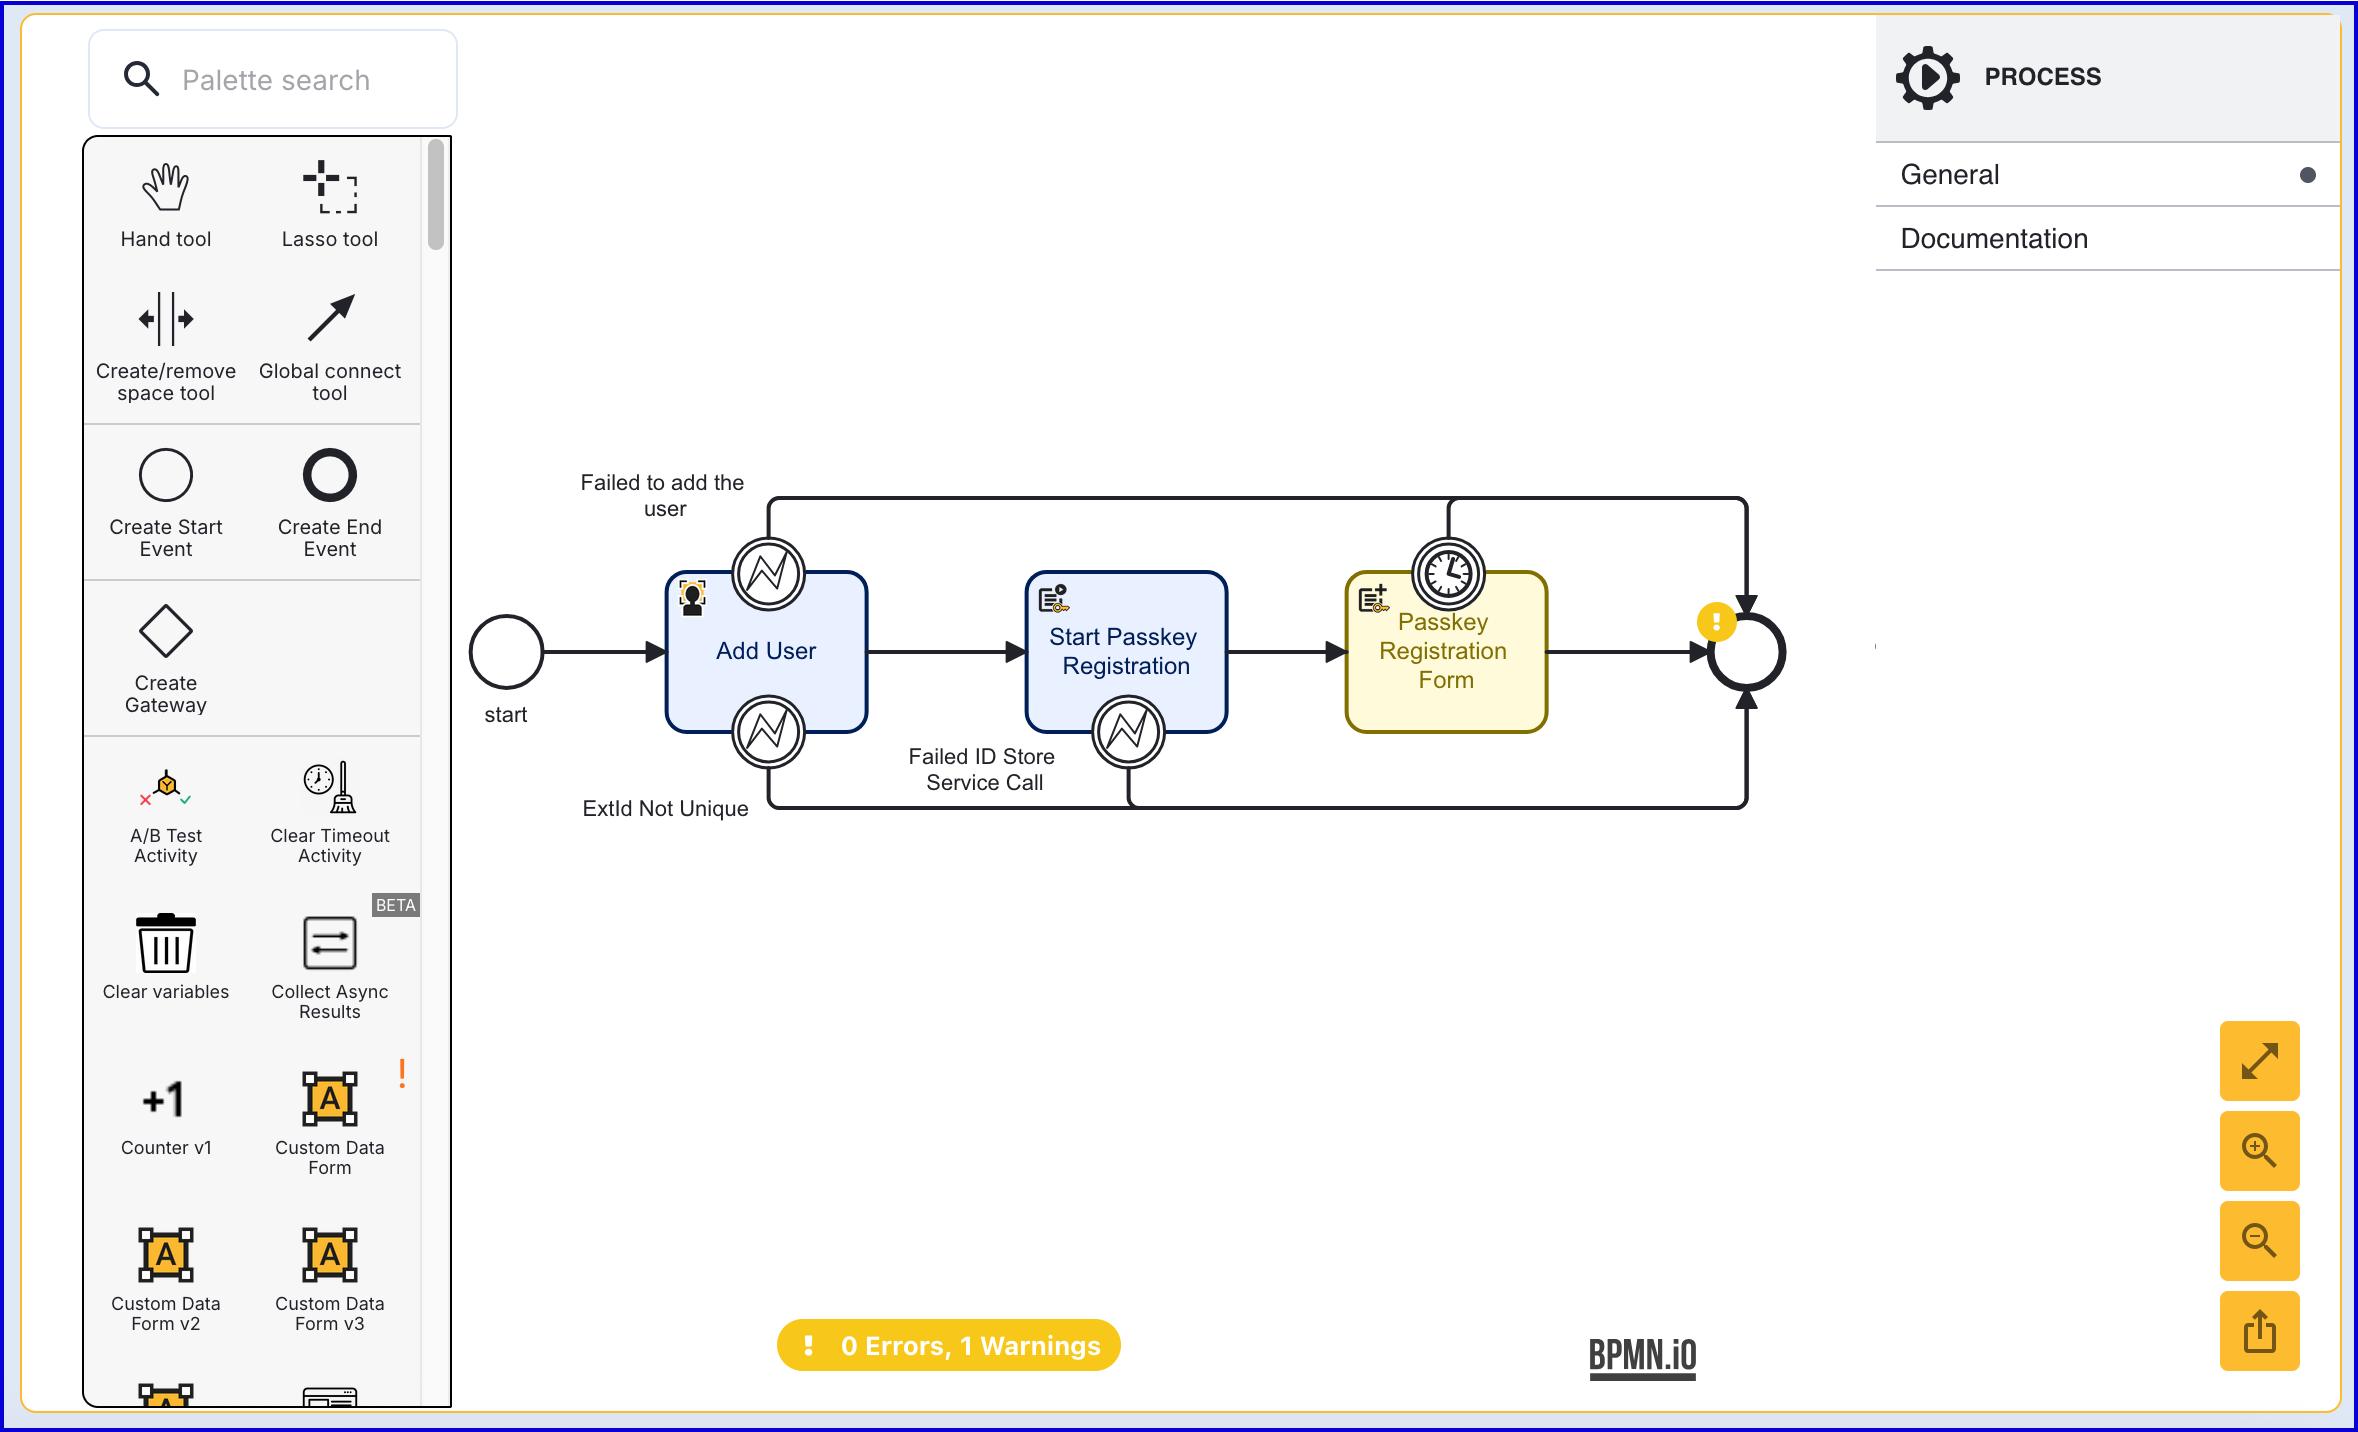
Once the Custom Form has been created, add a 'Passkey Registration Form' activity to the Process Designer and connect to the 'Start Passkey Registration' activity using a sequence flow arrow.
The 'Passkey Registration Form' contains configurable input parameters. The table below describes each configurable parameter:
Input Parameter | Type | Description |
|---|---|---|
Data form name | String | The Custom Form that will be displayed to the end-user. |
Data form version | String | The version of the Custom Form. |
Delay (in seconds) | Integer | When 'Hide buttons' is enabled, this value will determine how long the form will display before automatically proceeding to the next step. |
Form data key | String | The unique identifier of the 'Passkey Registration Form' activity. |
Hide buttons | Boolean | If enabled, the 'continue' button will be hidden from the form. This is disabled by default, meaning buttons will be shown. |
Passkey Registration Key | String | The unique ID associated with the passkey registration attempt. |
Registration timeout (in seconds) | Integer | The allotted time to complete the form before a timeout event occurs. |
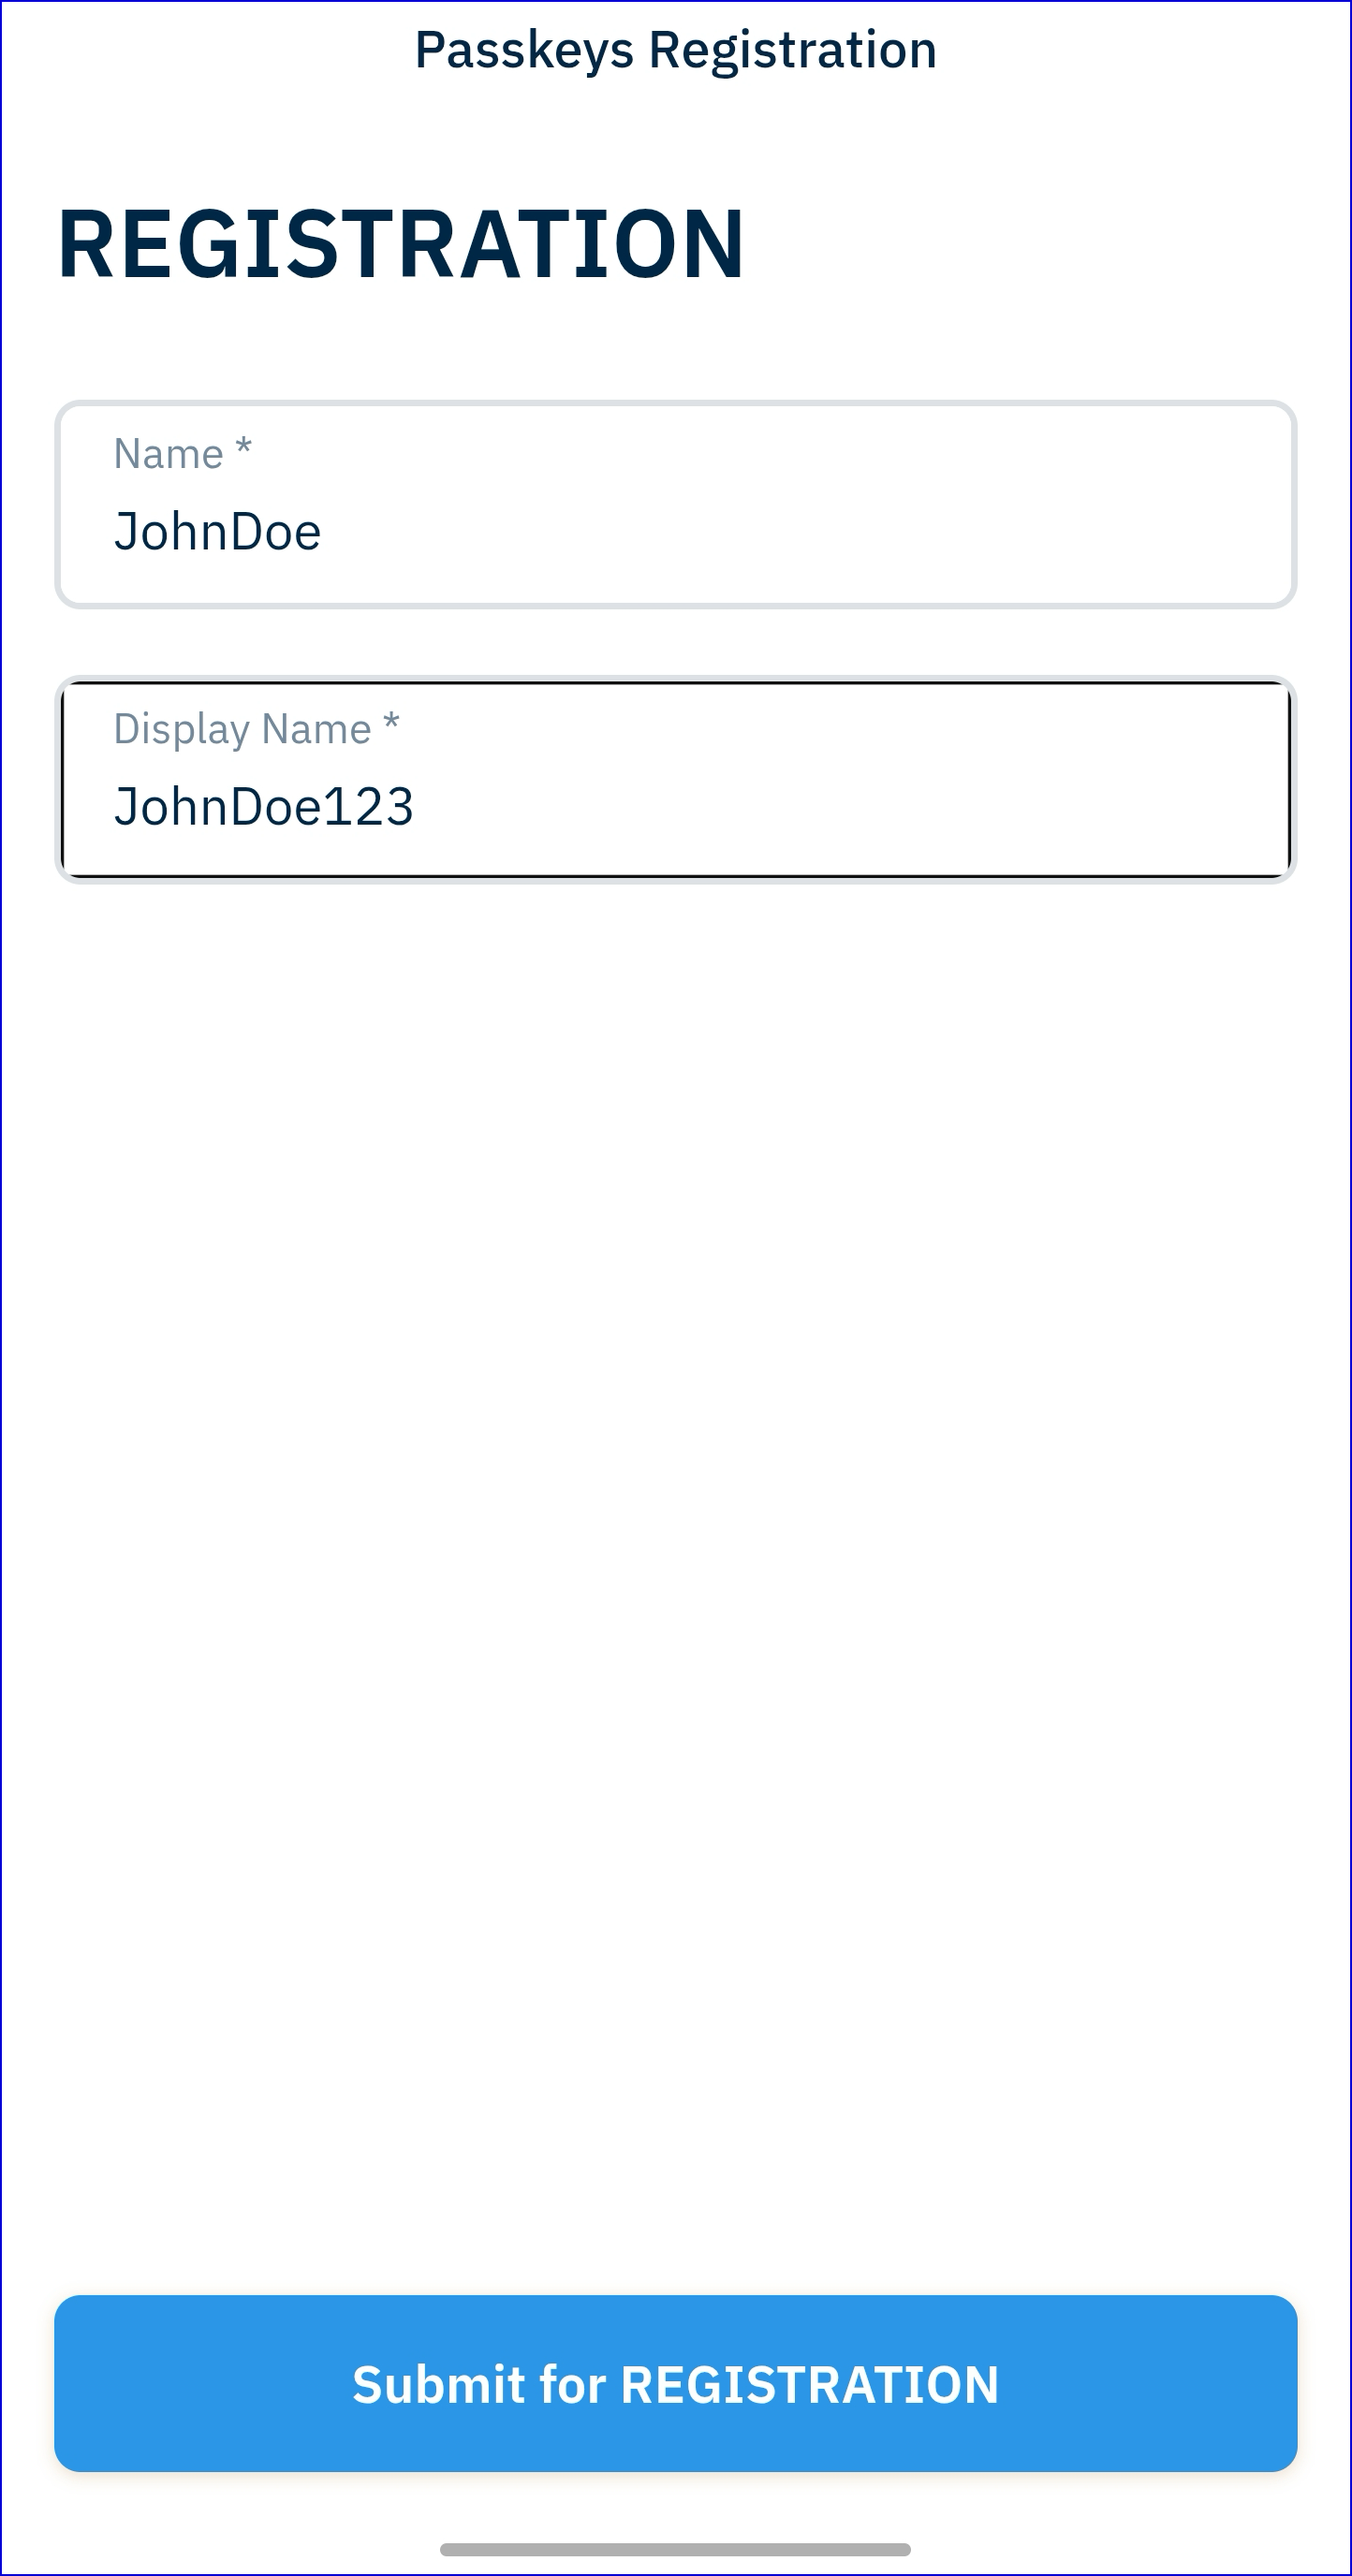
When the form is displayed to the end-user, they will have the ability to define their username and display name:
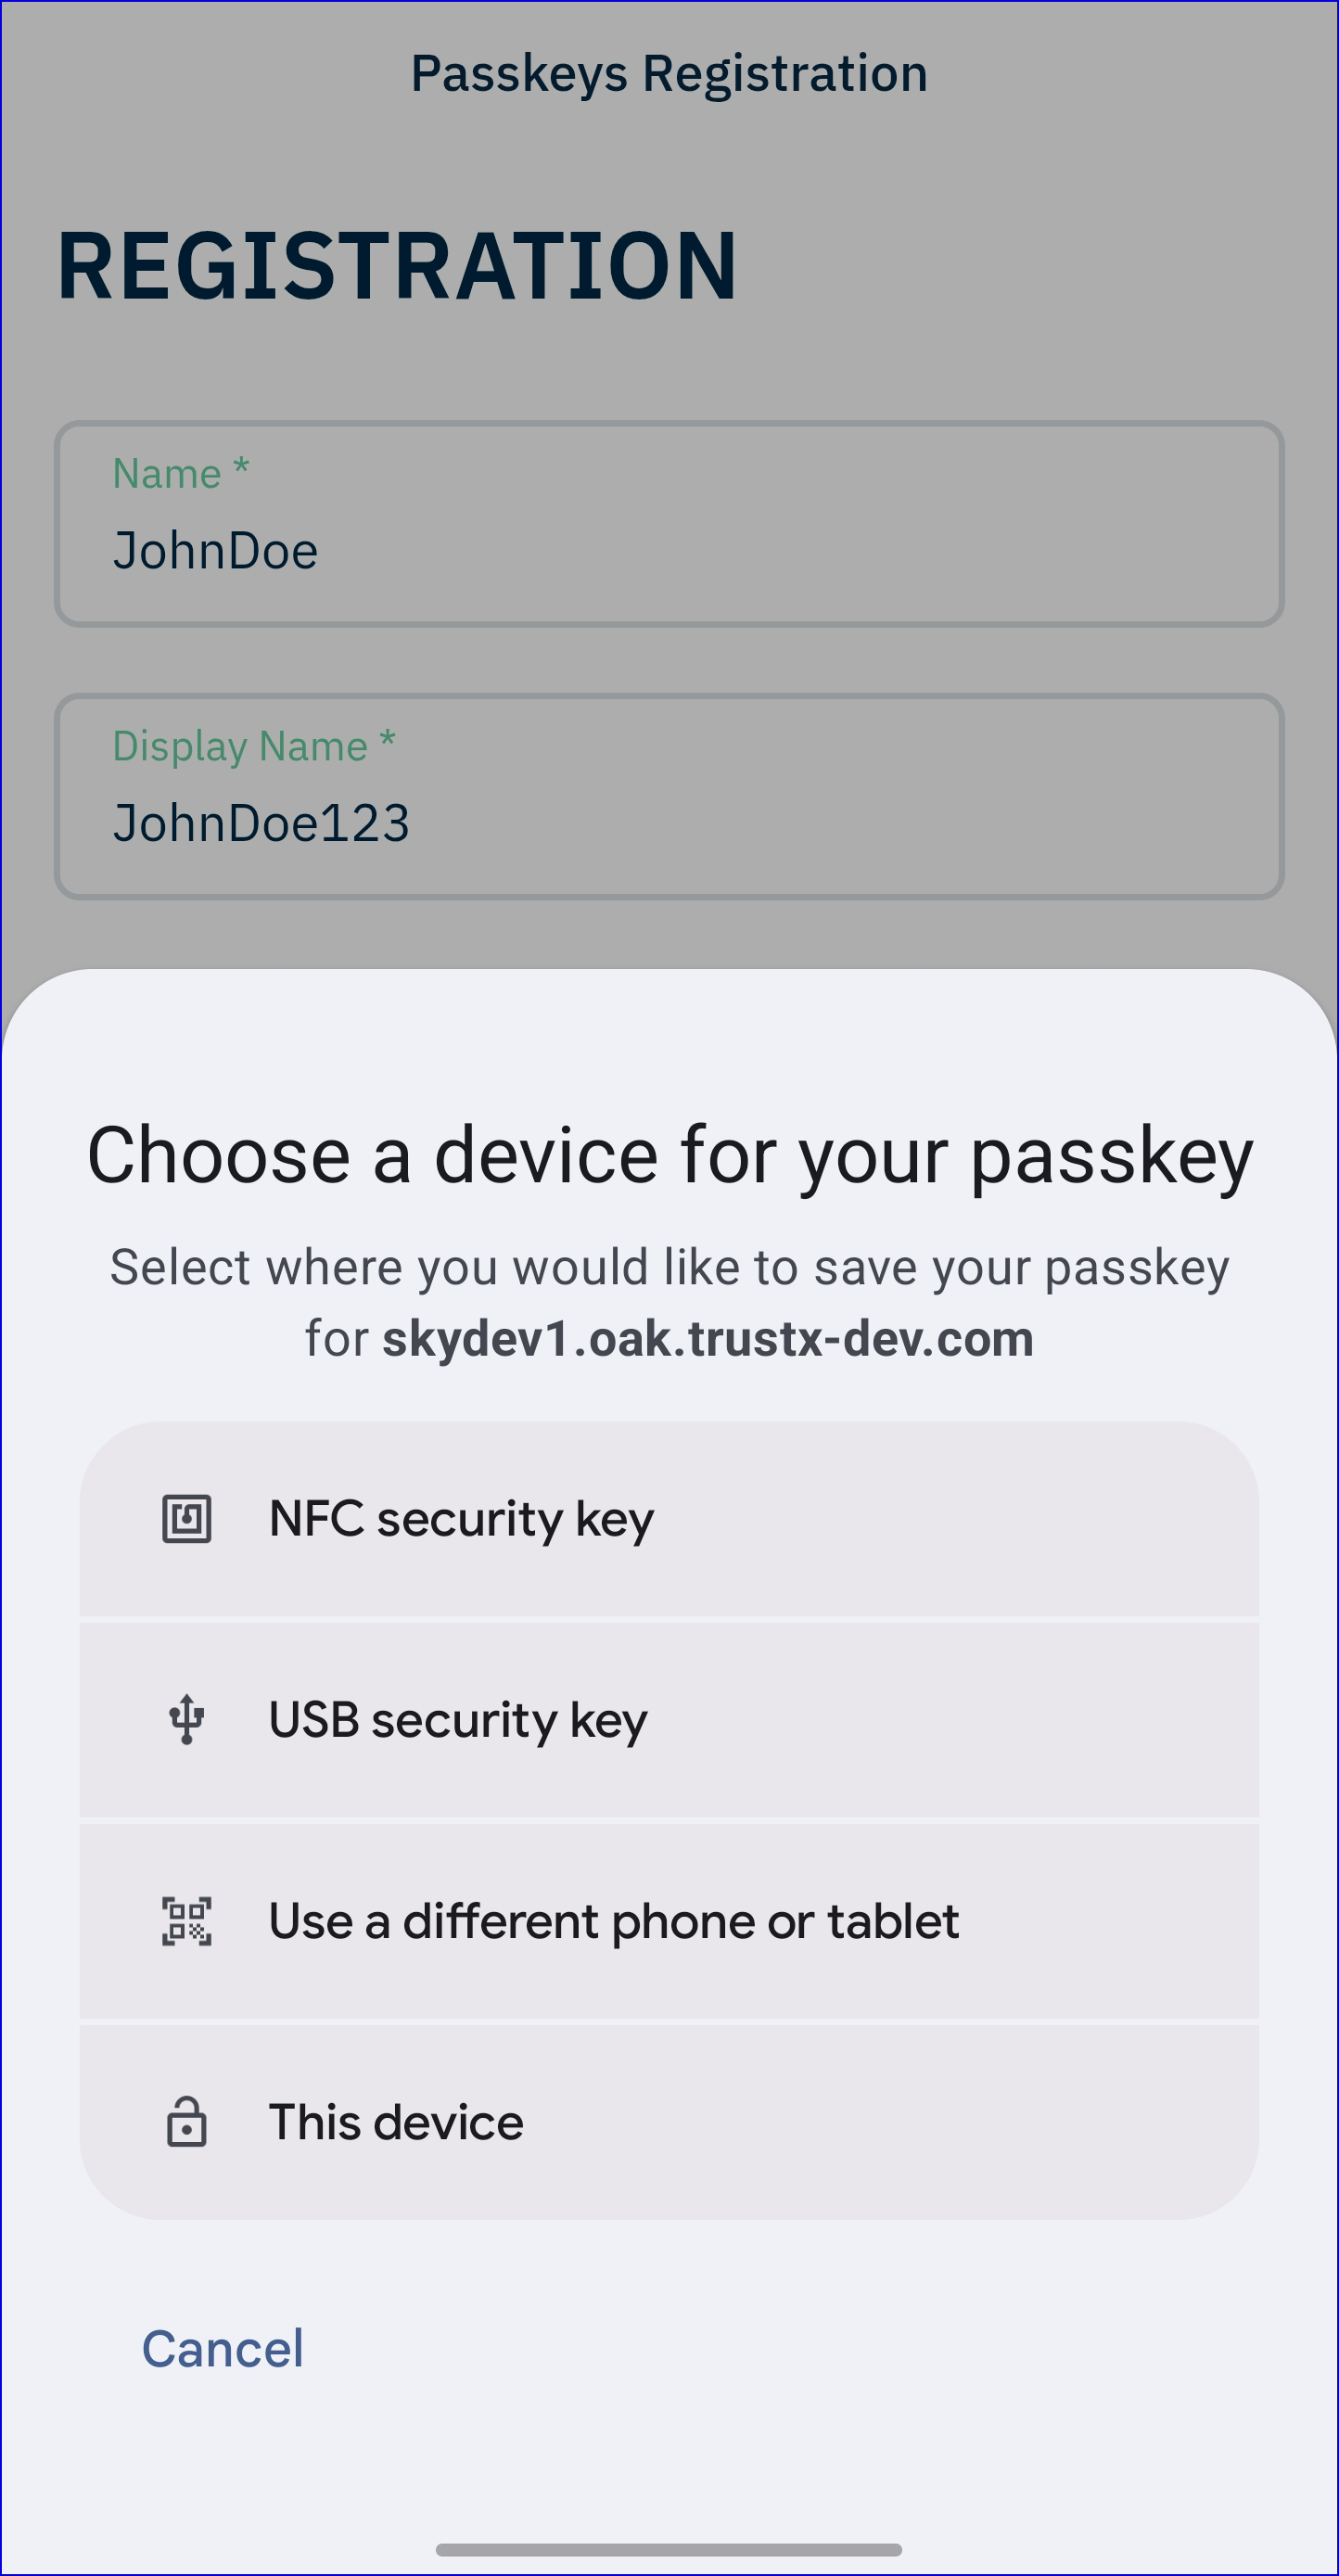
When clicking the 'Submit for Registration' button, a popup will appear to choose the registration method.
Step 4 - Configure a Custom Page (Optional)
It is also possible to request the data from a Custom Page instead of a Custom Form by using the Custom Page activity. For this flow to work, it is important that the 'Passkey Registration Browser Response' input parameter is entered in Step 6.
Create a new Custom Page from the Integration Hub > Custom Pages section of the Backoffice. For more information on creating Custom Pages, see the Custom Pages Guide.
The example HTML below requests the 'User Name' and 'Display Name' from the end-user:
In the Process Definition, configure the 'Custom Page V2' activity by connecting it to the 'Start Passkey Registration' activity.
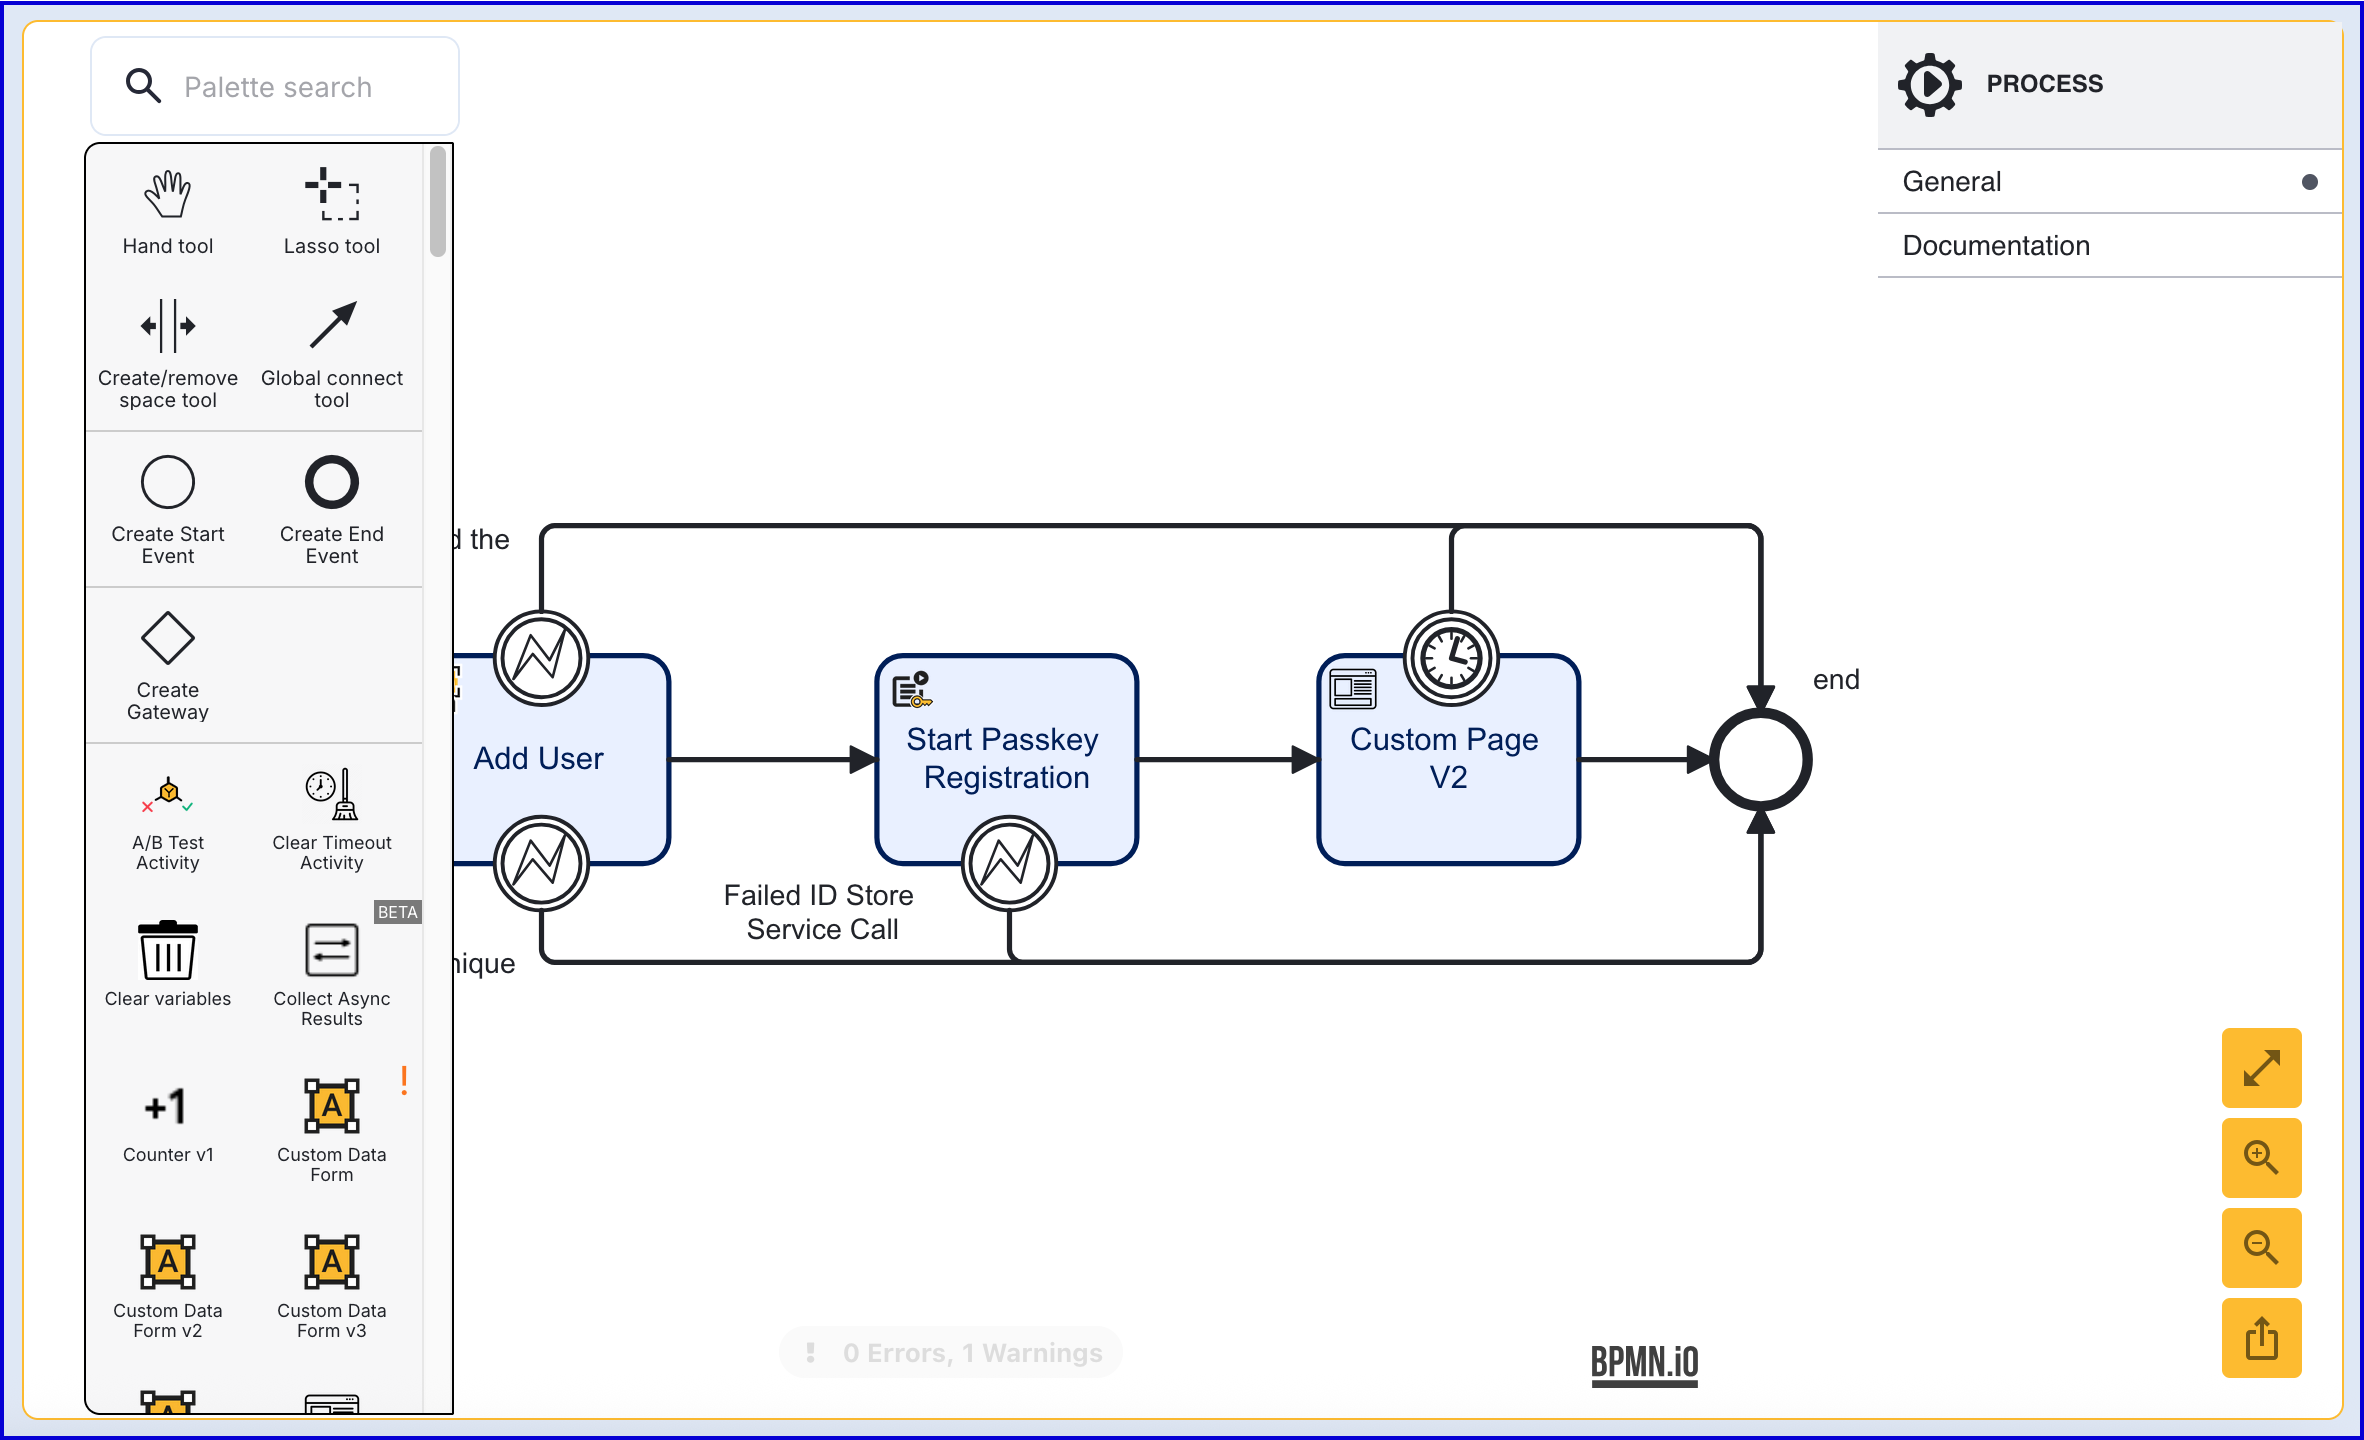
Under the activity input parameters, set the 'Constants' to ensure the client request is sent.
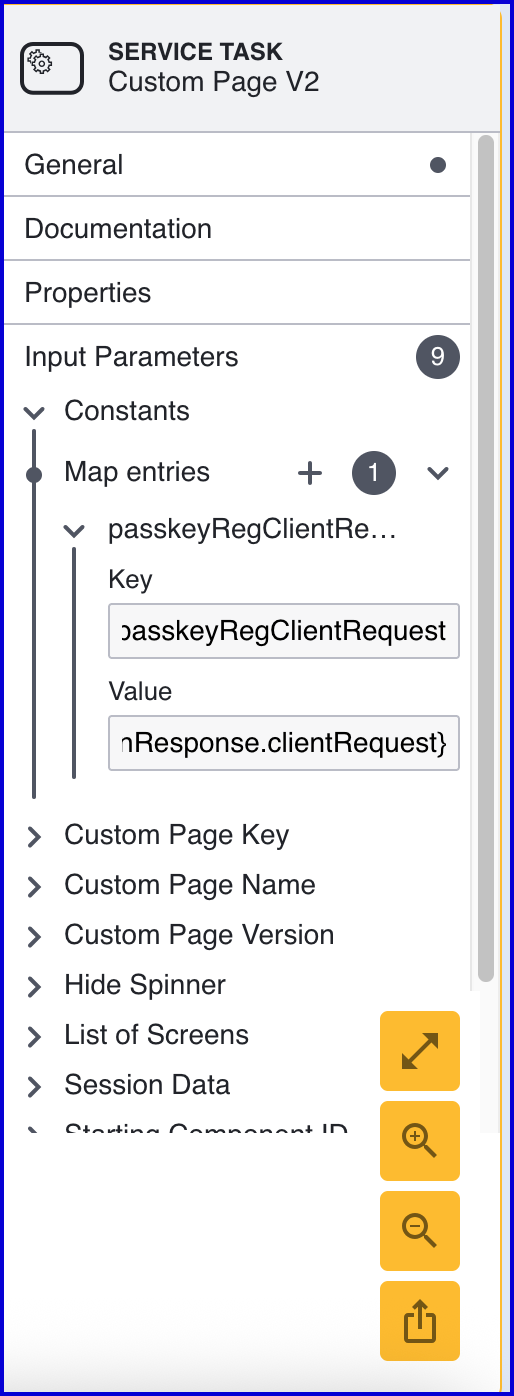
In the example above, the entry is set accordingly:
Key:
passkeyRegClientRequestValue:
${_identityStore.passkeys.registrations["passkeyReg1"].currentPasskeyRegistrationRecord.startPasskeyRegistrationResponse.clientRequest}
Step 5 - Add a Simple Decider
A 'Simple Decider' activity can be used to determine whether the registration attempt has been successful. At this point, it can also be used to connect the various boundary events that appear in the previous steps.
Add the 'Simple Decider' activity to the Process Designer and connect all boundary events configured so far to the activity.
The 'Simple Decider' includes two input parameters which can be defined as follows:
Decision on Any Failure - The result that will be returned in the event that any failure occurs during the Process Instance.
Derive Decision From - Determines whether to derive a decision from a variable. In this example, the parameter is left blank.
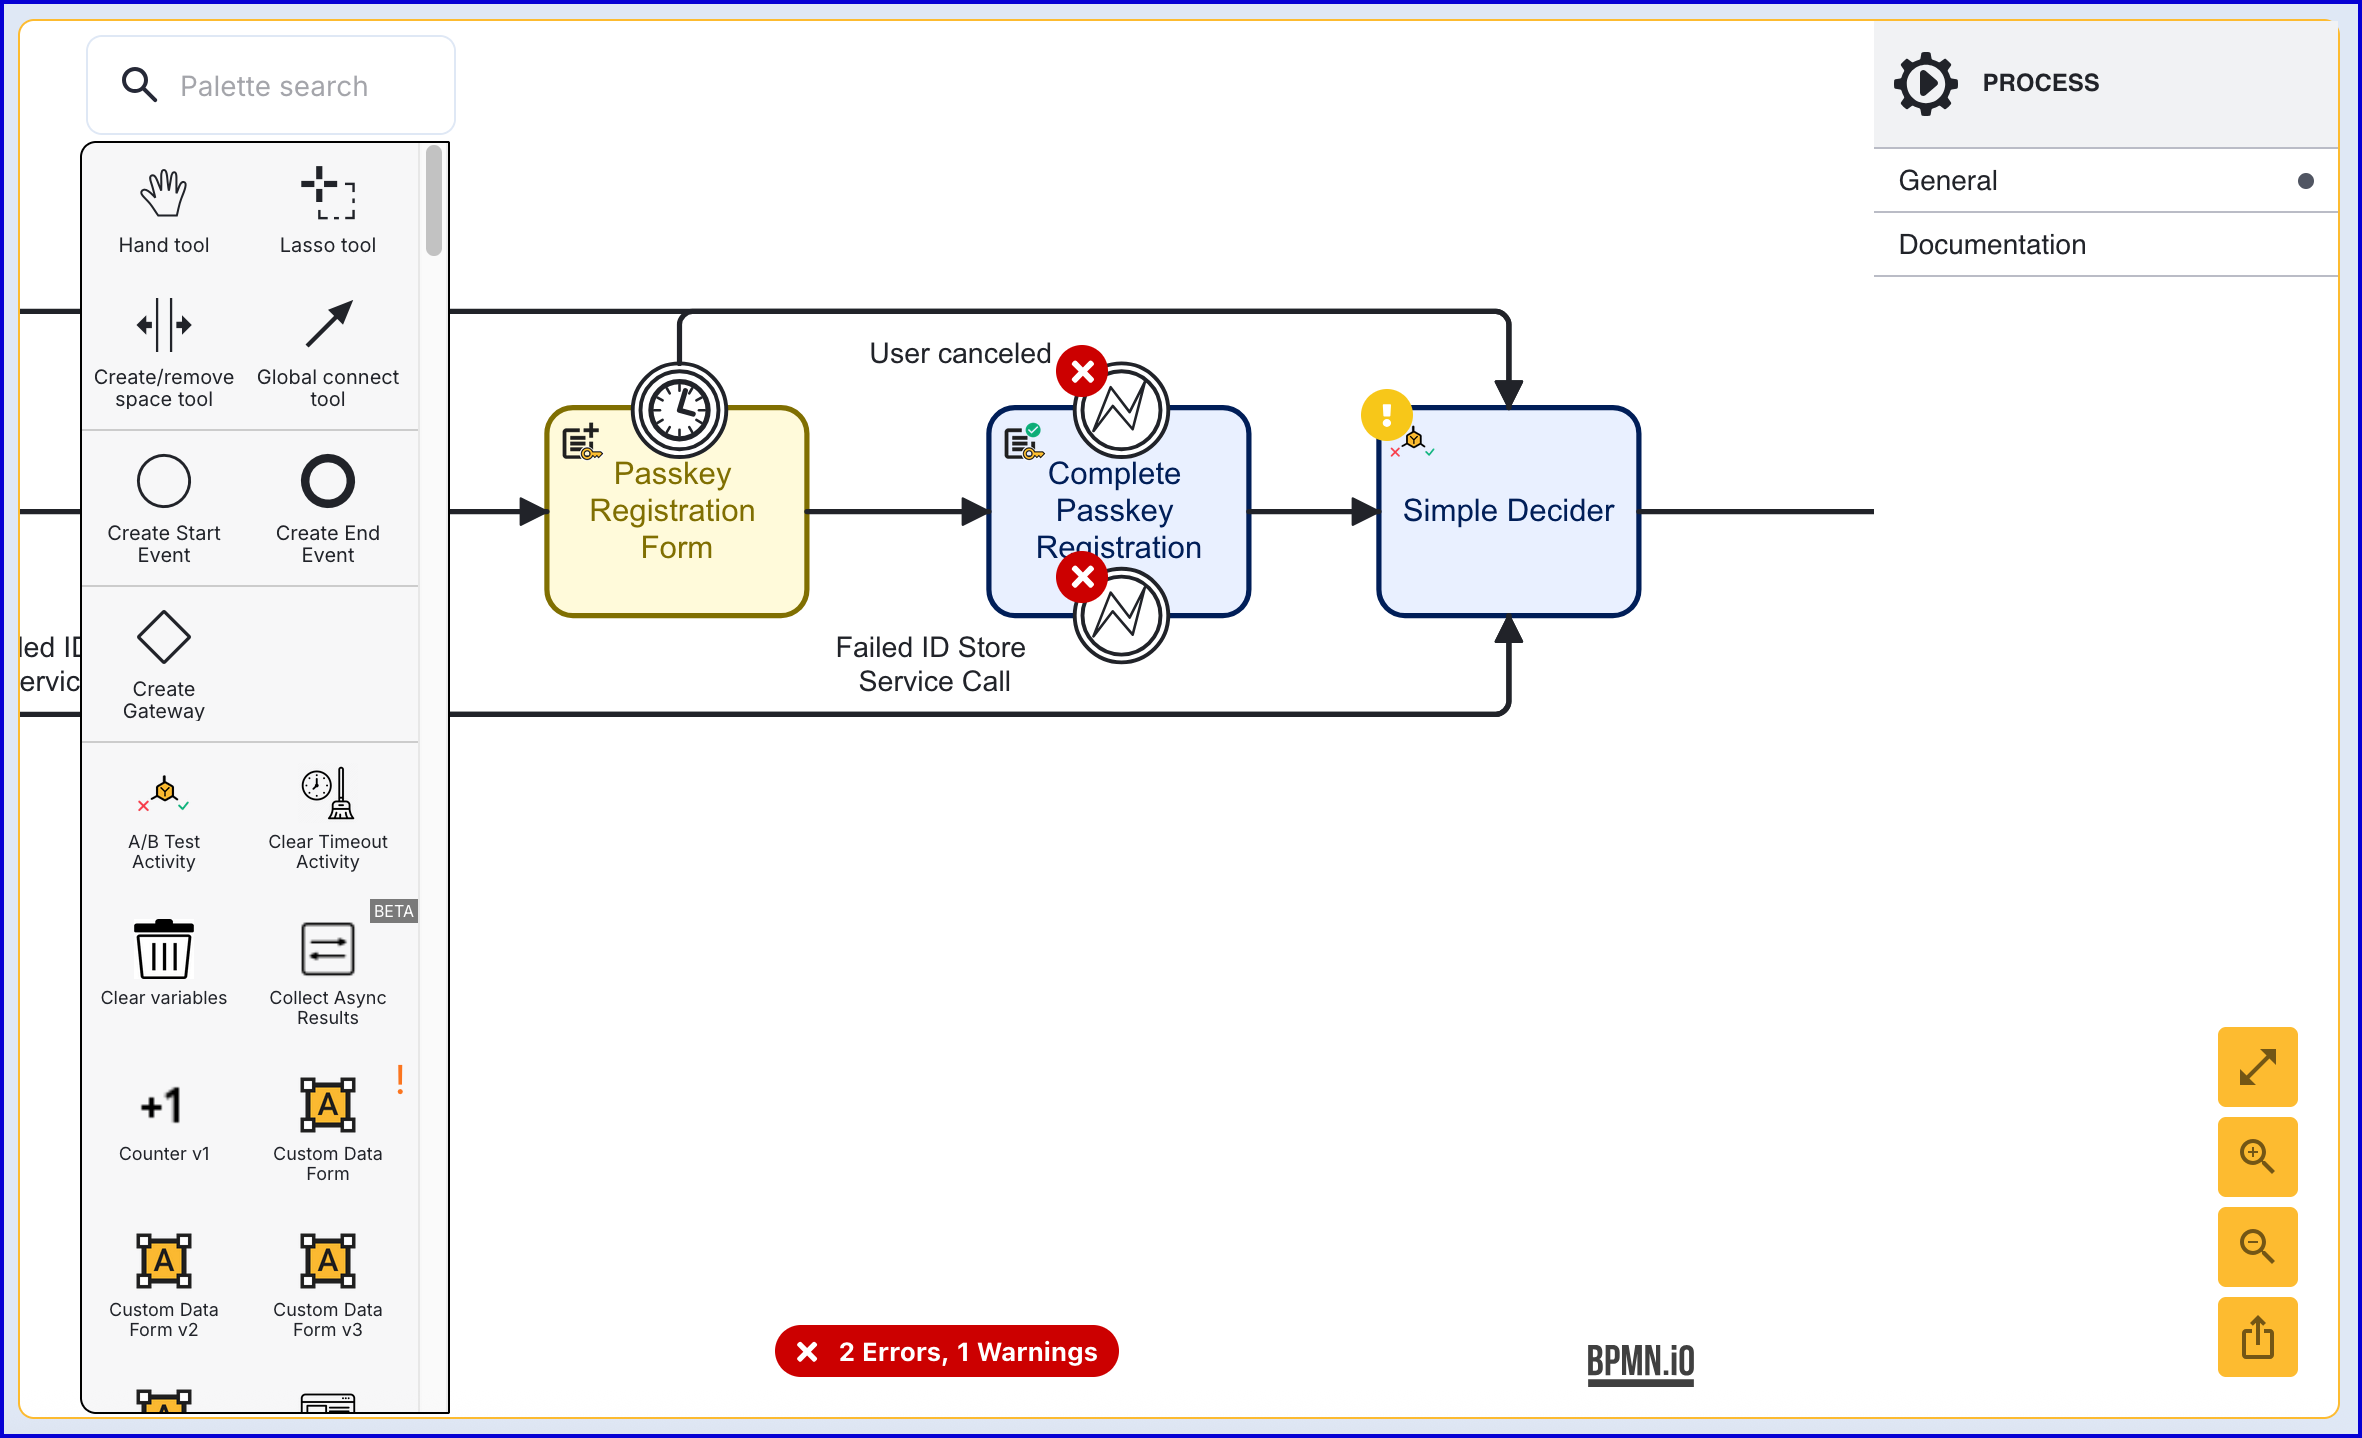
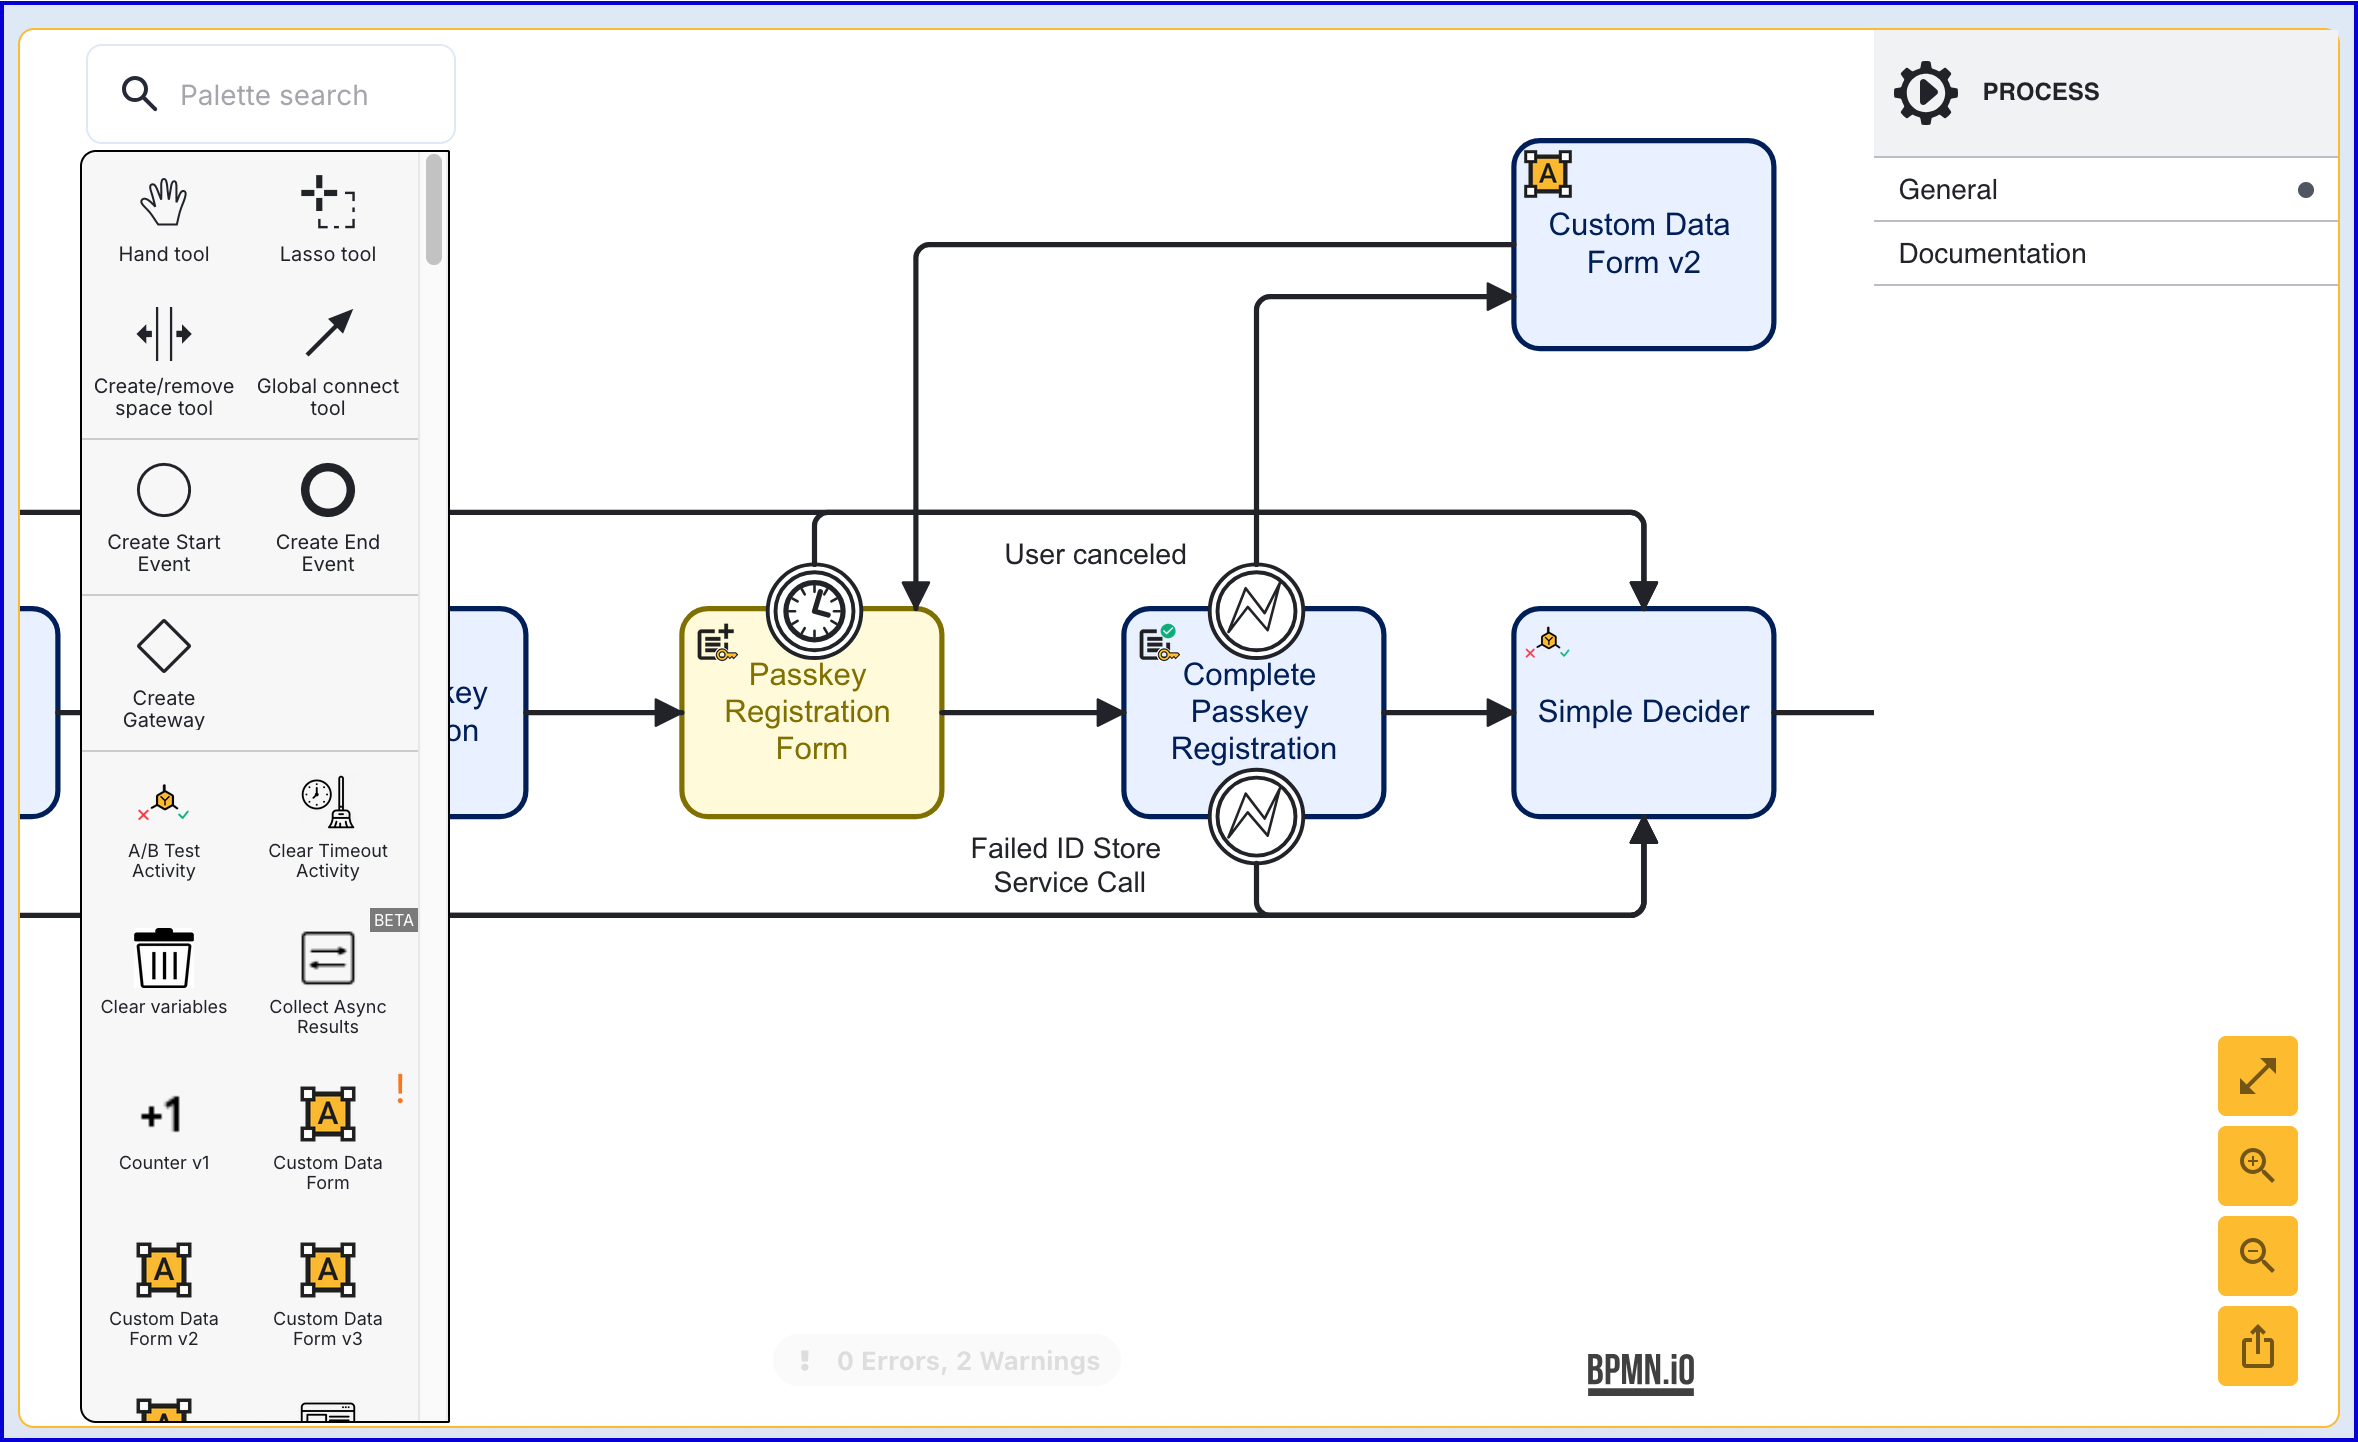
Step 6 - Complete Passkey Registration
The 'Complete Passkey Registration' activity is used to finalize the passkey registration process.
Add the 'Complete Passkey Registration' activity after the 'Passkey Registration Form' and connect using a sequence flow arrow.
The 'Complete Passkey Registration' has three configurable input parameters described in the table below:
Input Parameter | Type | Description |
|---|---|---|
Fail Check on Cancel | Boolean | If enabled, checks will fail if the end-user cancels out of the process. Default behavior is disabled. |
Passkey Registration Browser Response | String | This input parameter must be set when the passkey registration flow uses a Custom Page to collect data instead of a form. In order to complete the passkey registration, a response from the browser must be provided. This response is returned from the Custom Page and can be entered into the 'Passkey Registration Browser Response' using variable substitution.
For example:
|
Passkey Registration Key | String | The unique ID associated with the passkey registration attempt. |
This activity includes two boundary events that are described below:
User cancelled - This event is triggered when the end-user cancels the passkey registration flow.
Failed ID Store Service Call - This event is triggered when the process fails to reach the Identity Store service.
One possible handling of the error boundary event is to request a retry from the end-user. This example demonstrates a retake form that is shown after the User cancelled boundary event is triggered.
Create a new Custom Form to handle the retry flow. The example form below demonstrates a simple retry flow where the registration can be attempted again.
In the Process Definition, add a 'Custom Data Form' activity and connect it to the 'User cancelled' boundary event using a sequence flow arrow. Connect another sequence flow arrow back to the 'Passkey Registration Form' activity.
Complete Passkey Registration via API
The passkey registration process can be completed via the API by calling either:
/api/identity-store/stores/{storeName}/users/{userId}/passkeys/relyingParties/{rpId}/registrations/{regPolicyName}/api/identity-store/stores/{storeName}/users/{userExtId}/passkeys/relyingParties/{rpId}/registrations/{regPolicyName}/ext endpoints.
Permissions: TNT#{tenant}#IdentityStore:createPasskeyRegistrationForUser, TNT#{tenant}#IdentityStore:createPasskeyRegistrationForUserByExtId , TNT#{tenant}#IdentityStore:createPasskeyRegistration
Example Request:
The {sessionId} is supplied by the response of the Start Passkey Registration API response seen above.