Early Access
Introduction
TrustX Offers identity verification through biometric face authentication. An Identity Store User with an associated face image can be authenticated against a live captured face image to verify the identity of the end-user.
This guide will describe the steps required to:
Capture an image and add the face to an Identity Store User.
Capture a second image and perform face match authentication.
Manually lock a User if the number of match attempts exceeds the configured limit.
Completing Face Authentication
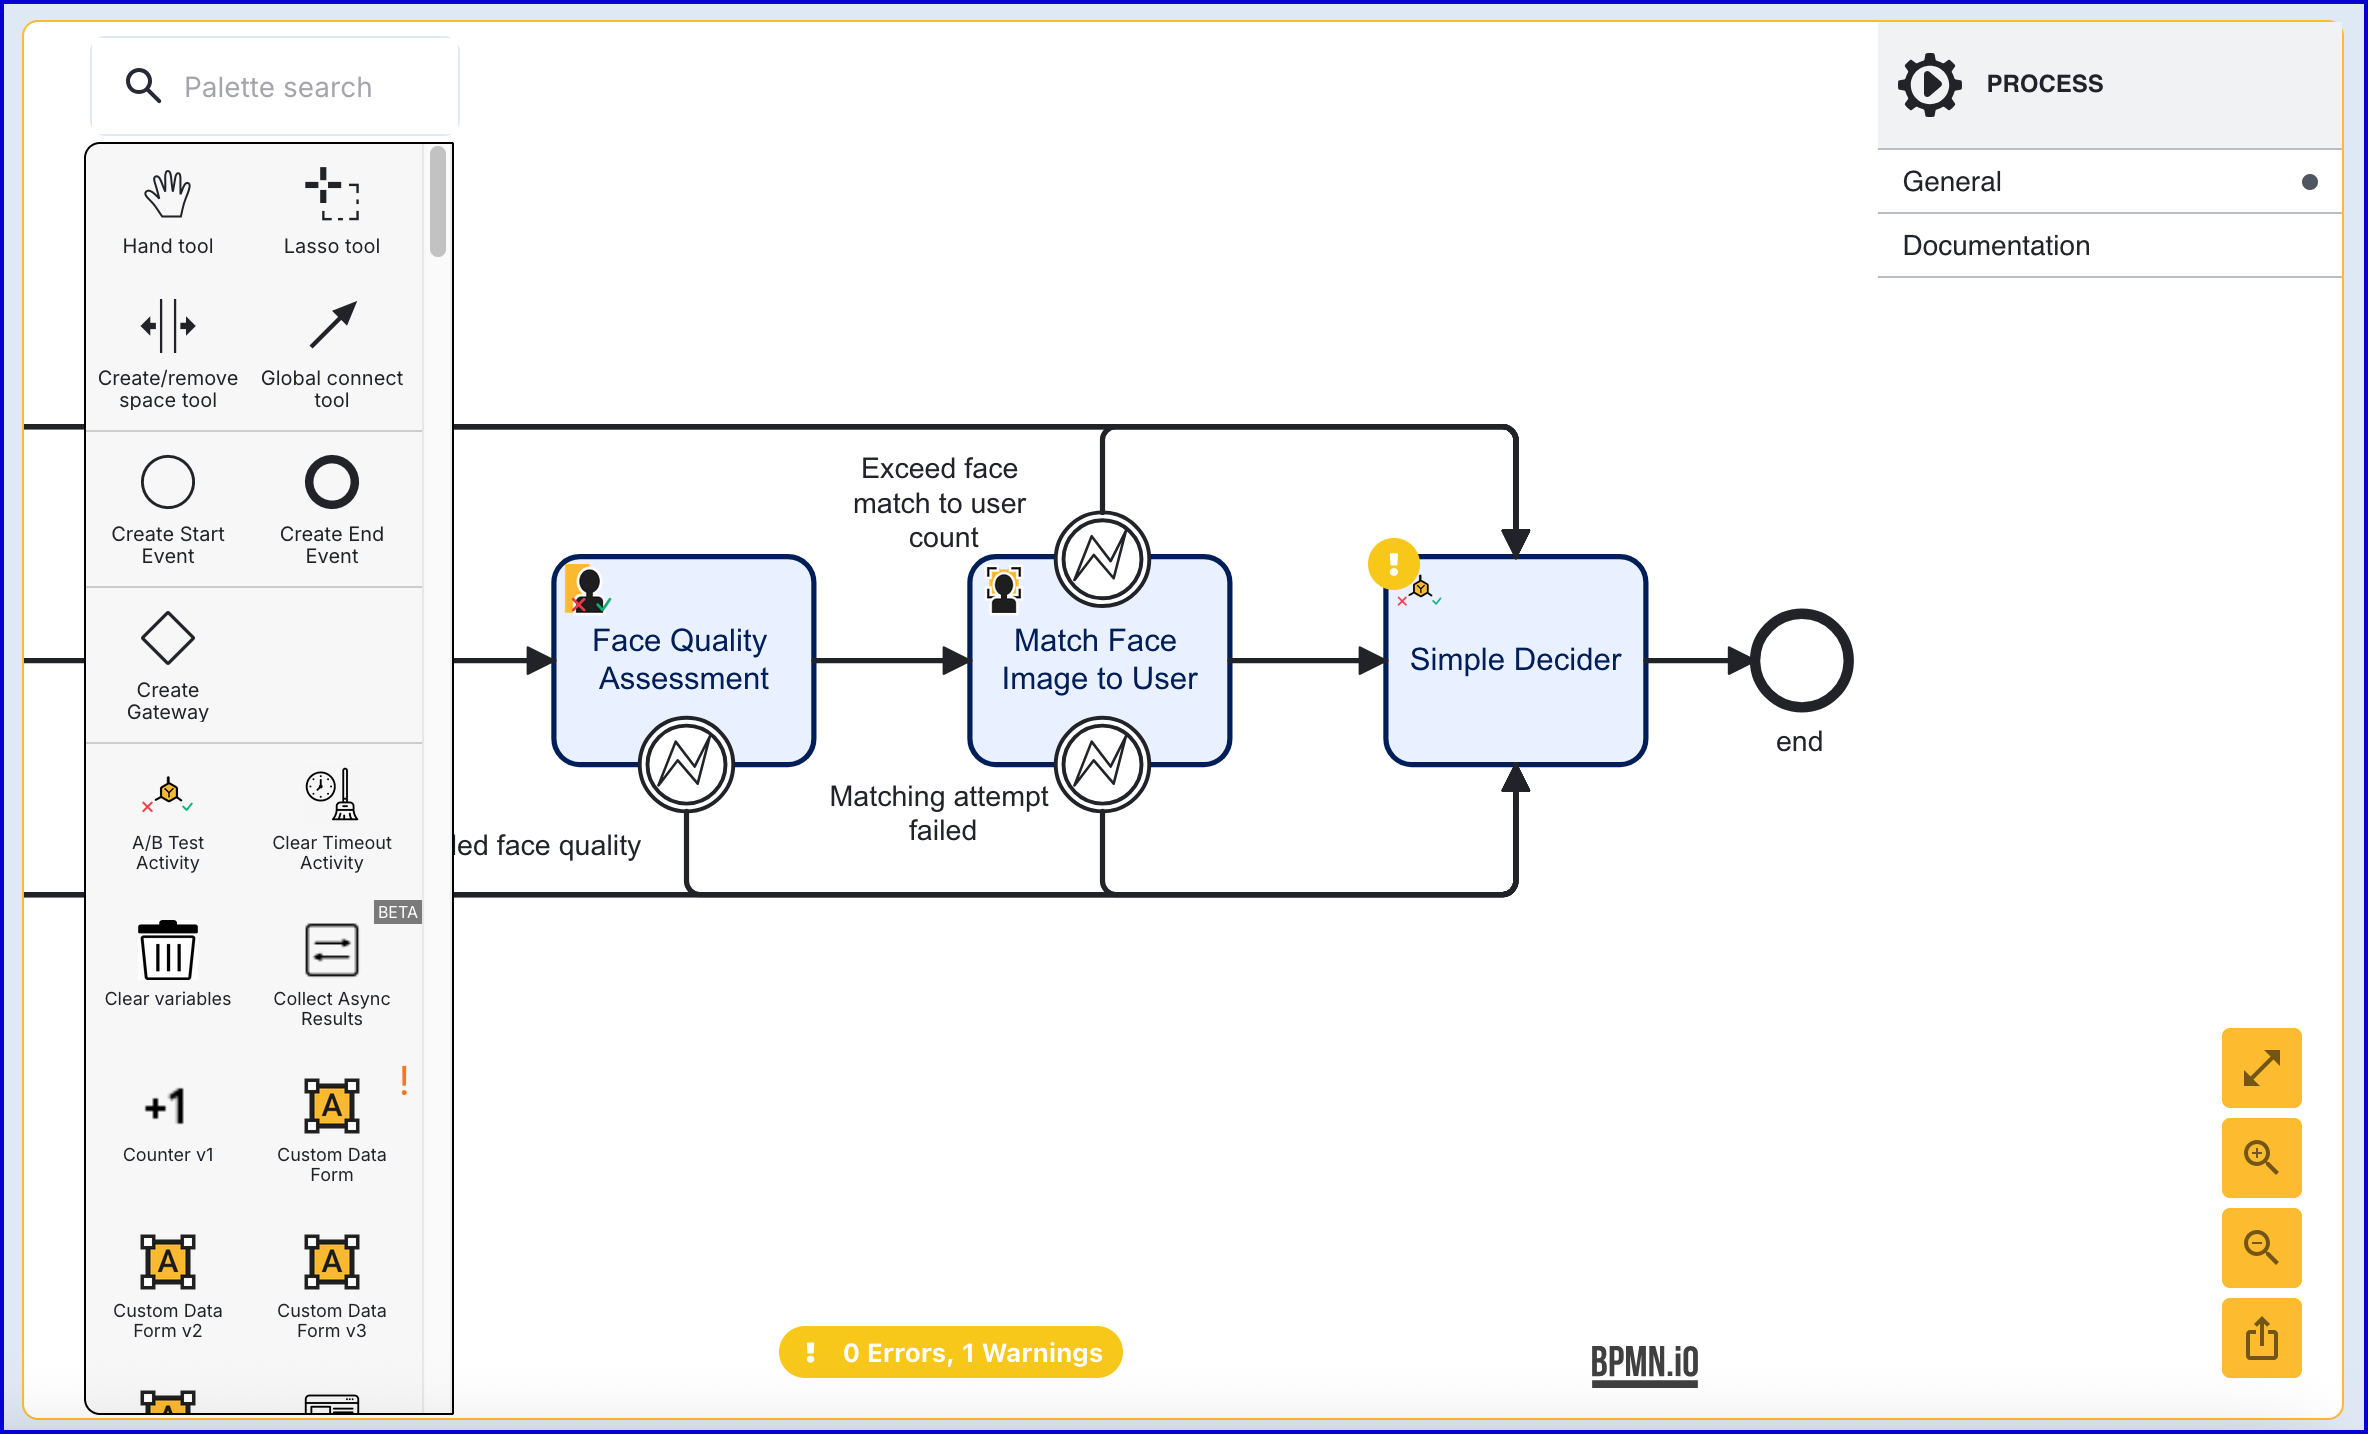
This example flow demonstrates:
Creating a new User in an identity store
Enrolling a face to that User
Capture a User’s face
Match the captured face against the enrolled face
Typically face enrollment and matching will be two separate flows. This document performs both in one flow as an example.
Step 1 - Add a User (Optional)
This step is only required if the User has not been added to the Identity Store. See Managing Users for more information on adding a User.
The 'Add User' activity is used to add a new User to an Identity Store. Find the activity and connect it to the 'Start' and 'End' events using a sequence flow arrow.
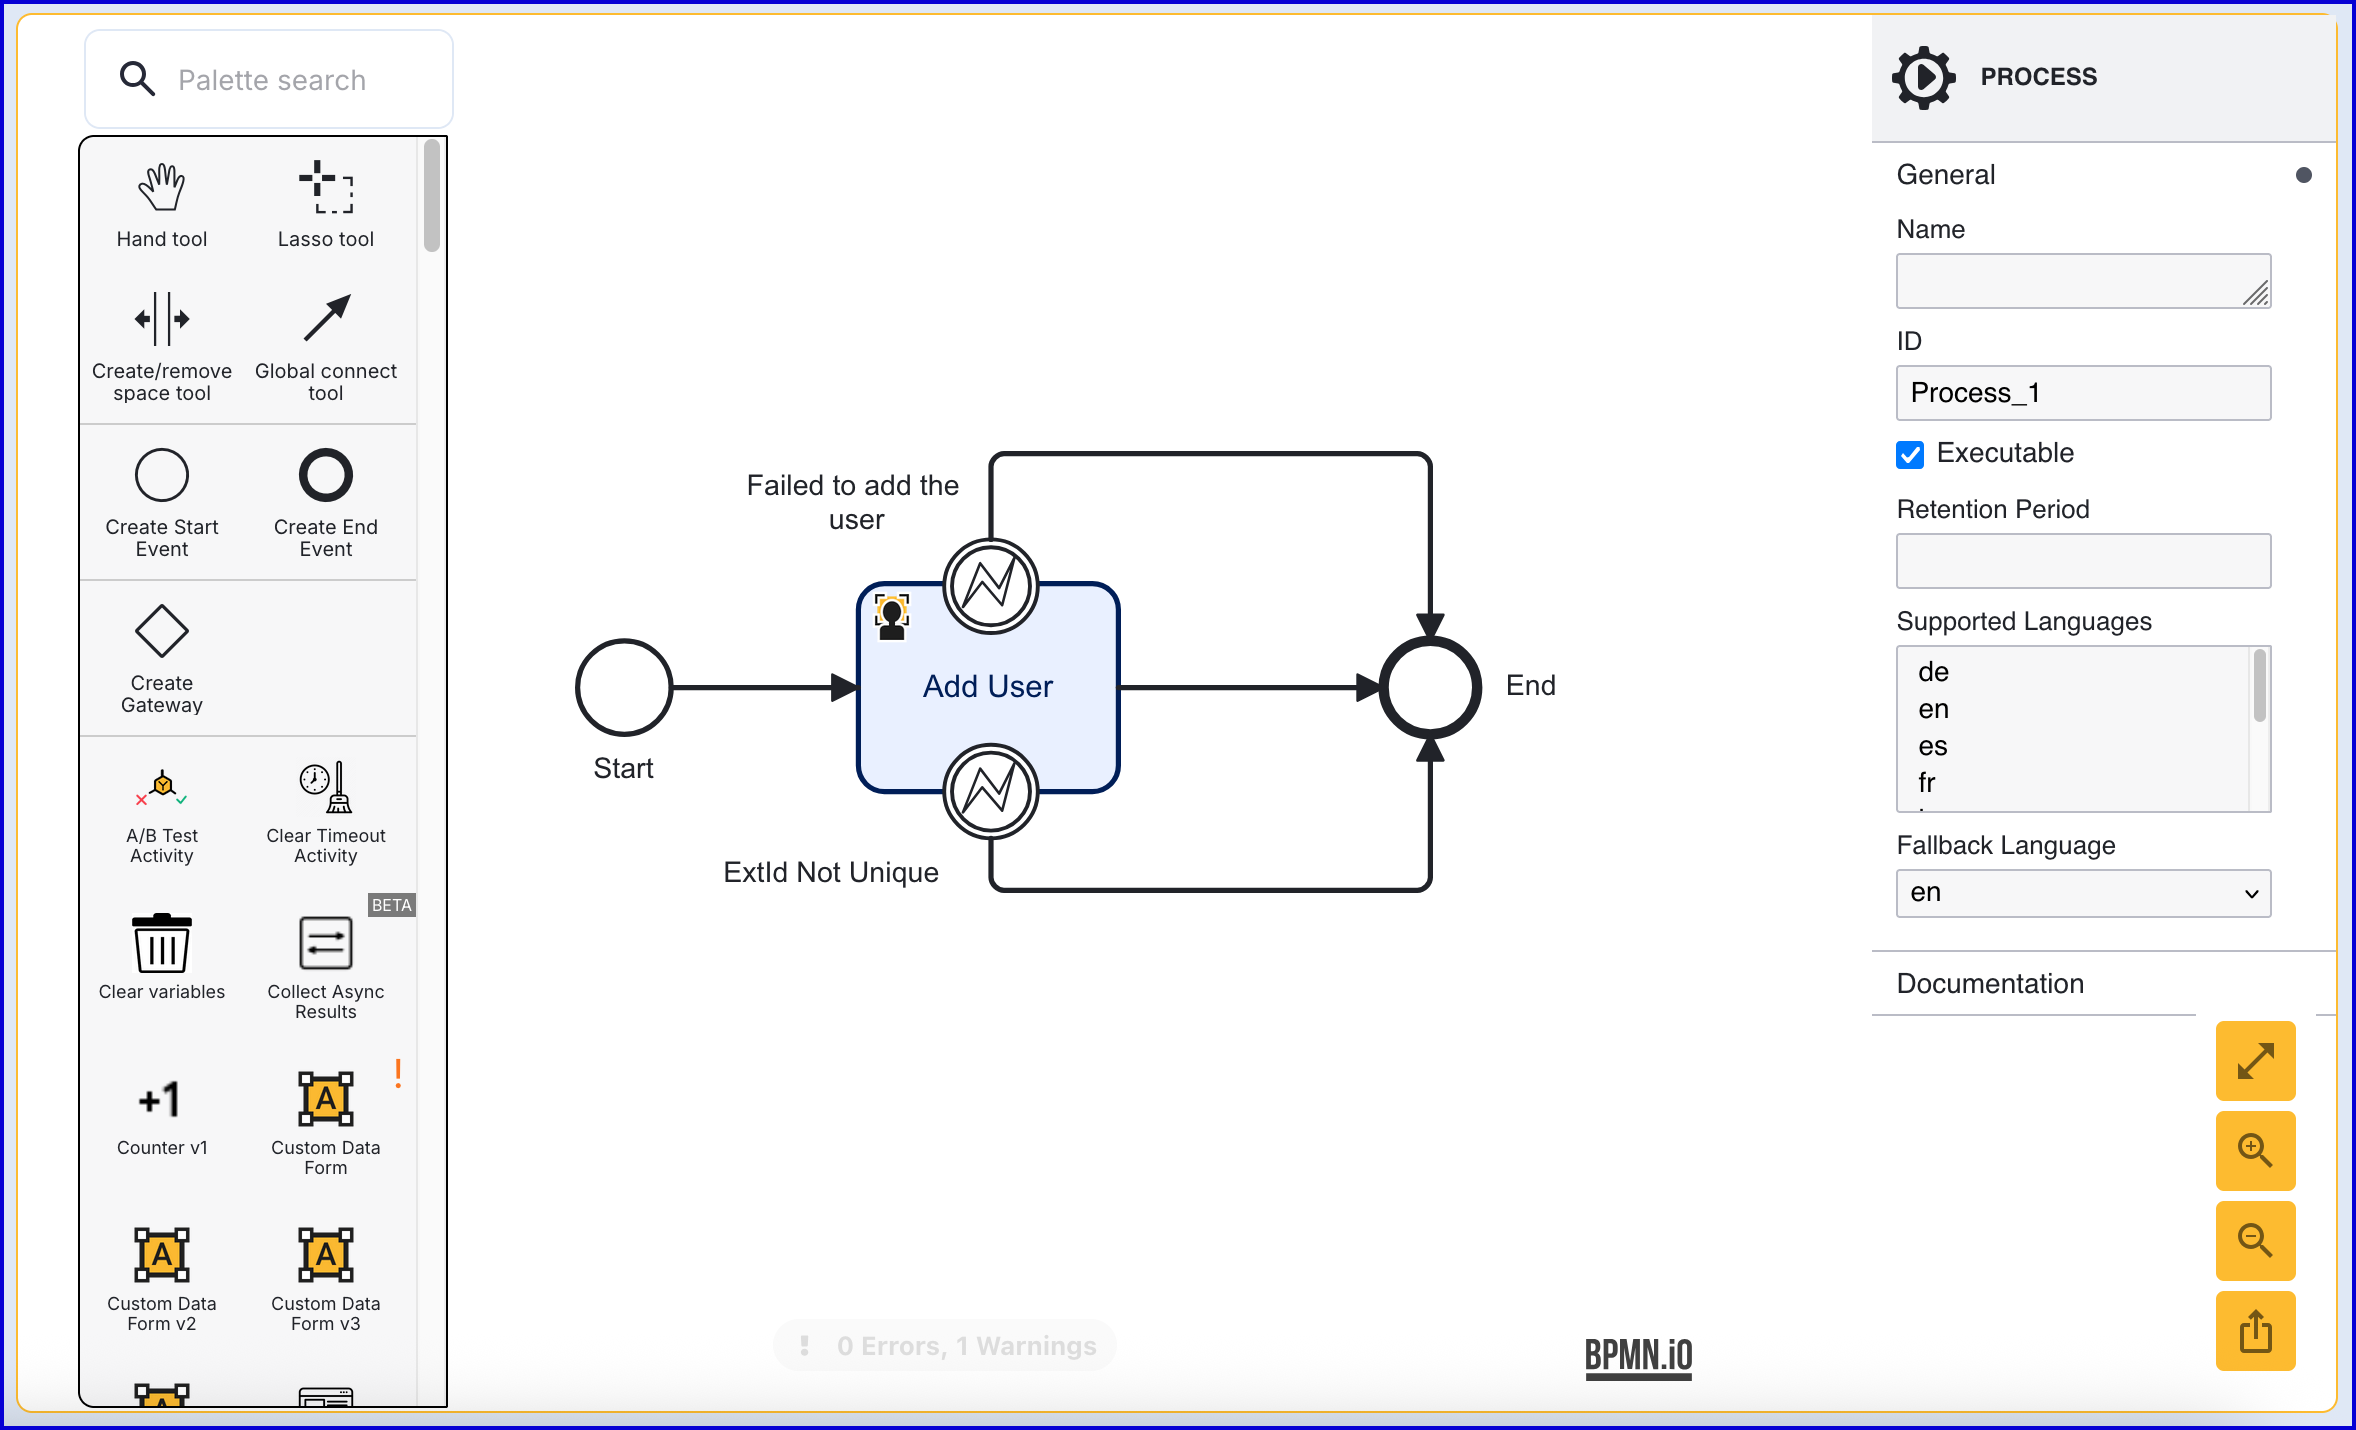
The 'Add User' activity includes two error events. In this example, the error events have been connected to the 'End' event.
Failed to add the user - This event is triggered when an error occurs adding the User to the Identity Store.
ExtId Not Unique - This event occurs if the External ID provided is not unique.
Click the 'Add User' activity to open the right-side contextual menu. Using the available input parameters, information about the User can be defined, including the External ID and which Identity Store the user will be added to.
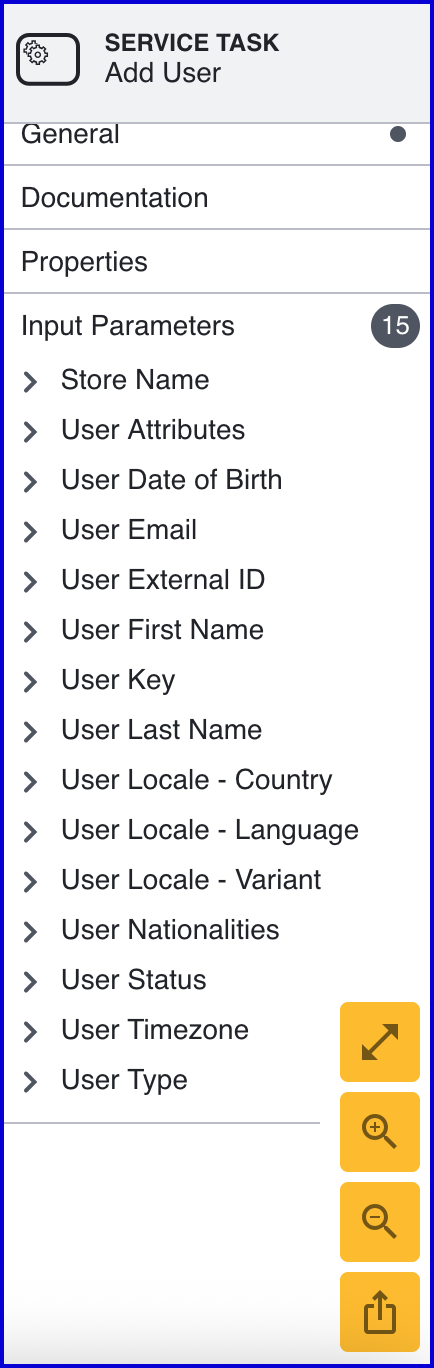
When creating a User, the following input parameters are available:
Input Parameter | Type | Description |
|---|---|---|
Store Name* | String | Required - Represents the Identity Store that the User will be added to. |
User Attributes | <String, String> | A key-value pair of additional optional attributes used to describe the User. |
User Date of Birth | Date | The User's date of birth in the format: "yyyy-mm-dd" |
User Email | String | The User's email address in the format: "example@domain.com" |
User External ID | String | A unique User ID. If no ID is required, an external ID will be generated automatically by TrustX. |
User First Name | String | The first name of the User. |
User Key* | String | Required - A key used to identify the User. |
User Last Name | String | The last name of the User. |
User Locale - Country | String | The User country. |
User Locale - Language | String | A two-letter ISO-639 formatted language tag. |
User Locale - Variant | String | A variant subtag of the User country. 5-8 letters or 4 characters starting with a digit, separated by hyphens. |
User Nationalities | String | The nationality of the User. |
User Status | String | The User status indicates whether the User is in a pending, active, locked or disabled state. |
User Timezone | String | The timezone of the User Country. This value must be in line with TZDB code format. Example: EST. |
User Type | String | An optional parameter used for organizing Users into different types. A maximum of 64 characters is allowed. |
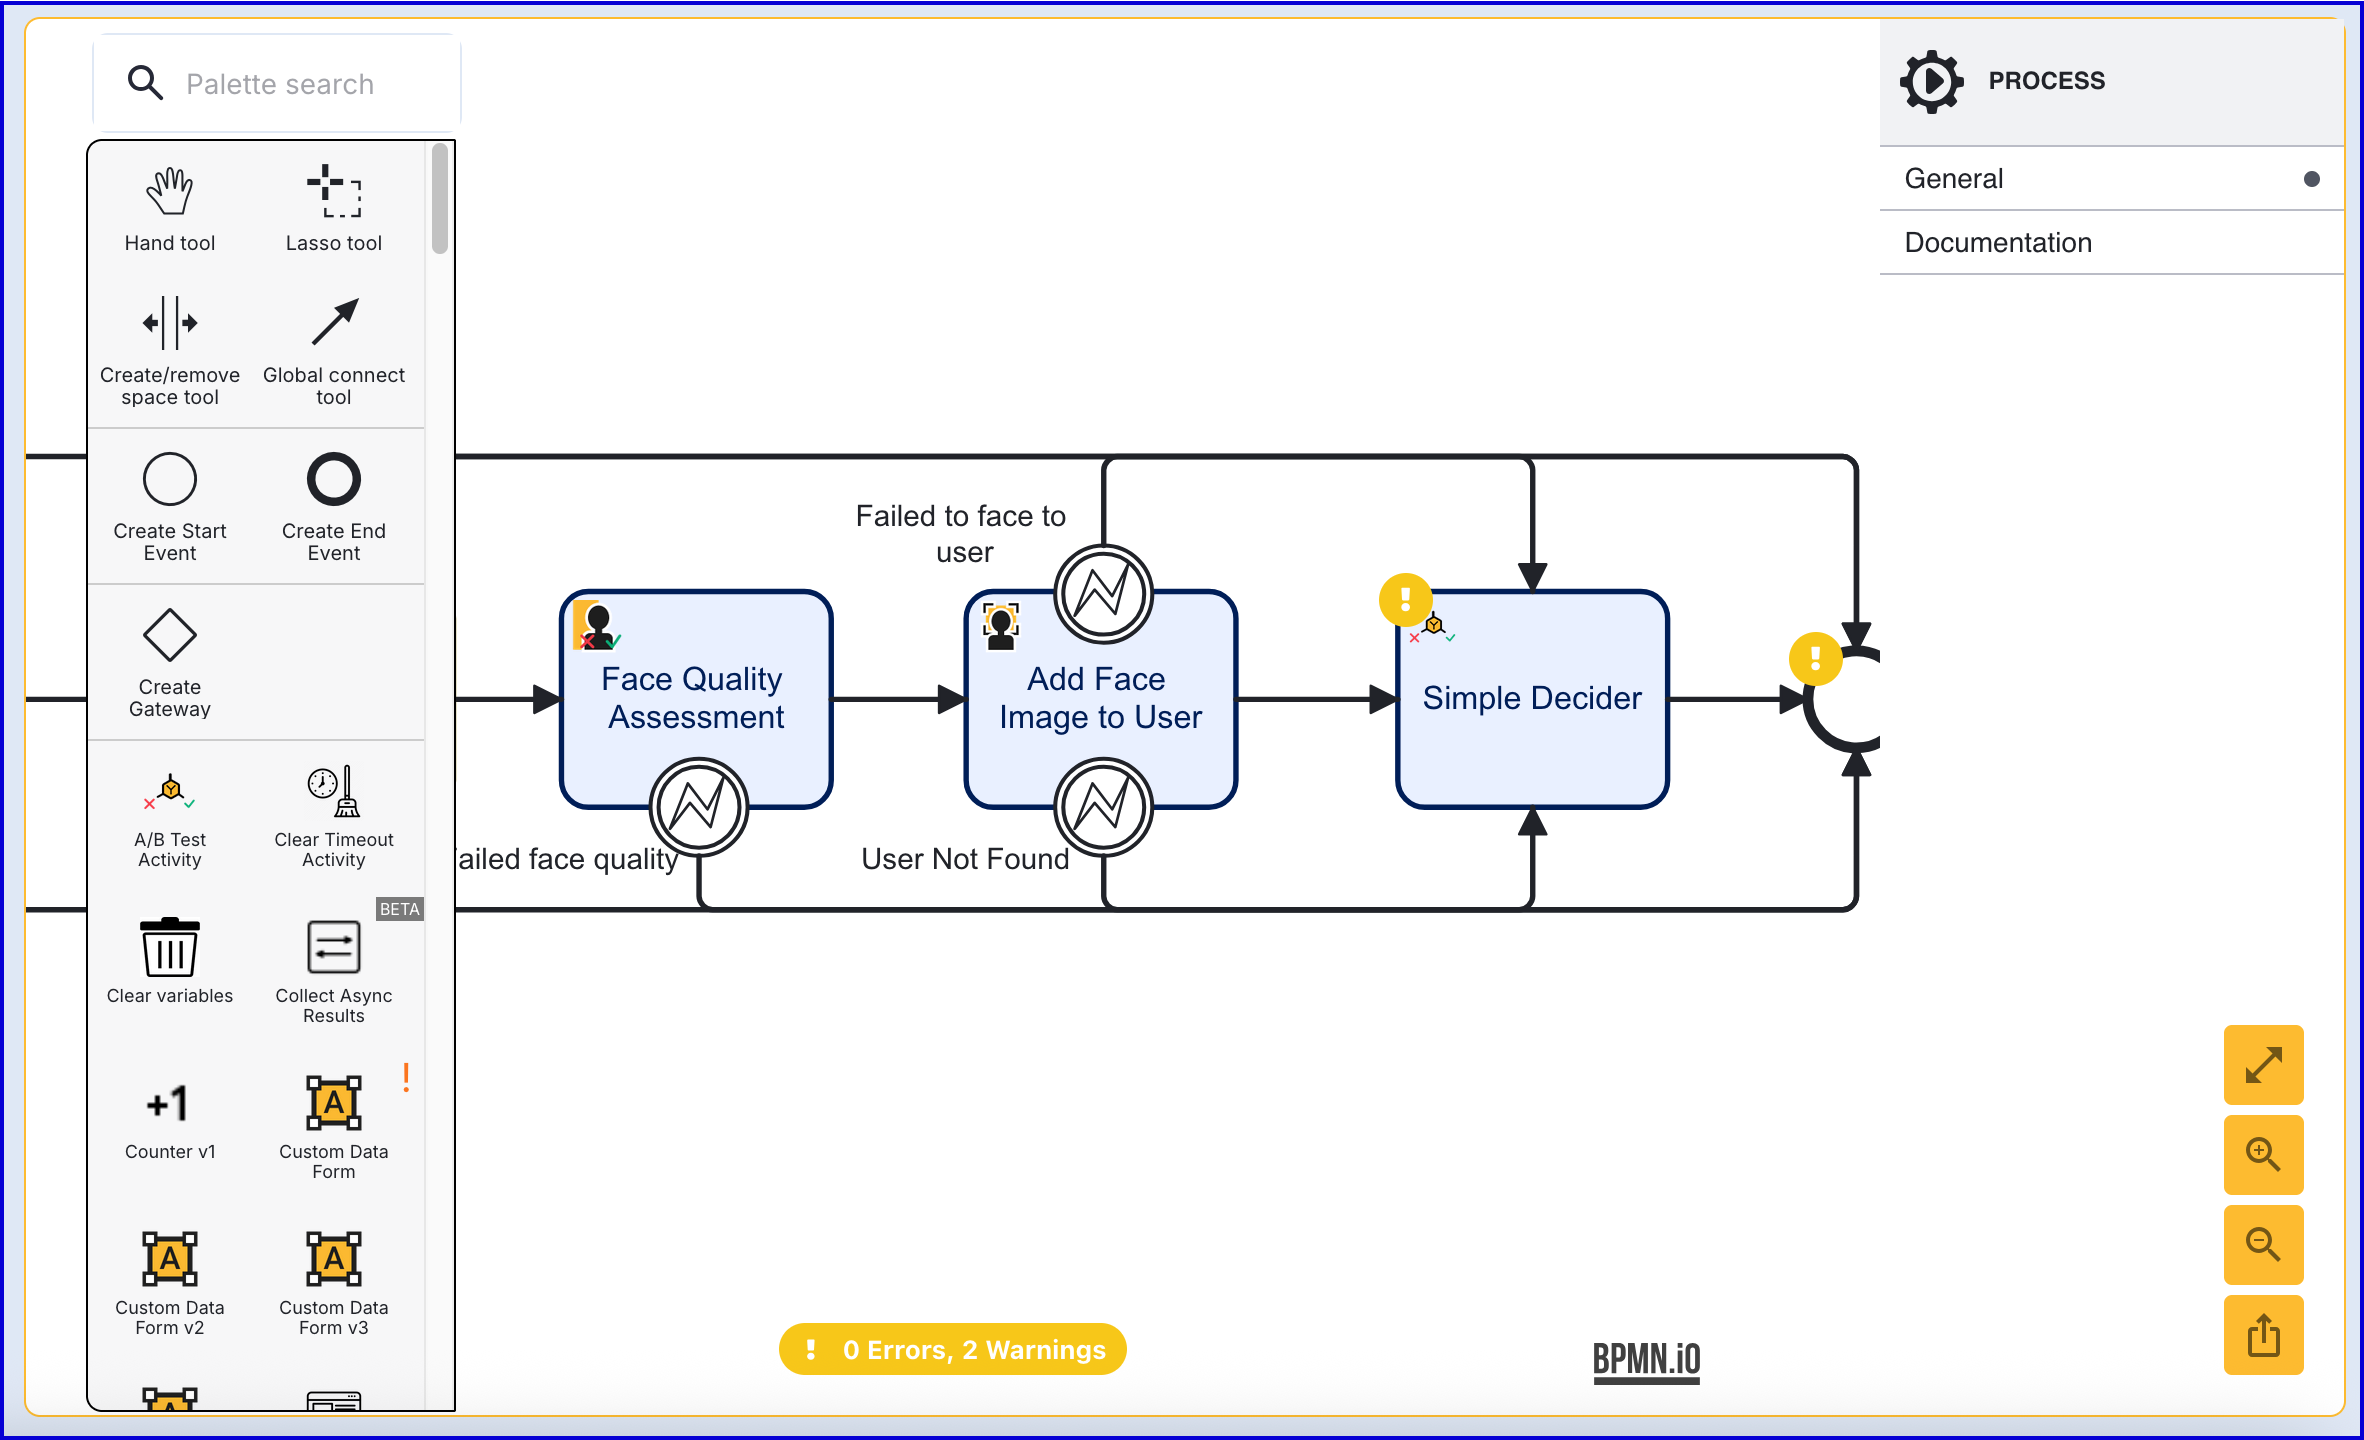
Step 2 - Configure the Face Capture Process
Add a 'Capture Face Image' or 'Capture Face Image V2' activity to capture a face image.
Perform a face quality assessment using a 'Face Quality Assessment' activity.
Connect the activities using sequence flow arrows. In this example, a 'Simple Decider' activity has also been added.
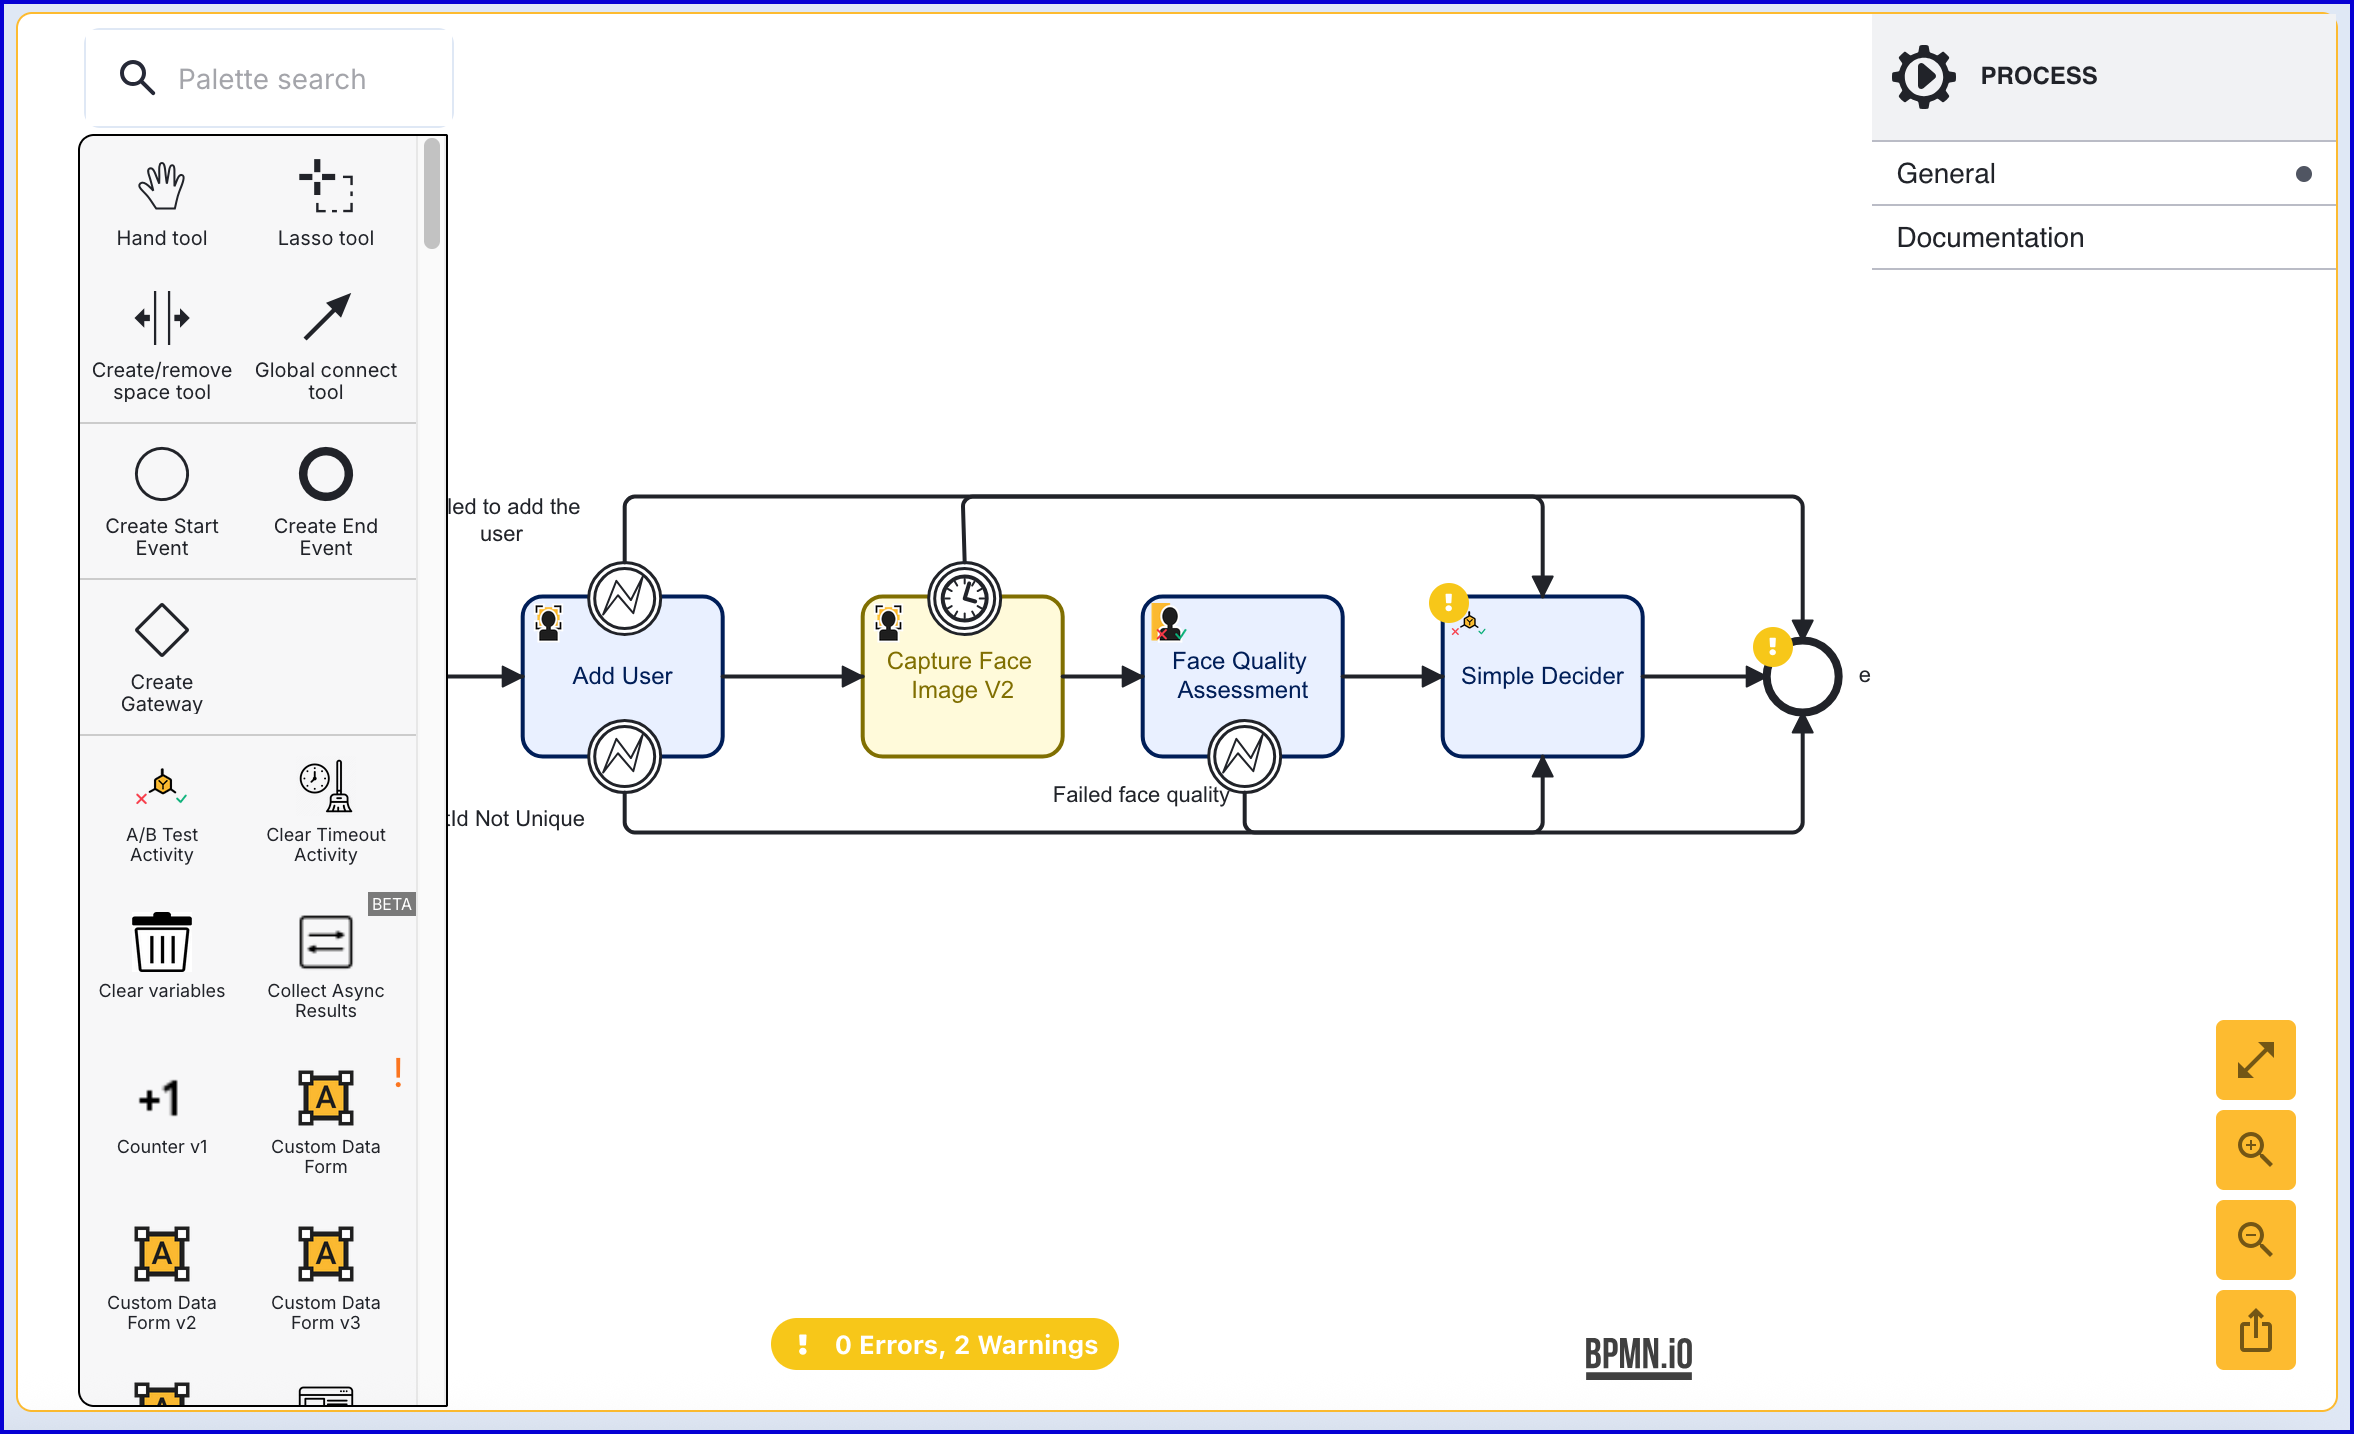
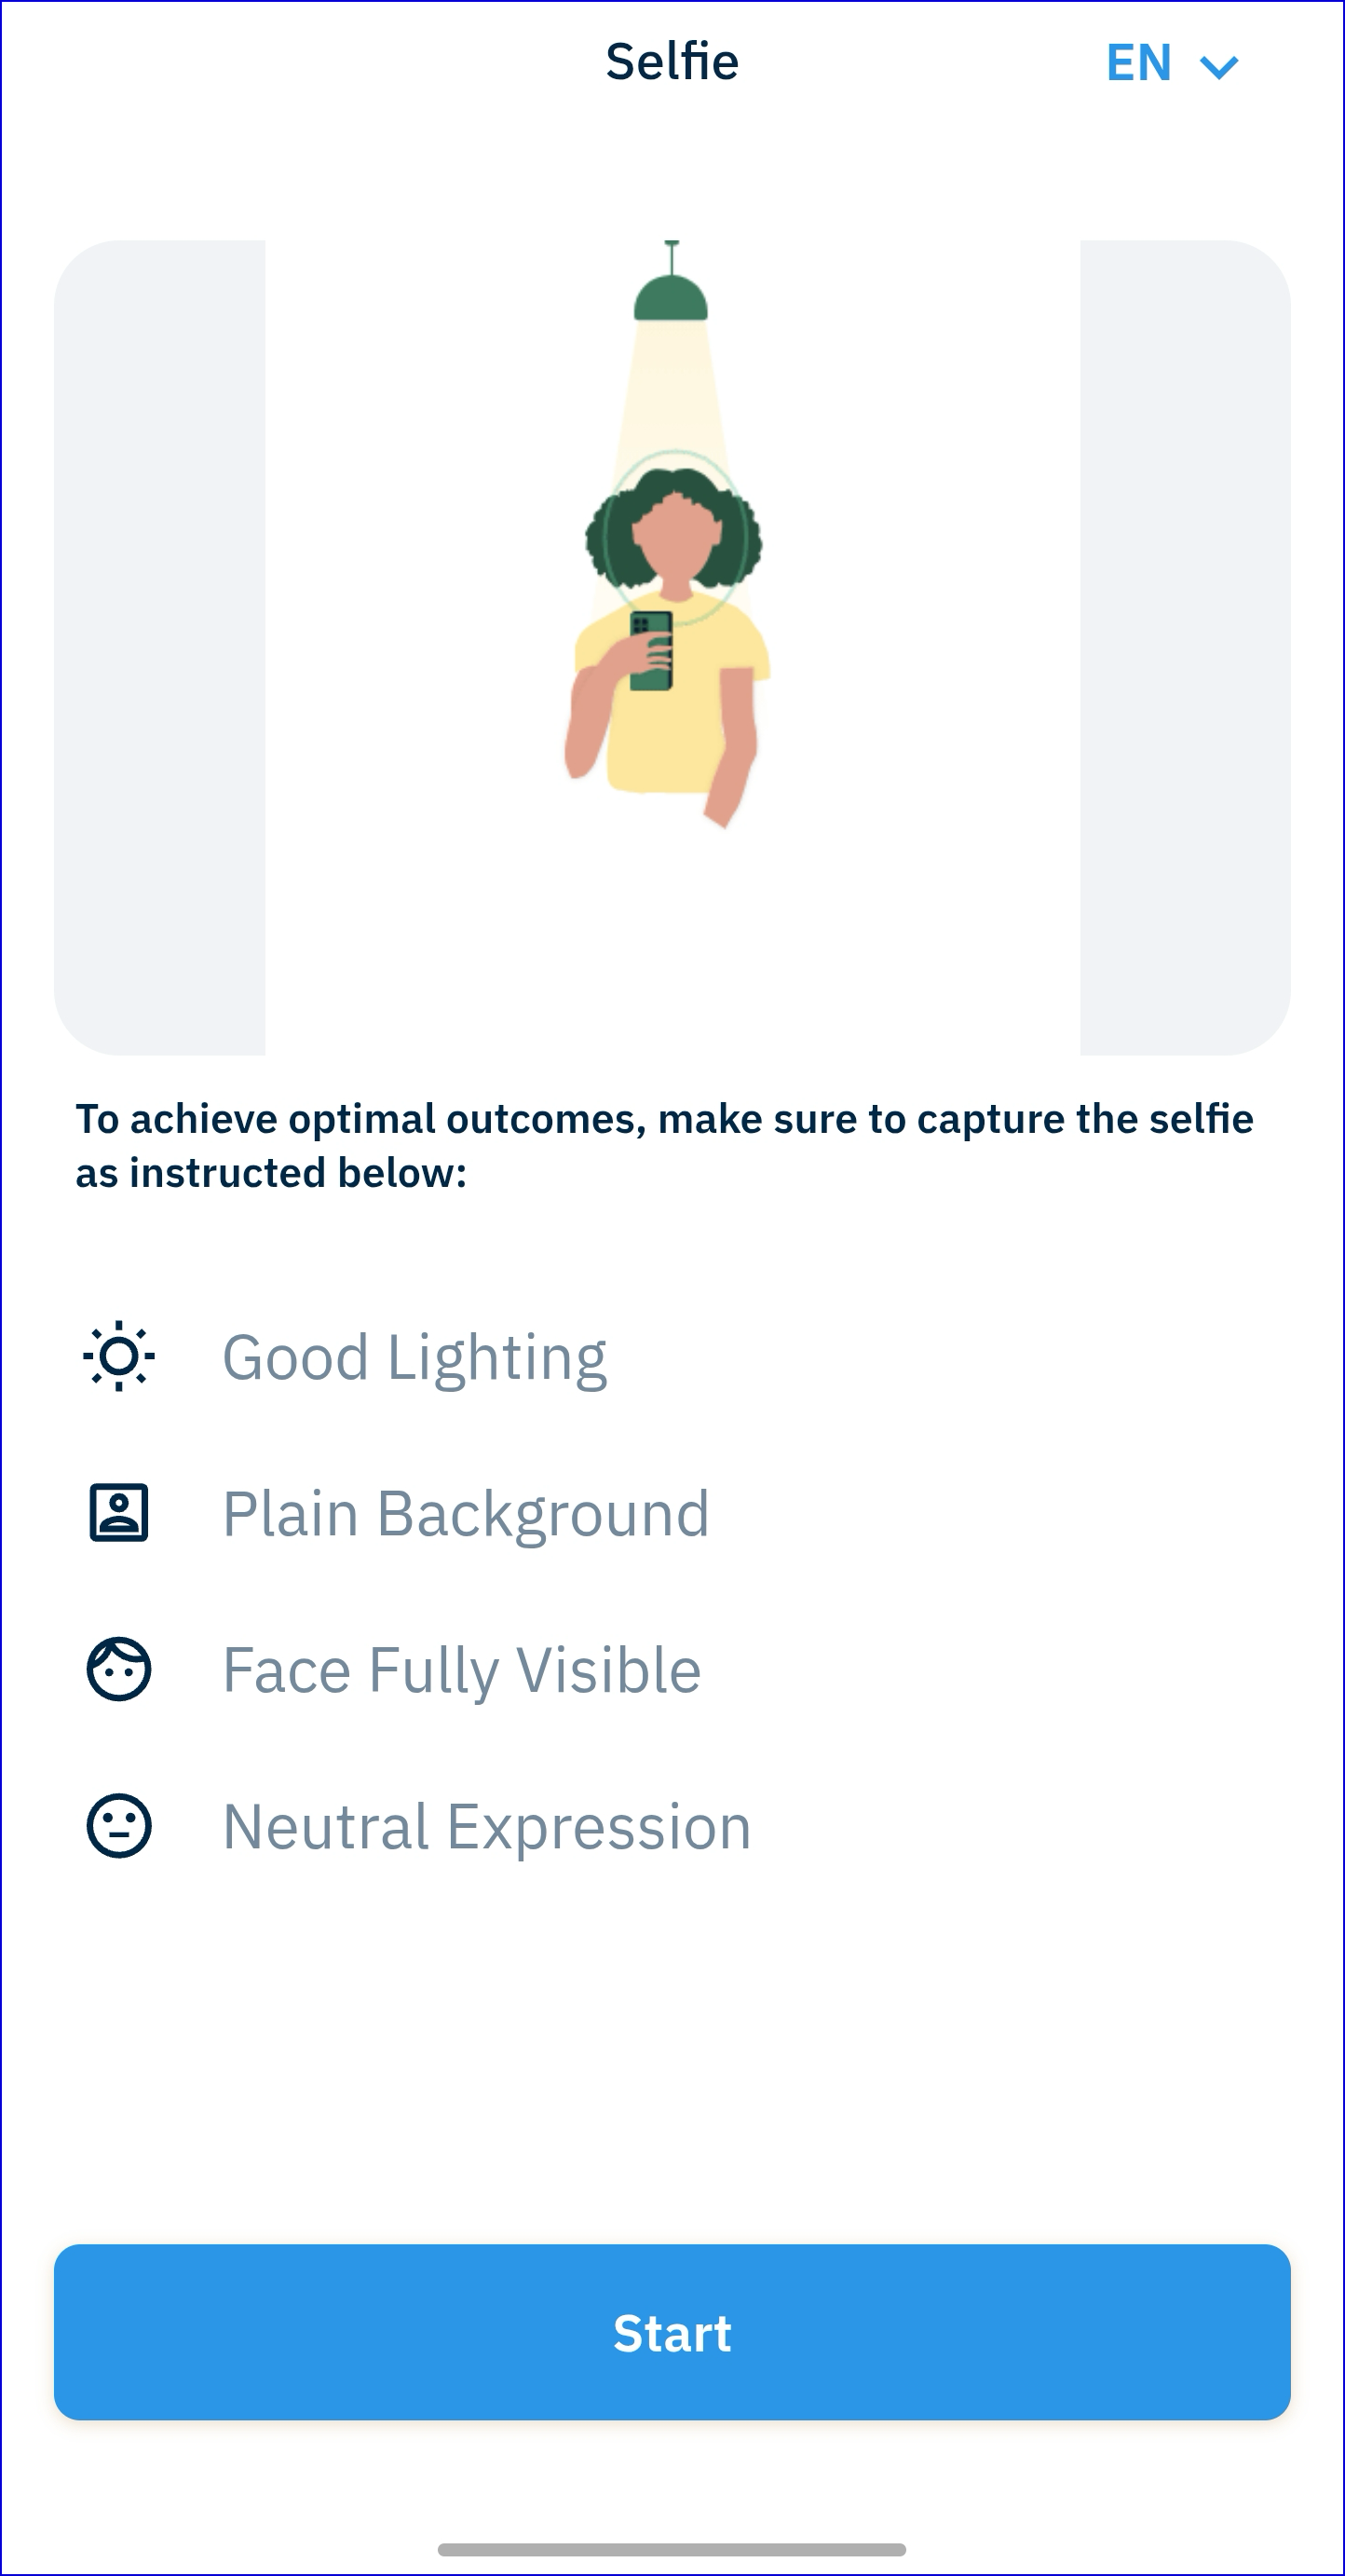
When starting the Process Instance, the end-user will be prompted to capture a face image:
Step 3 - Add Face Image to User Activity
The 'Add Face Image to User' activity stores a face image against a user and transforms the image into one or more face biometric templates which are mathematical representations of the image which are stored with the user and are used when performing a face match.
Add the 'Add Face Image to User' activity and connect them using a sequence flow arrow.
Click the 'Add Face Image to User' activity to open the right-side contextual menu to configure the input parameters.
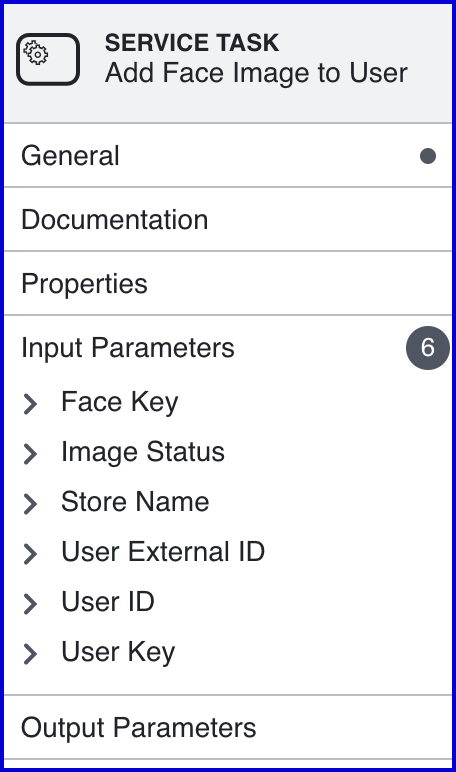
It is important to configure each of the following parameters to ensure the correct face image, User, and Identity Store are used.
Input Parameter | Description |
|---|---|
Face Key | This represents the key of the captured face image. This should match with the face captured during the Process Instance. |
Store Name | The name of the Identity Store that contains the User |
User External ID | This property can be used to identify the User that the face image will be added to. |
User ID | The unique ID automatically generated when the User is created. In the context of the 'Start Passkey Registration' activity, this ID can be used to identify the User that the face image will be added to. |
User Key | The User Key that can be used to identify the User that the face image will be added to. |
When defining which User the the face image will be added to, only one of the User ID input parameters is required.
Add Face Image to User Via API
Alternatively, a face image can be added to a User via the TrustX API.
Endpoints:
/api/identity-store/stores/{storeName}/users/{userExtId}/biometrics/ext/api/identity-store/{tenantId}/stores/{storeName}/users/{userId}/biometrics
This query can be used to add or update an existing face biometric associated with a User.
The type, subtype and data fields of the biometric object are mandatory and the data must match the subtype .
Permissions: TNT#{tenant}#IdentityStore:addUserBiometricByExtId , TNT#{tenant}#IdentityStore:addUserBiometric
Example Request:
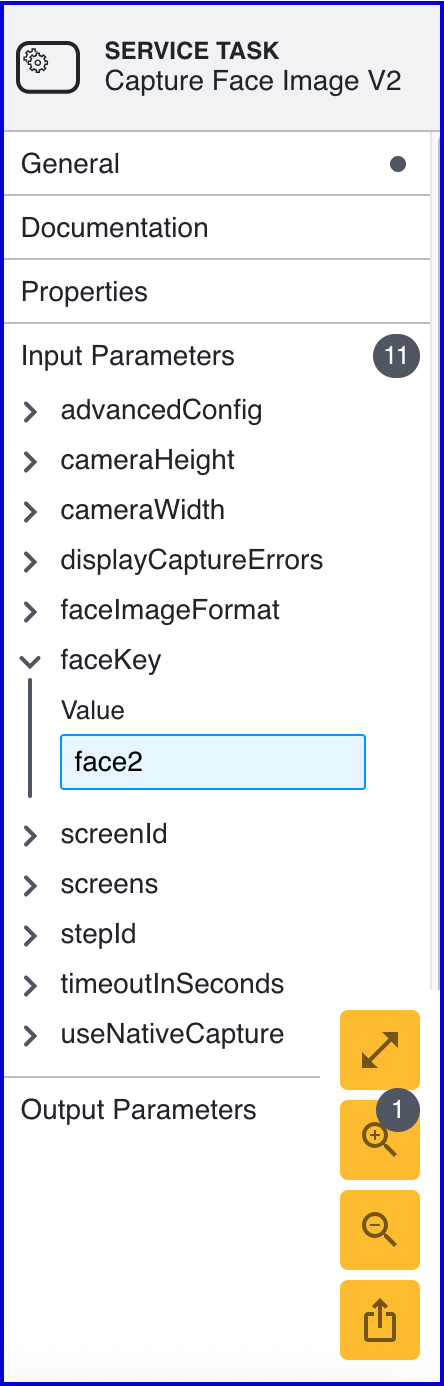
Step 4 - Capture a Second Face Image
In this step, the face capture process from Step 2 is repeated to capture a face that will be used to compare against the User face image.
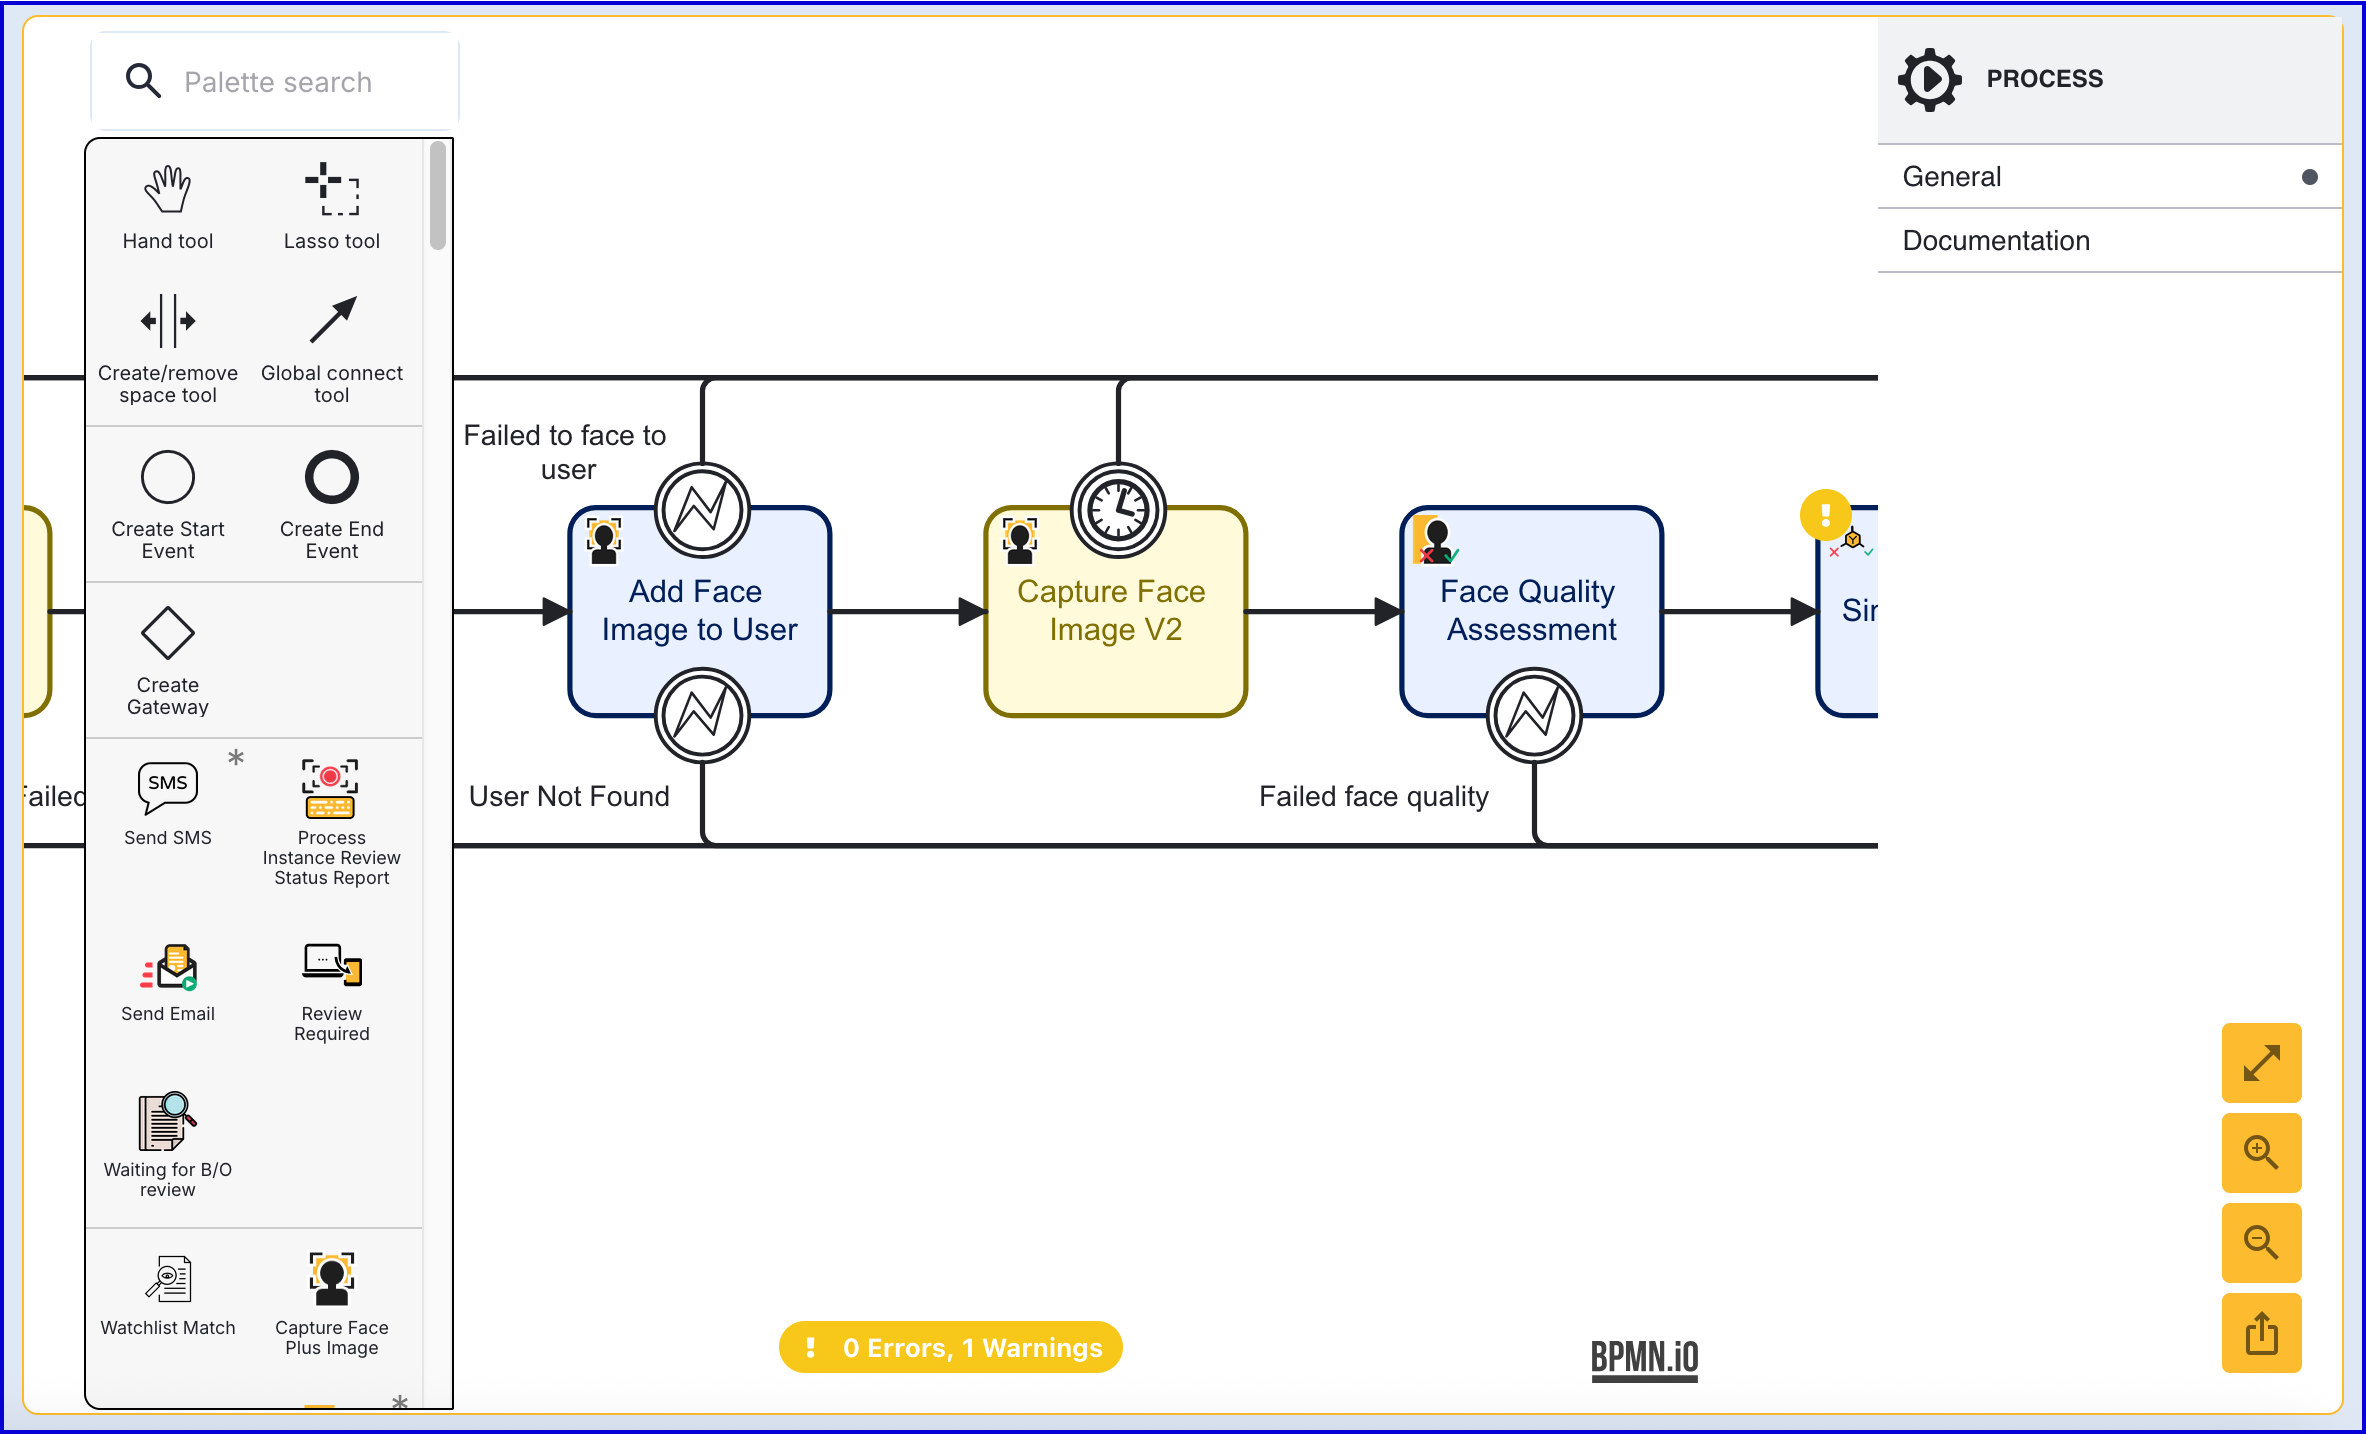
To distinguish between the first captured face image, the face key must be set within the input parameters. In this example, the second face key is set to face2:
Step 5 - Perform Face Match Authentication
The 'Match Face Image to User' activity matches a User’s enrolled face against a captured face.
The face image to be matched must have previously been captured using an existing TrustX activity as shown in the example flow and is referenced by a face key, for example face2 in this example to distinguish it from the enrolled face, face1. The Identity Store and User against whom the matching will take place must be set.
The User may be referenced either by the user ID or external ID depending on the scenario. The updated User will be stored and referenced by the provided Identity Store user key which defaults to user1. The maximum number of attempts defaults to 3 after which a boundary event is triggered as shown in the example process definition diagram below.
Add the 'Match Face Image to User' activity to the Process Designer and connect after the second 'Face Quality Assessment' is completed.
The 'Match Face Image to User' has the following configurable input parameters:
Input Parameter | Type | Description |
|---|---|---|
Error navigation screen | String | The screen that will be displayed when an error is shown. |
Exception on Match Attempts Exceeded | Boolean | If enabled, an exception will be thrown when the allotted maximum attempts is exceeded. |
Face Key | String | The face key that the User will be matched against. In this example, the Face Key will be set to |
Max Attempts | Integer | The maximum number of match attempts before an exception is thrown. |
Store Name | String | The name of the Identity Store that contains the User. |
User External ID | String | This property can be used to identify the User that the face matching will be performed for. |
User ID | String | The unique ID automatically generated when the User is created. In the context of the 'Start Passkey Registration' activity, this ID can be used to identify the User that face matching will be performed for. |
User Key | String | The User Key that can be used to identify the User that the face matching will be performed for. |
When verification is completed, the end-user will receive confirmation from TrustWeb.

Perform Face Match Via API
It is also possible to perform a Face Match via the TrustX API by using the /api/identity-store/stores/{storeName}/users/{userId}/biometrics/authentications/face endpoint.
A face match sample must be provided with a type of Face, a subtype of Image or a supported template type, the data set to the image or template data and a status, typically set to ACTIVE.
If the storeAudit configuration field is set to true in the identity store's biometric authentication configuration then a detailed audit of the biometric authentication is created.
Permissions: TNT#{tenant}#IdentityStore:matchFace
Step 6 - Error Handling and Locking
Locking configuration is configured on an Identity Store which can define how many failed authentications results in a temporary or permanent user lock. Every time a face authentication fails the User lock status is updated as dictated by the configuration. For more information on locking via Identity Store configuration, see the Managing Identity Stores guide.
It is also possible to hard lock and unlock a User during a process using the 'Lock User' and Unlock User' activities.
Add a 'Lock User' activity to the Process Designer and connect it to the 'Exceed face match to user count' error boundary event. This will lock the User if the max attempts count is exceeded.
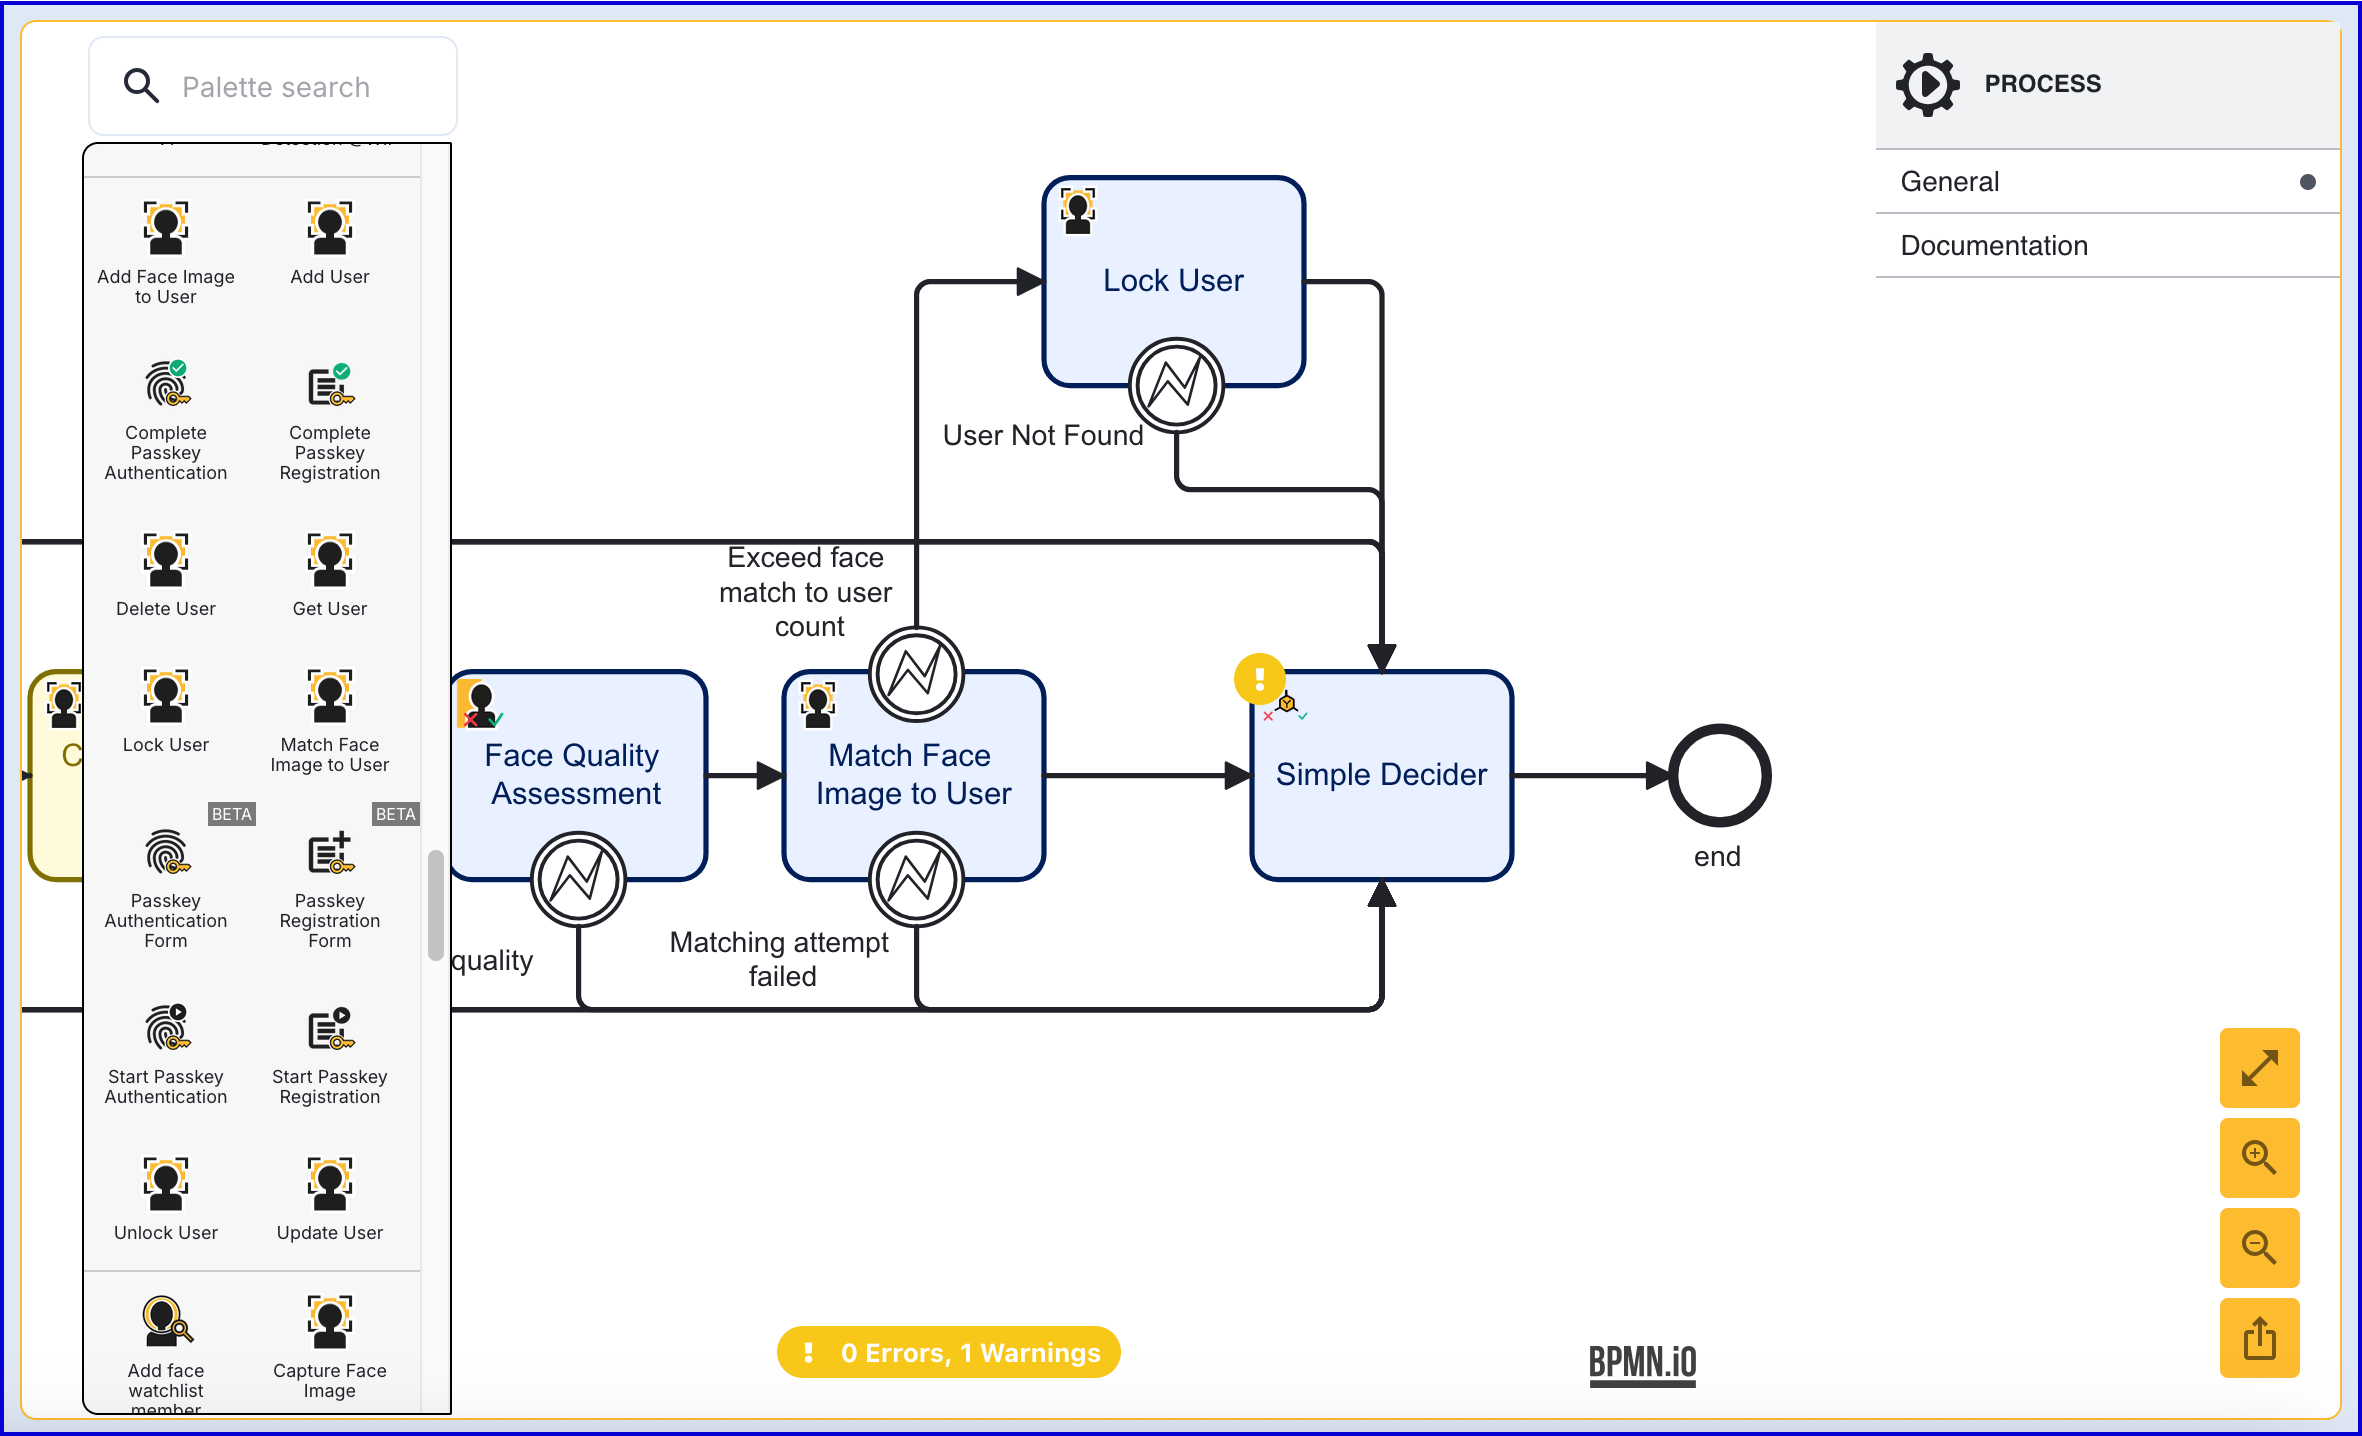
In the example configuration above, the User will become locked if the count of failed face matches is exceeded. Finally, the flow will end. The 'Lock User' activity contains the following input parameters:
Input Parameter | Type | Description |
|---|---|---|
Store Name | String | The name of the Identity Store containing the User. |
User External ID | String | This property can be used to identify the User that the face matching will be performed for. |
User ID | String | The unique ID automatically generated when the User is created. In the context of the 'Start Passkey Registration' activity, this ID can be used to identify the User that face matching will be performed for. |
User Key | String | The User Key that can be used to identify the User that the face matching will be performed for. |