Early Access
Appkeys can be integrated in TrustX using a silent, device-bound, solution where the authentication is tied to the device used to register the Appkey. This solution means end-users will not be required to register any biometric and binds the authentication to only one device.
This document will describe how to configure a Process Definition and flow that will integrate Appkeys using a device-bound authentication solution.
Integrating Trust and FIDO SDKs
The most secure method of storing Appkeys is to store the Appkey on a device by integrating a native application with the Trust SDK. Alternatively, Appkeys will be stored via the web browser, however this method is less secure.
Daon recommends integrating the Trust SDK first before continuing with the steps outlined in this guide.
Trust SDK Integration
Configuring the TrustX Appkey Web SDK
The Daon Appkey Javascript library provides secure biometric registration and authentication capabilities for web and mobile environments. It offers a simple JavaScript API for implementing user registration and authentication workflows that can be integrated with TrustX API.
The Appkey Web SDK can be installed using NPM:
For Android applications, if you are using Typescript, it is also required to add the following:
Usage Example:
A full explanation of the SDK can be found in the TrustX Appkey Web SDK guide.
See the Appkey Web SDK API Reference guide for a full API reference.
Configuring the Authentication Policy
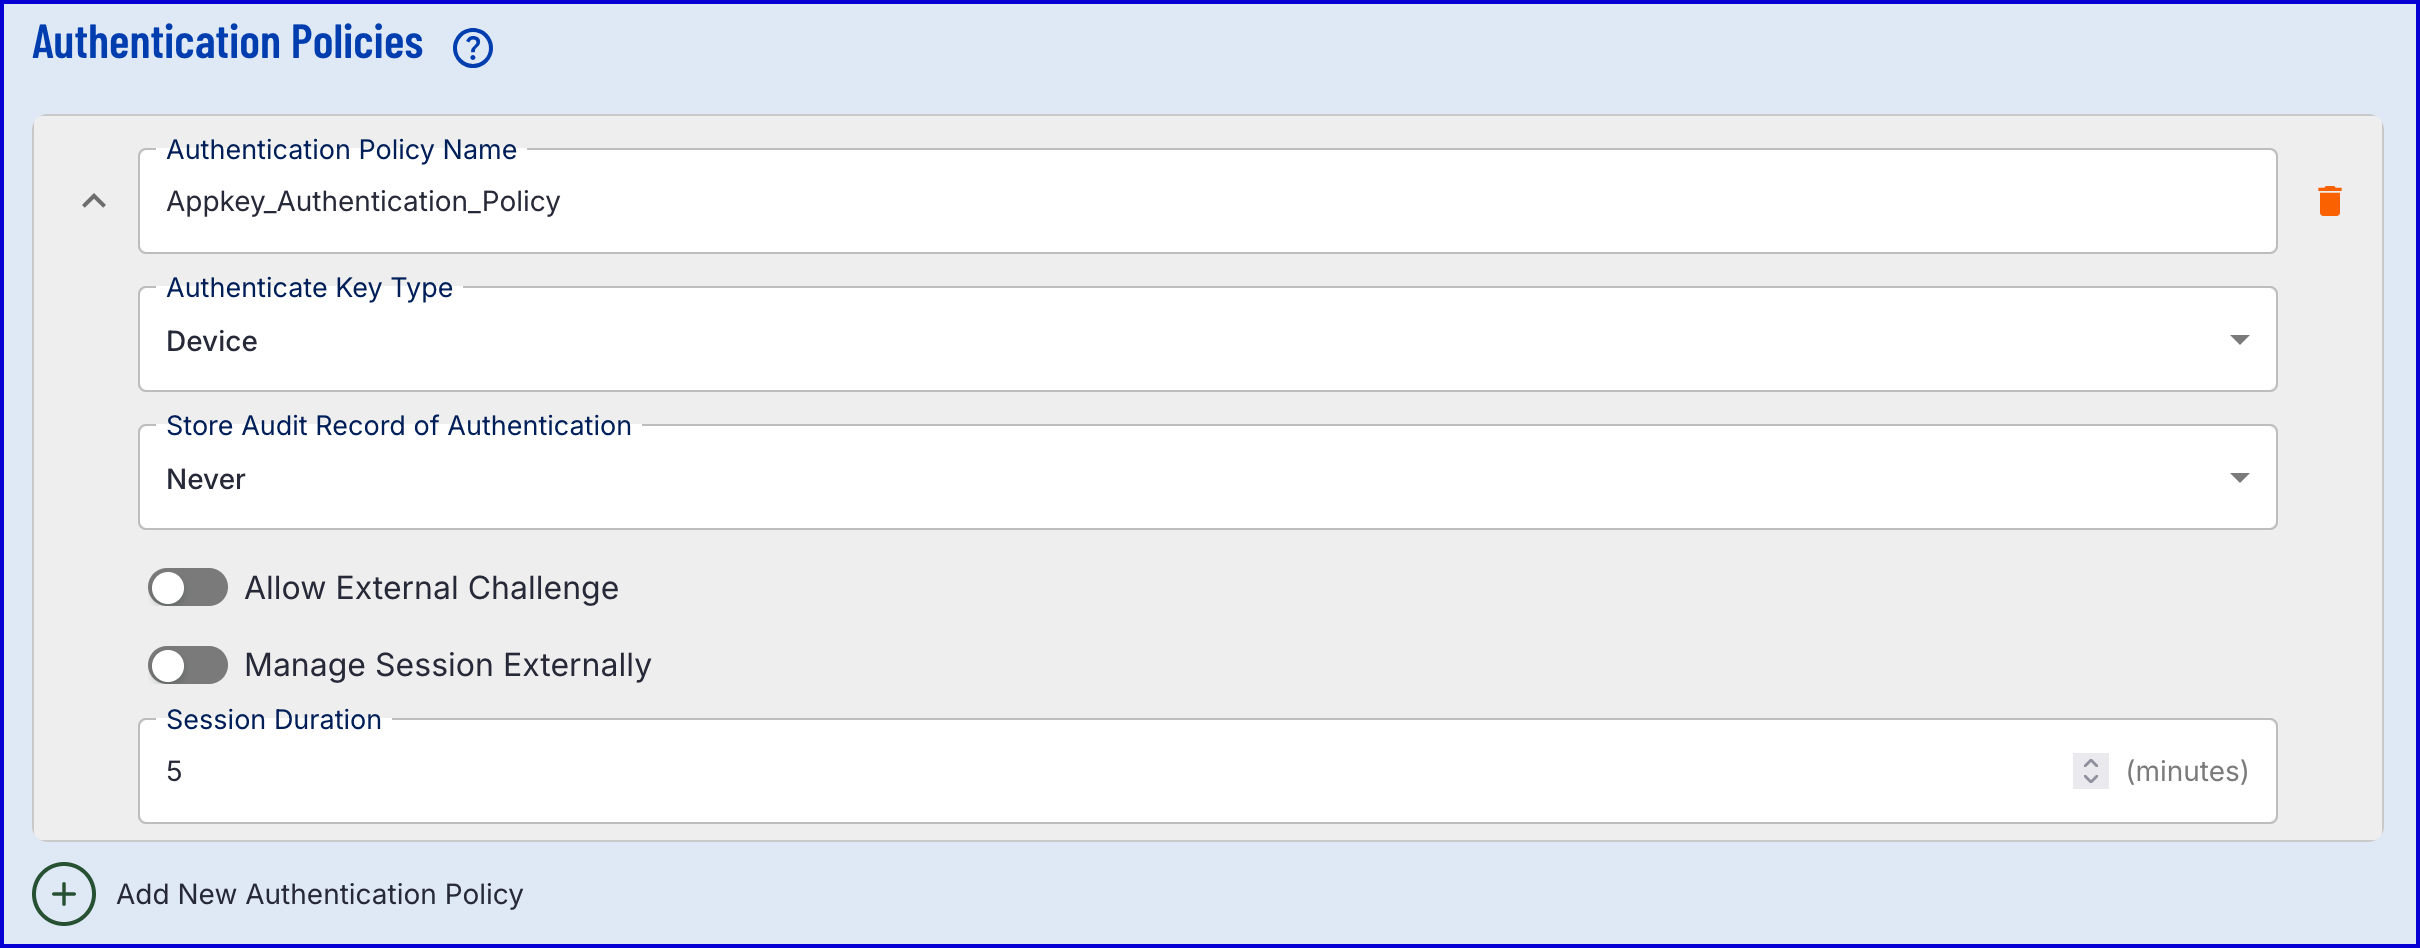
Before creating a Process Definition, it is important to define the Appkey Authentication Policy. This is where the type of key to register can be defined:
Device - The Appkey will be device bound.
Biometric - The Appkey will be bound to a biometric of the end-user.
Device and Biometric - The Appkey will be both device and biometric bound.
To create a new Appkey Policy, follow the steps outlined below.
Navigate to Identity Stores > Policies in the Backoffice application.
Select an Identity Store from which the Appkey Policy will be applied.
Click the 'New Appkey Configuration' button to create a new Appkey policy.
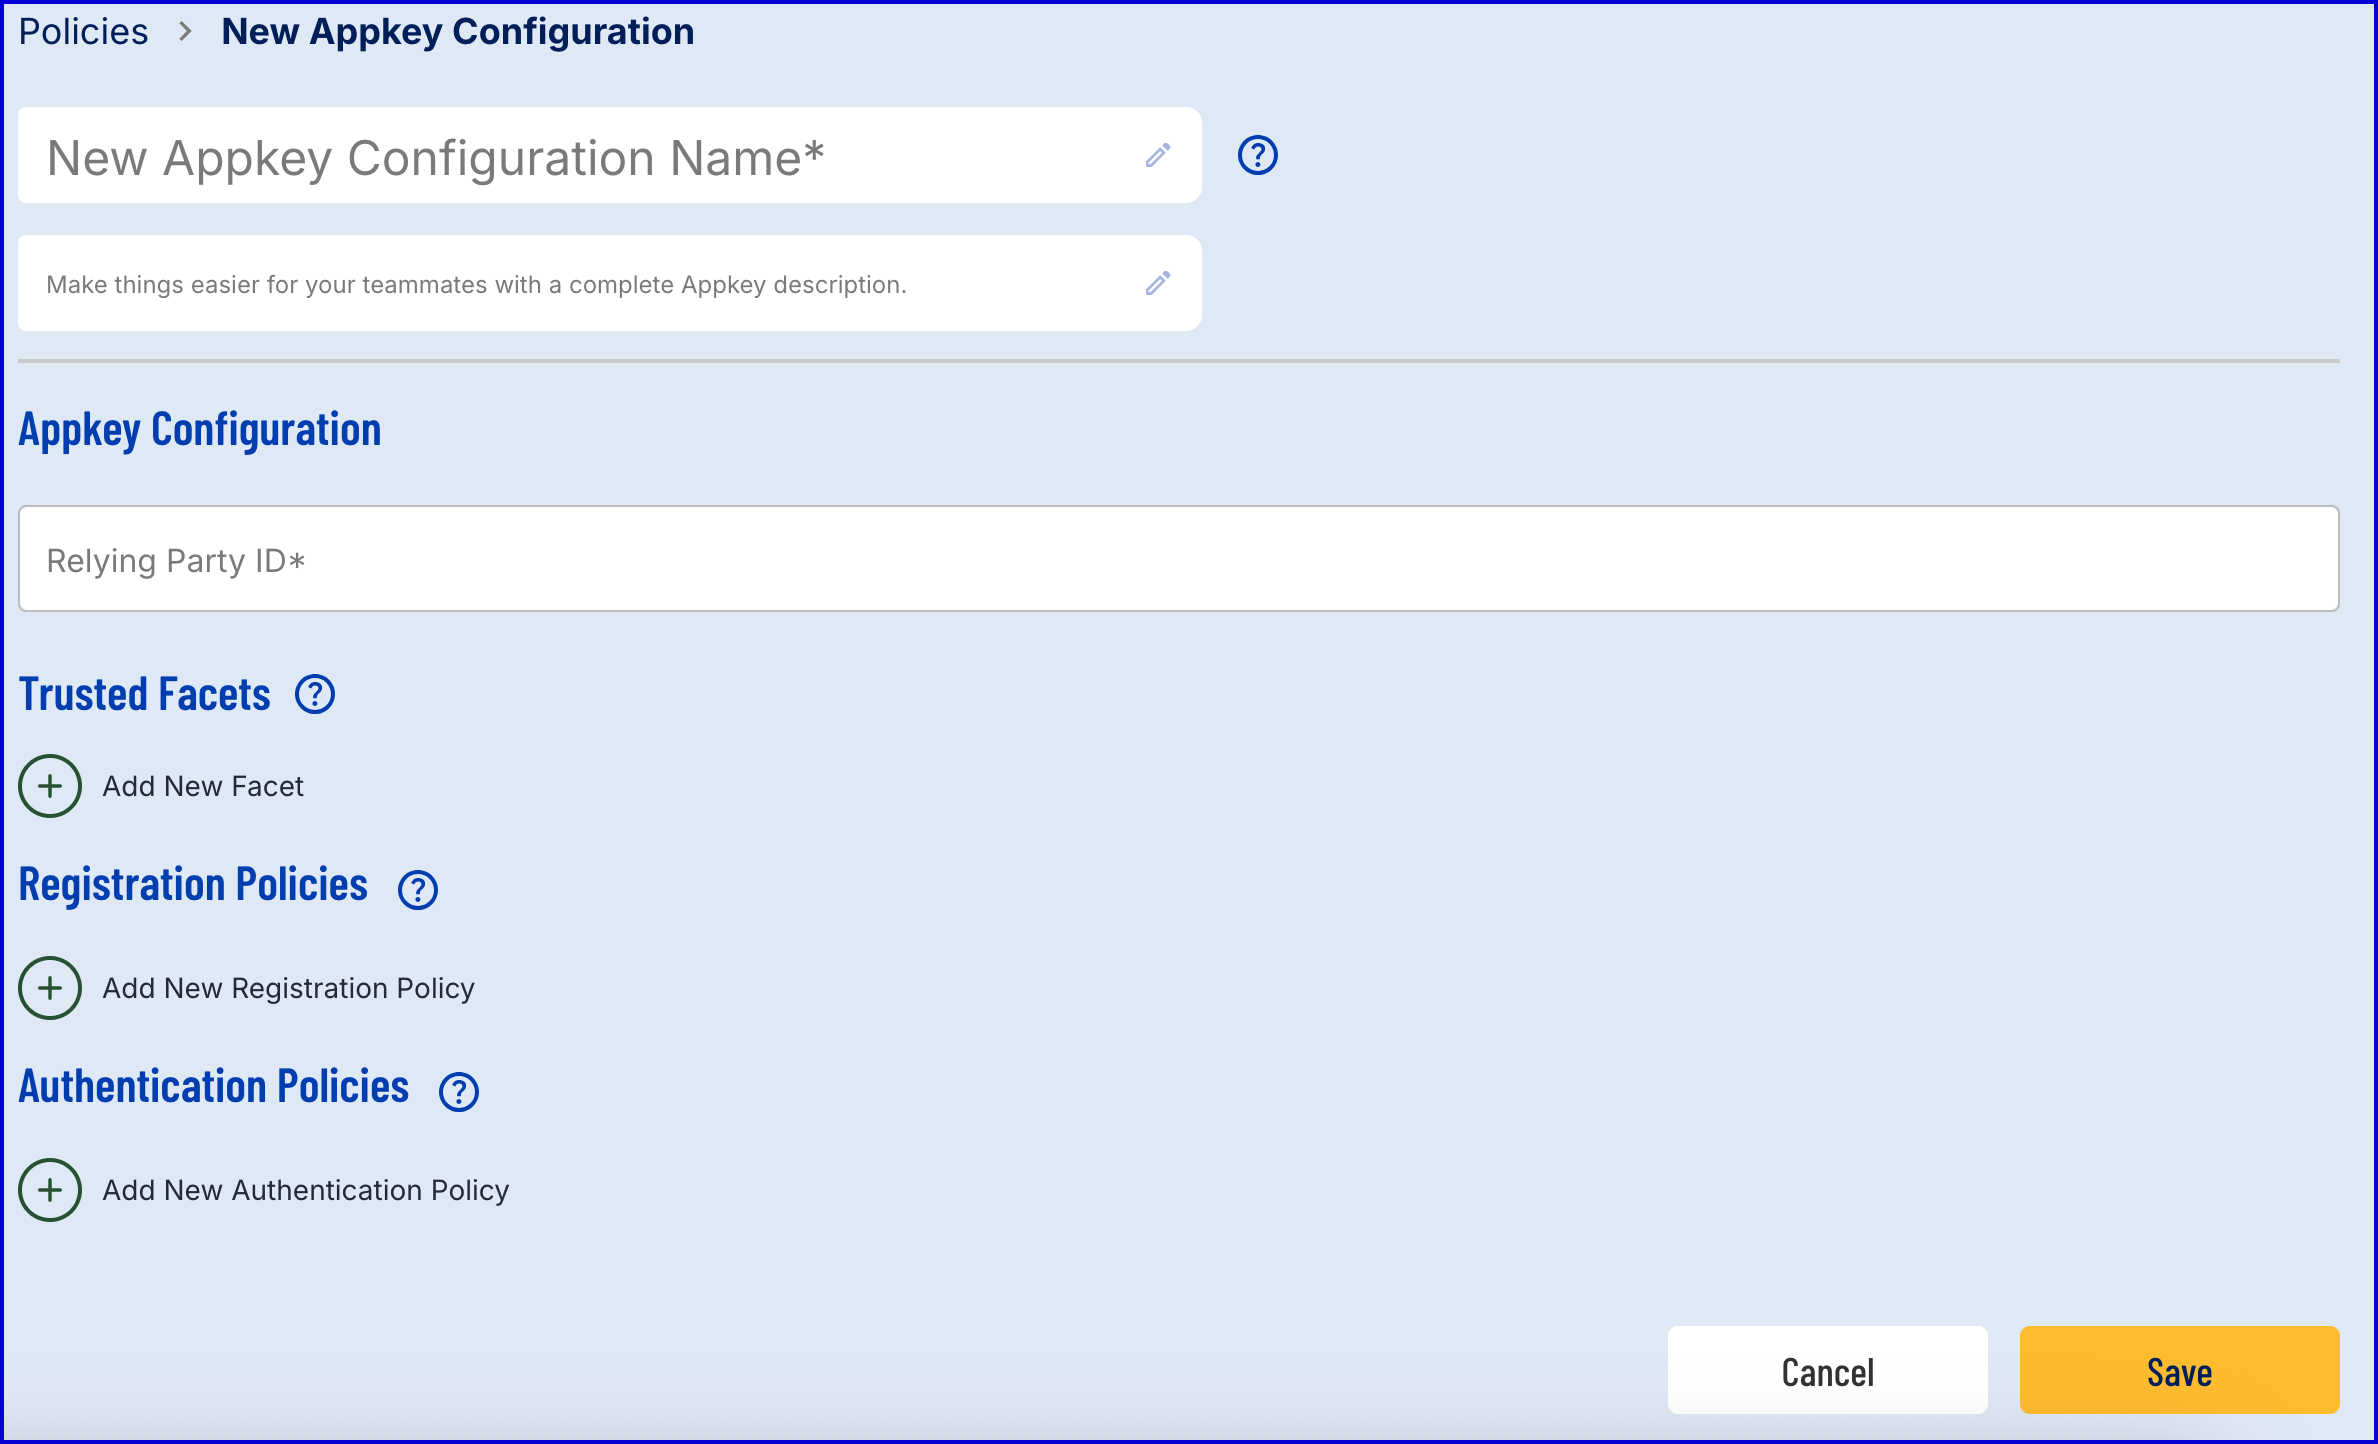
The example in this document will use a Device bound policy:
For information on the various configuration options available, see the Managing Policies guide.
Authenticating via Process Definition
The example Process Definition in this guide will utilize a Custom Data Form to handle the authentication of an app key. This process can also be completed using a Custom Page.
Step 1 - Create a Process Definition
Create a new Process Definition by navigating to Process Definitions > New Process Definition in the Backoffice application.
Add a 'Create Start Event' to the Process Designer.
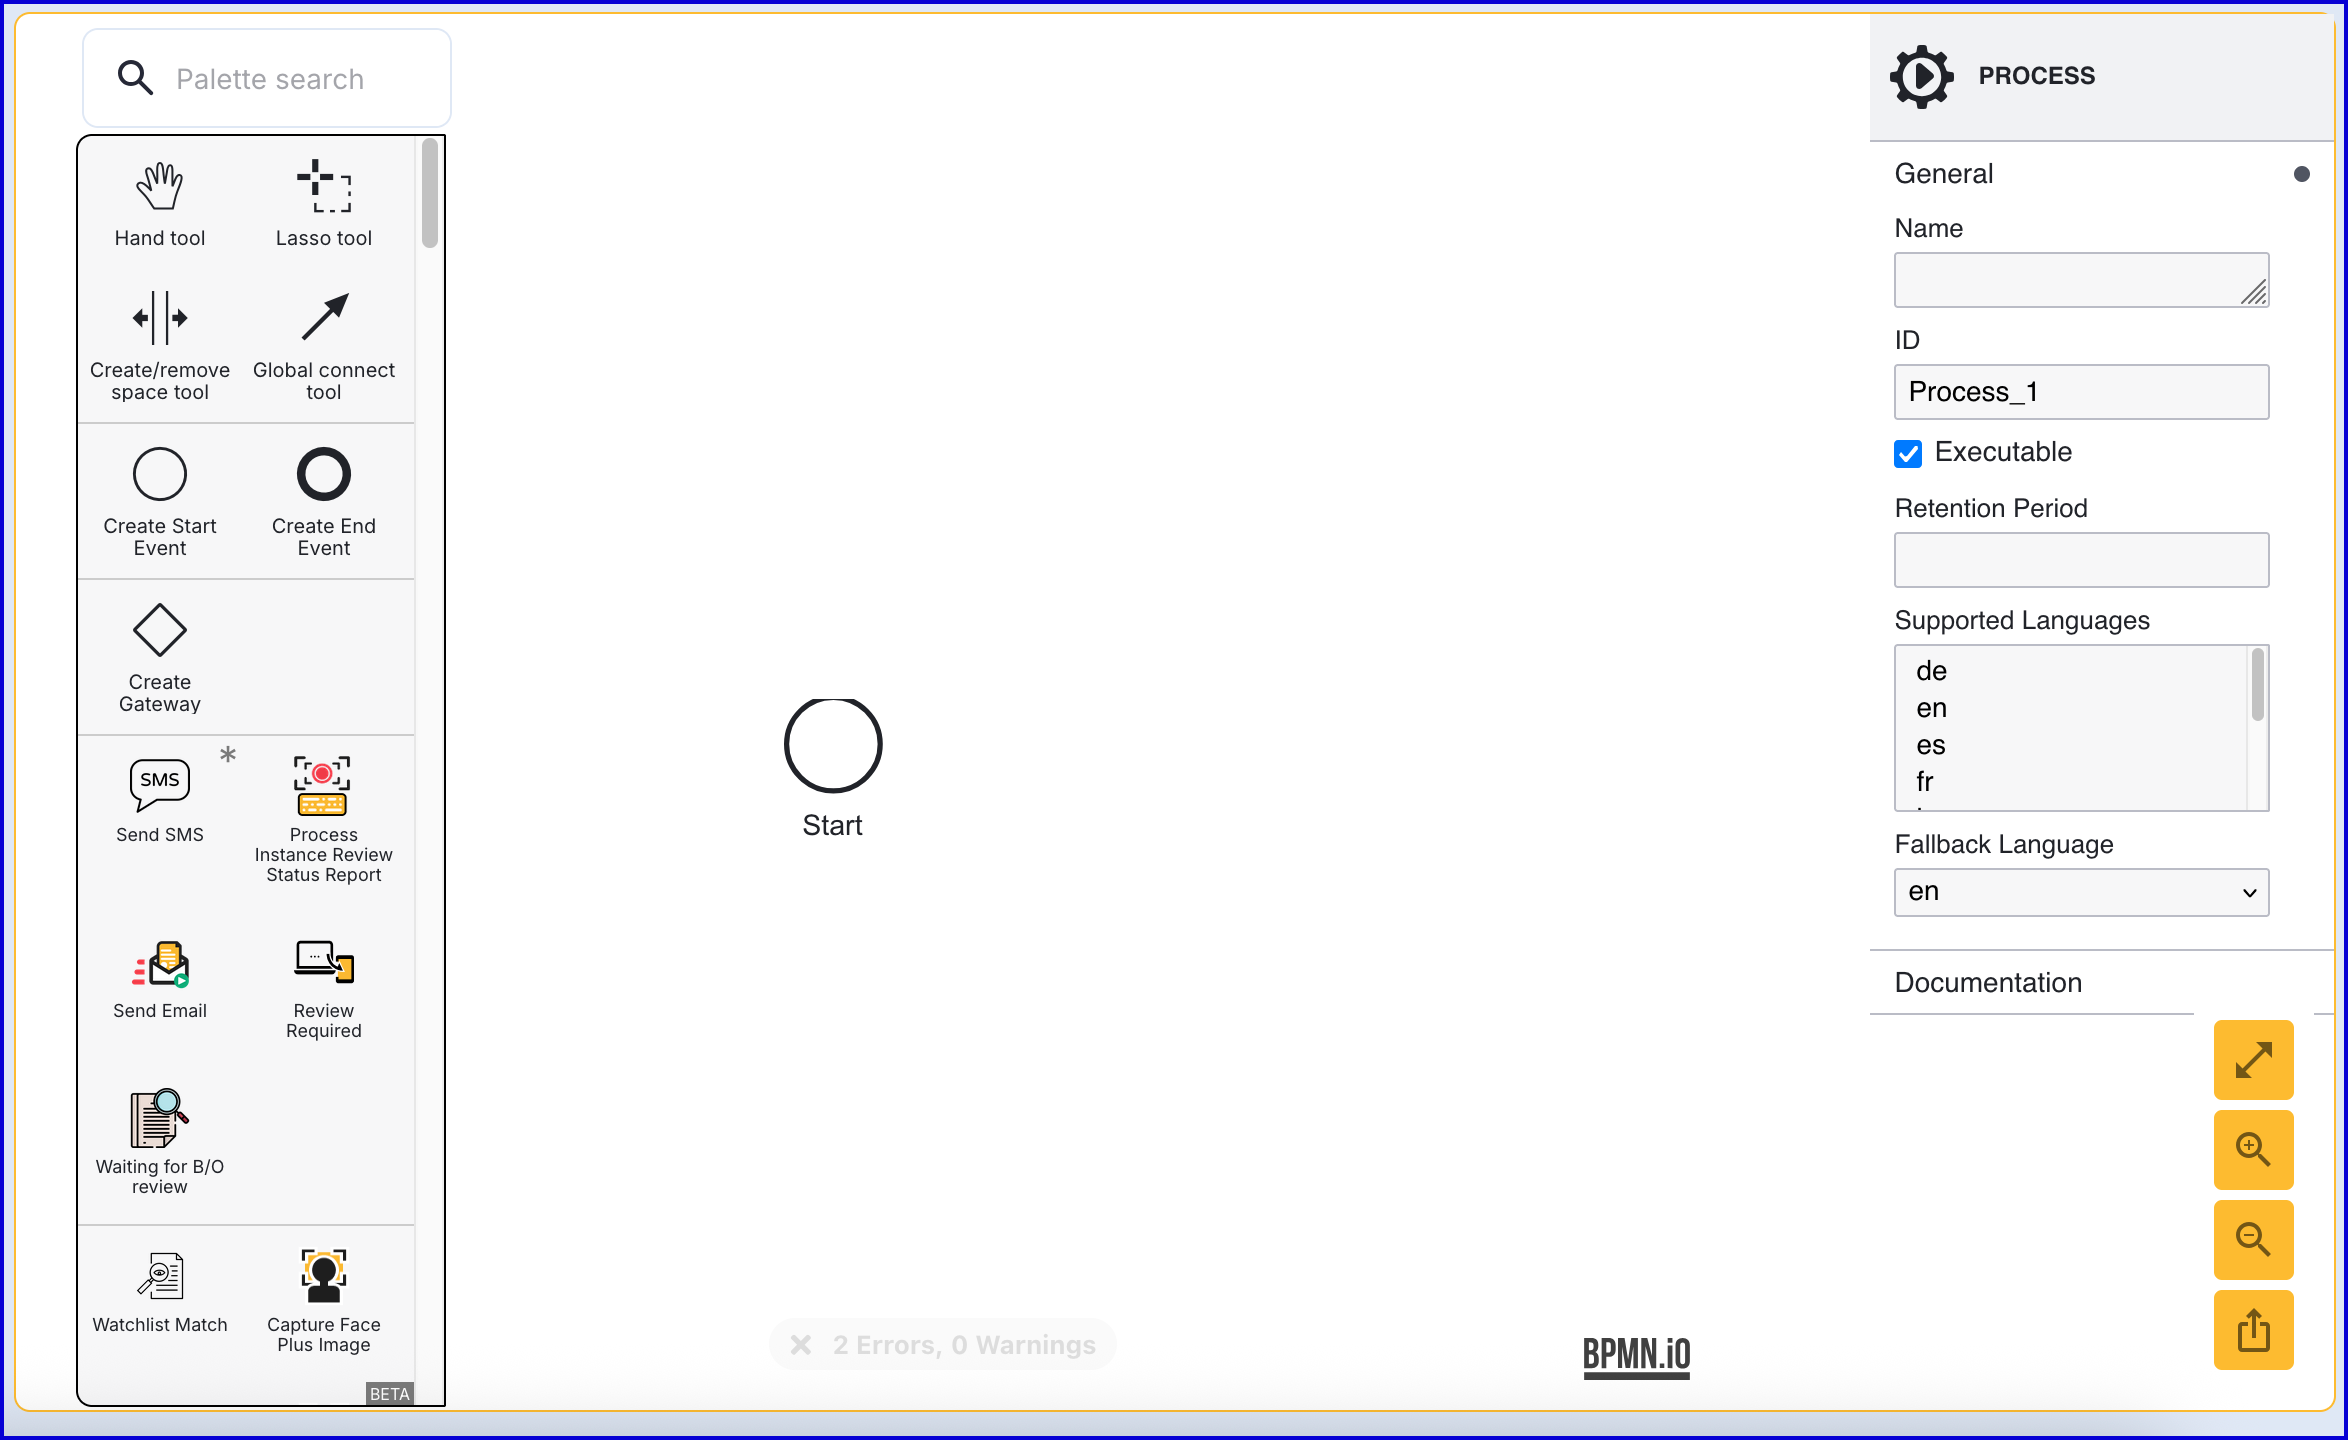
Click the 'Start' event to open the right-side contextual menu and enter a name for the 'Name' input parameter.
Add a 'Create End Event' to the Process Designer and connect it to the 'Start' event using a sequence flow arrow.
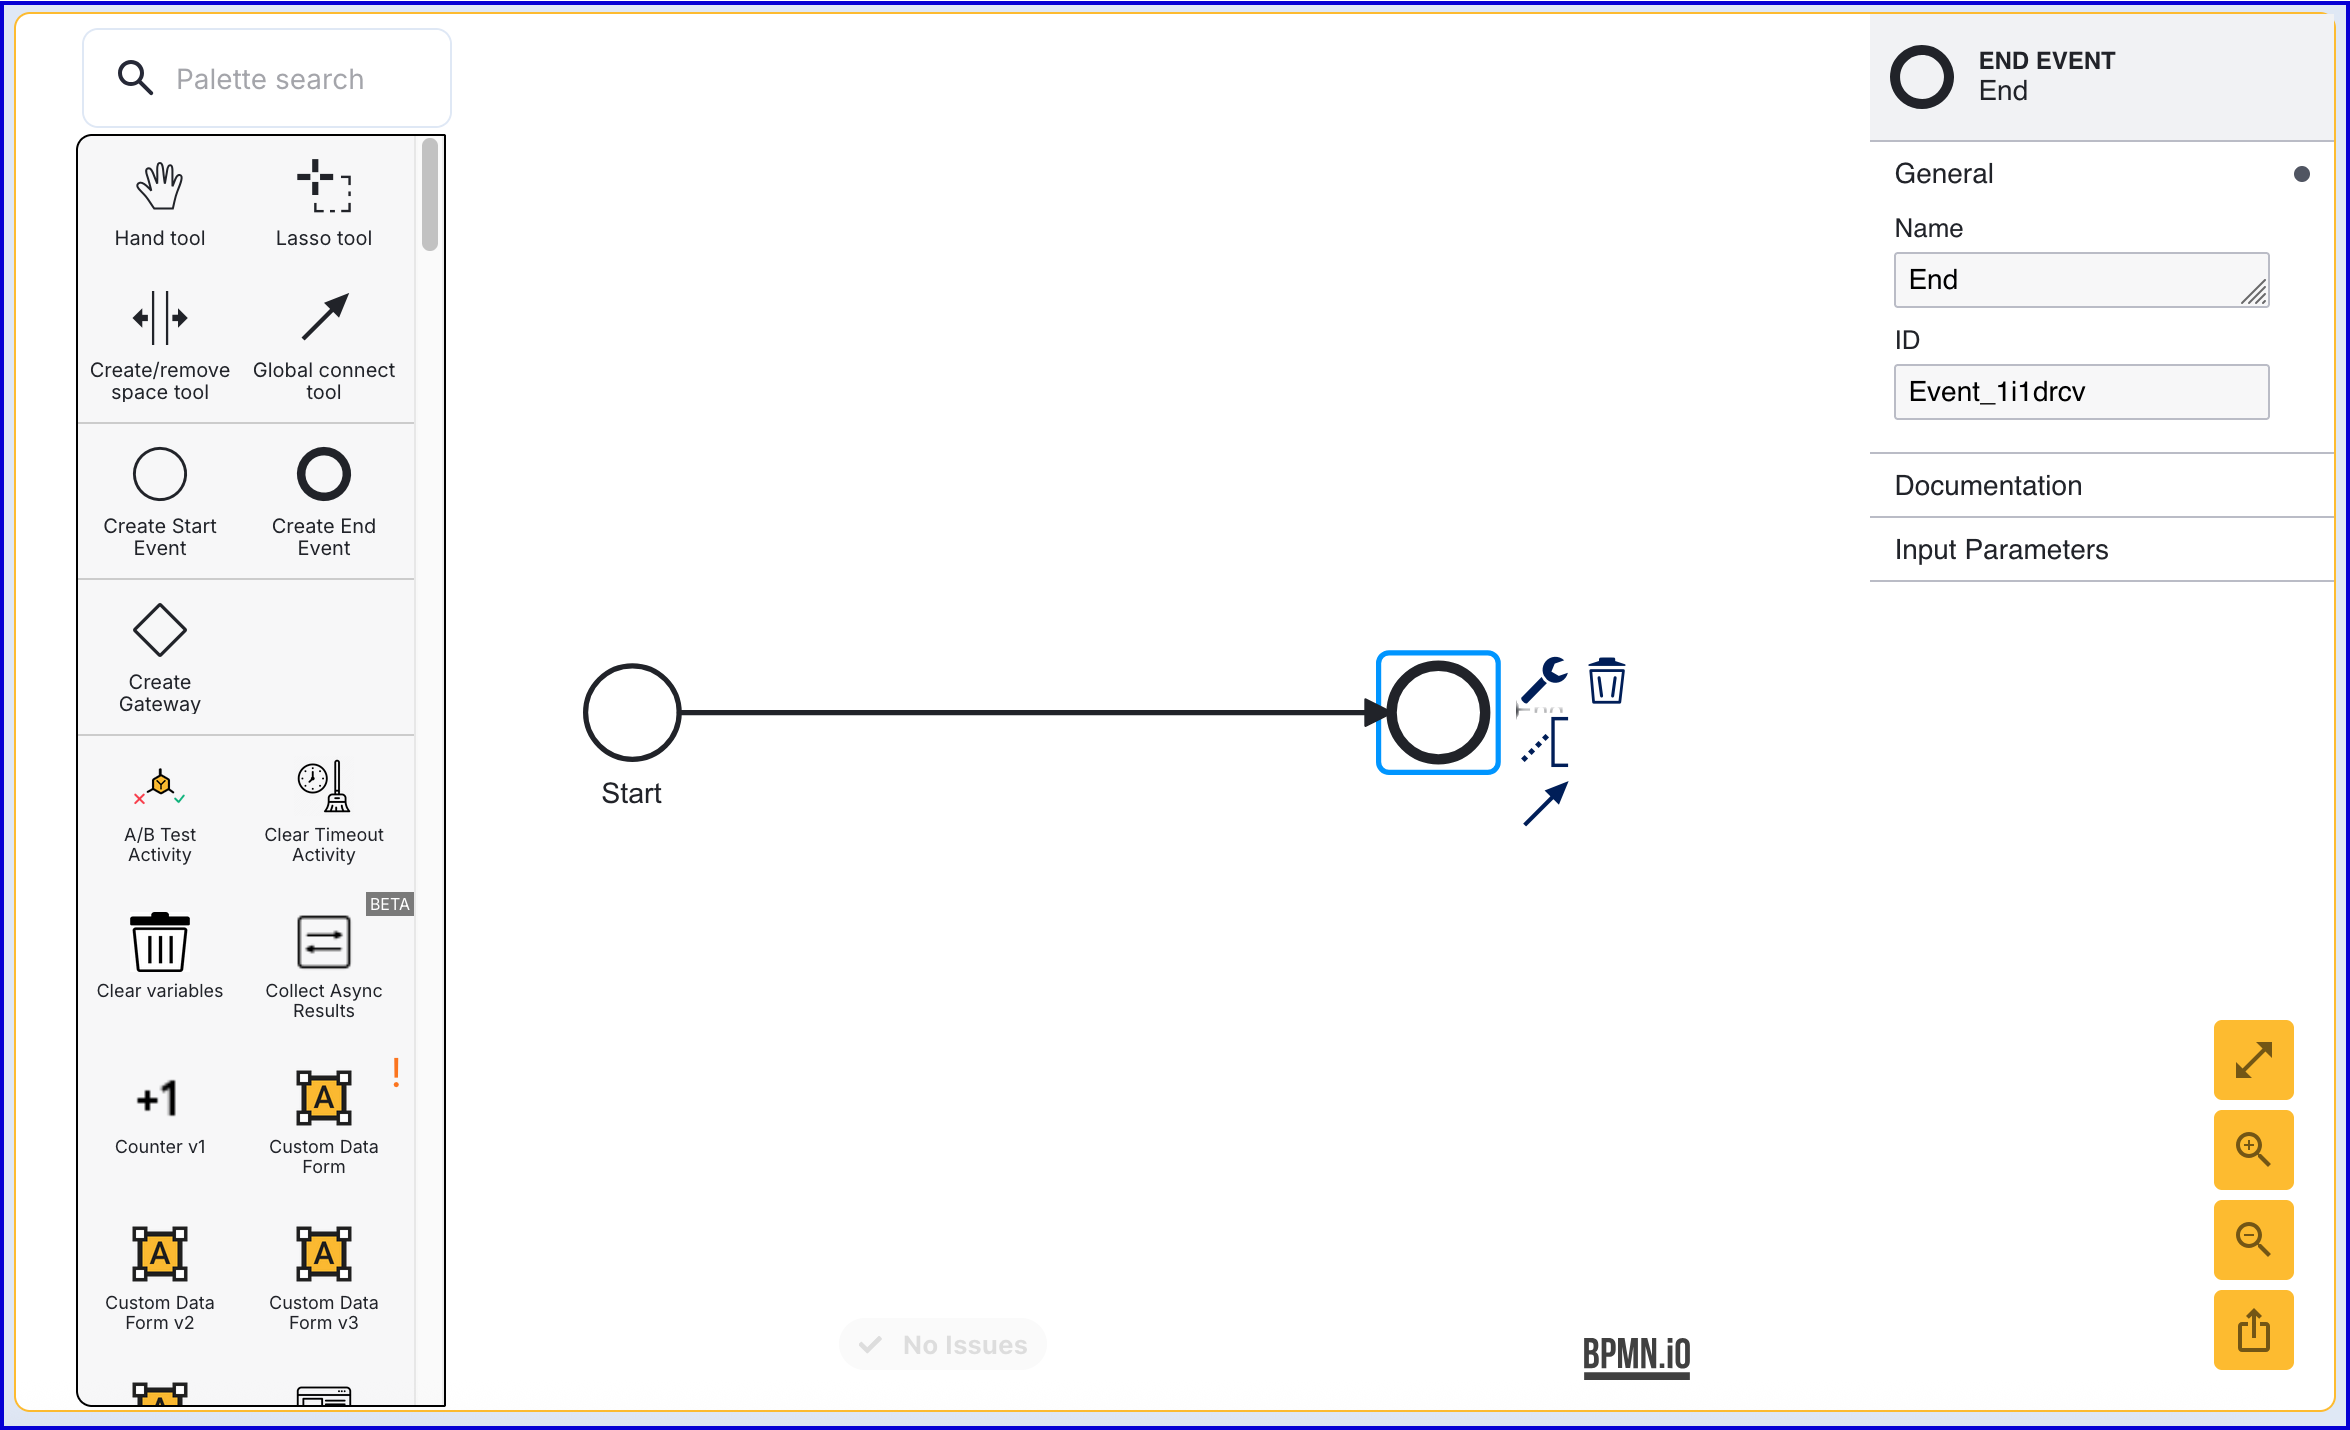
Click the 'End' event to open the right-side contextual menu and enter a name for the 'Name' input parameter.
Step 2 - Detect User Agent Capabilities
To determine whether Appkeys is supported for the current device, the 'Detect User Agent Capabilities' activity can be used. This activity will retrieve information about the device currently used by the end-user.
Add the 'Detect User Agent Capabilities' activity to the Process Designer and connect it to the 'Start' event using the 'Global connect tool'.
Connect the 'Timer Boundary Event' to the 'End' event.
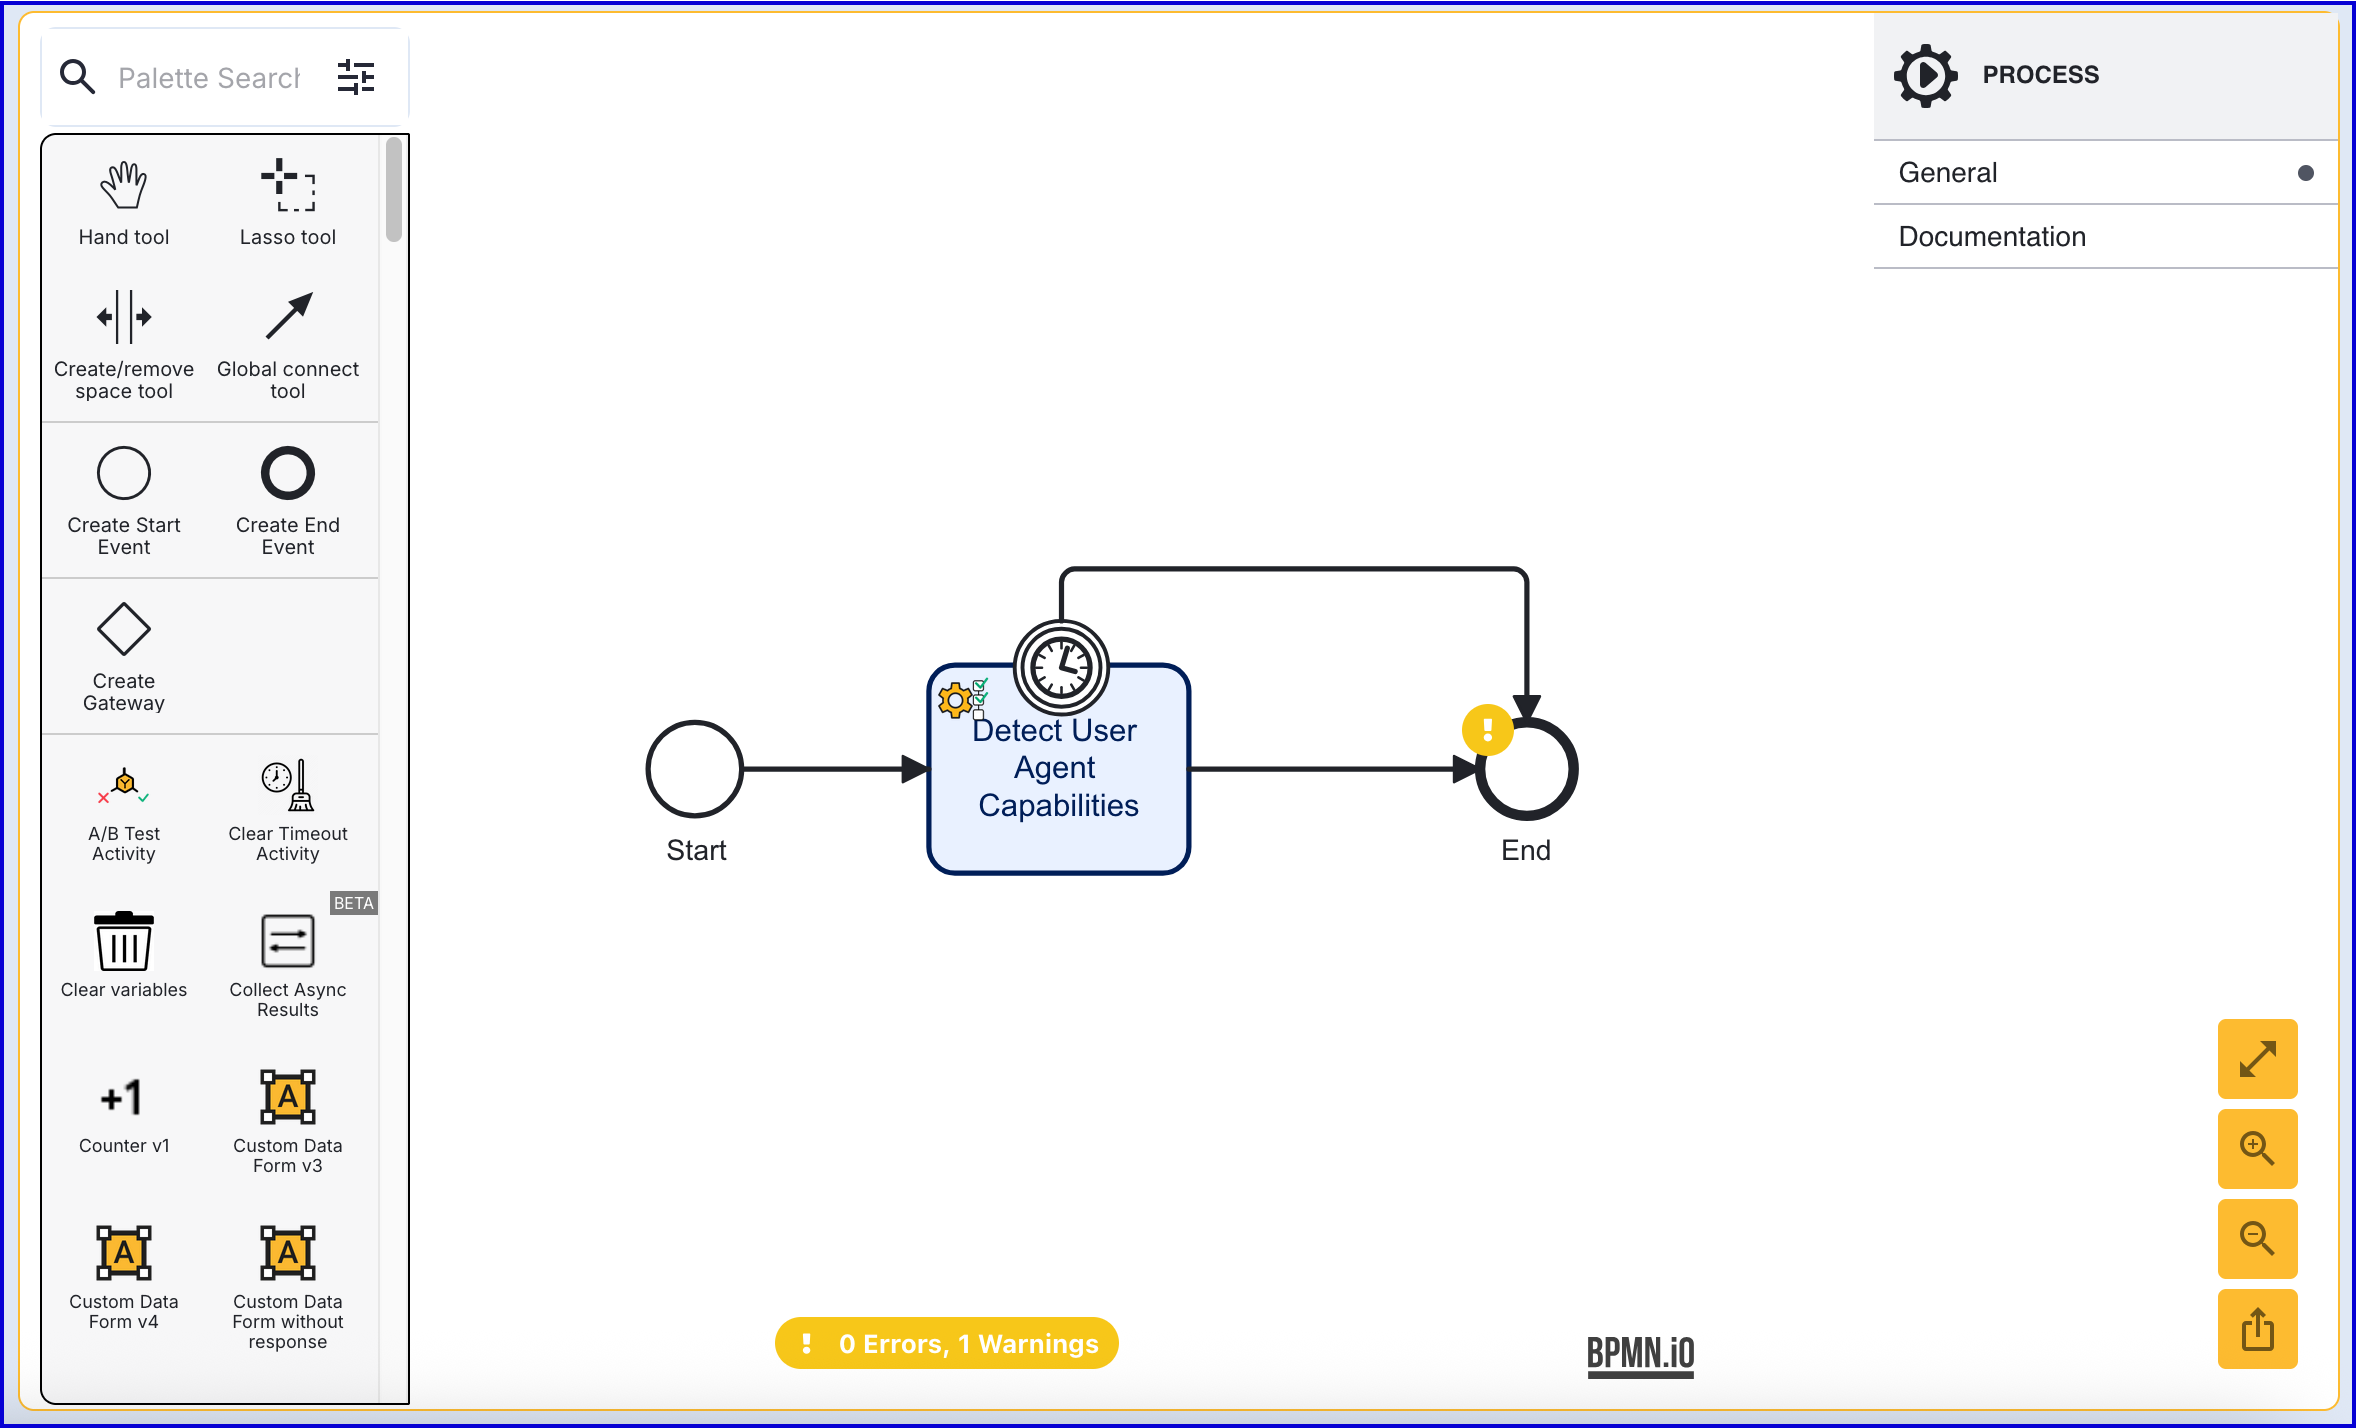
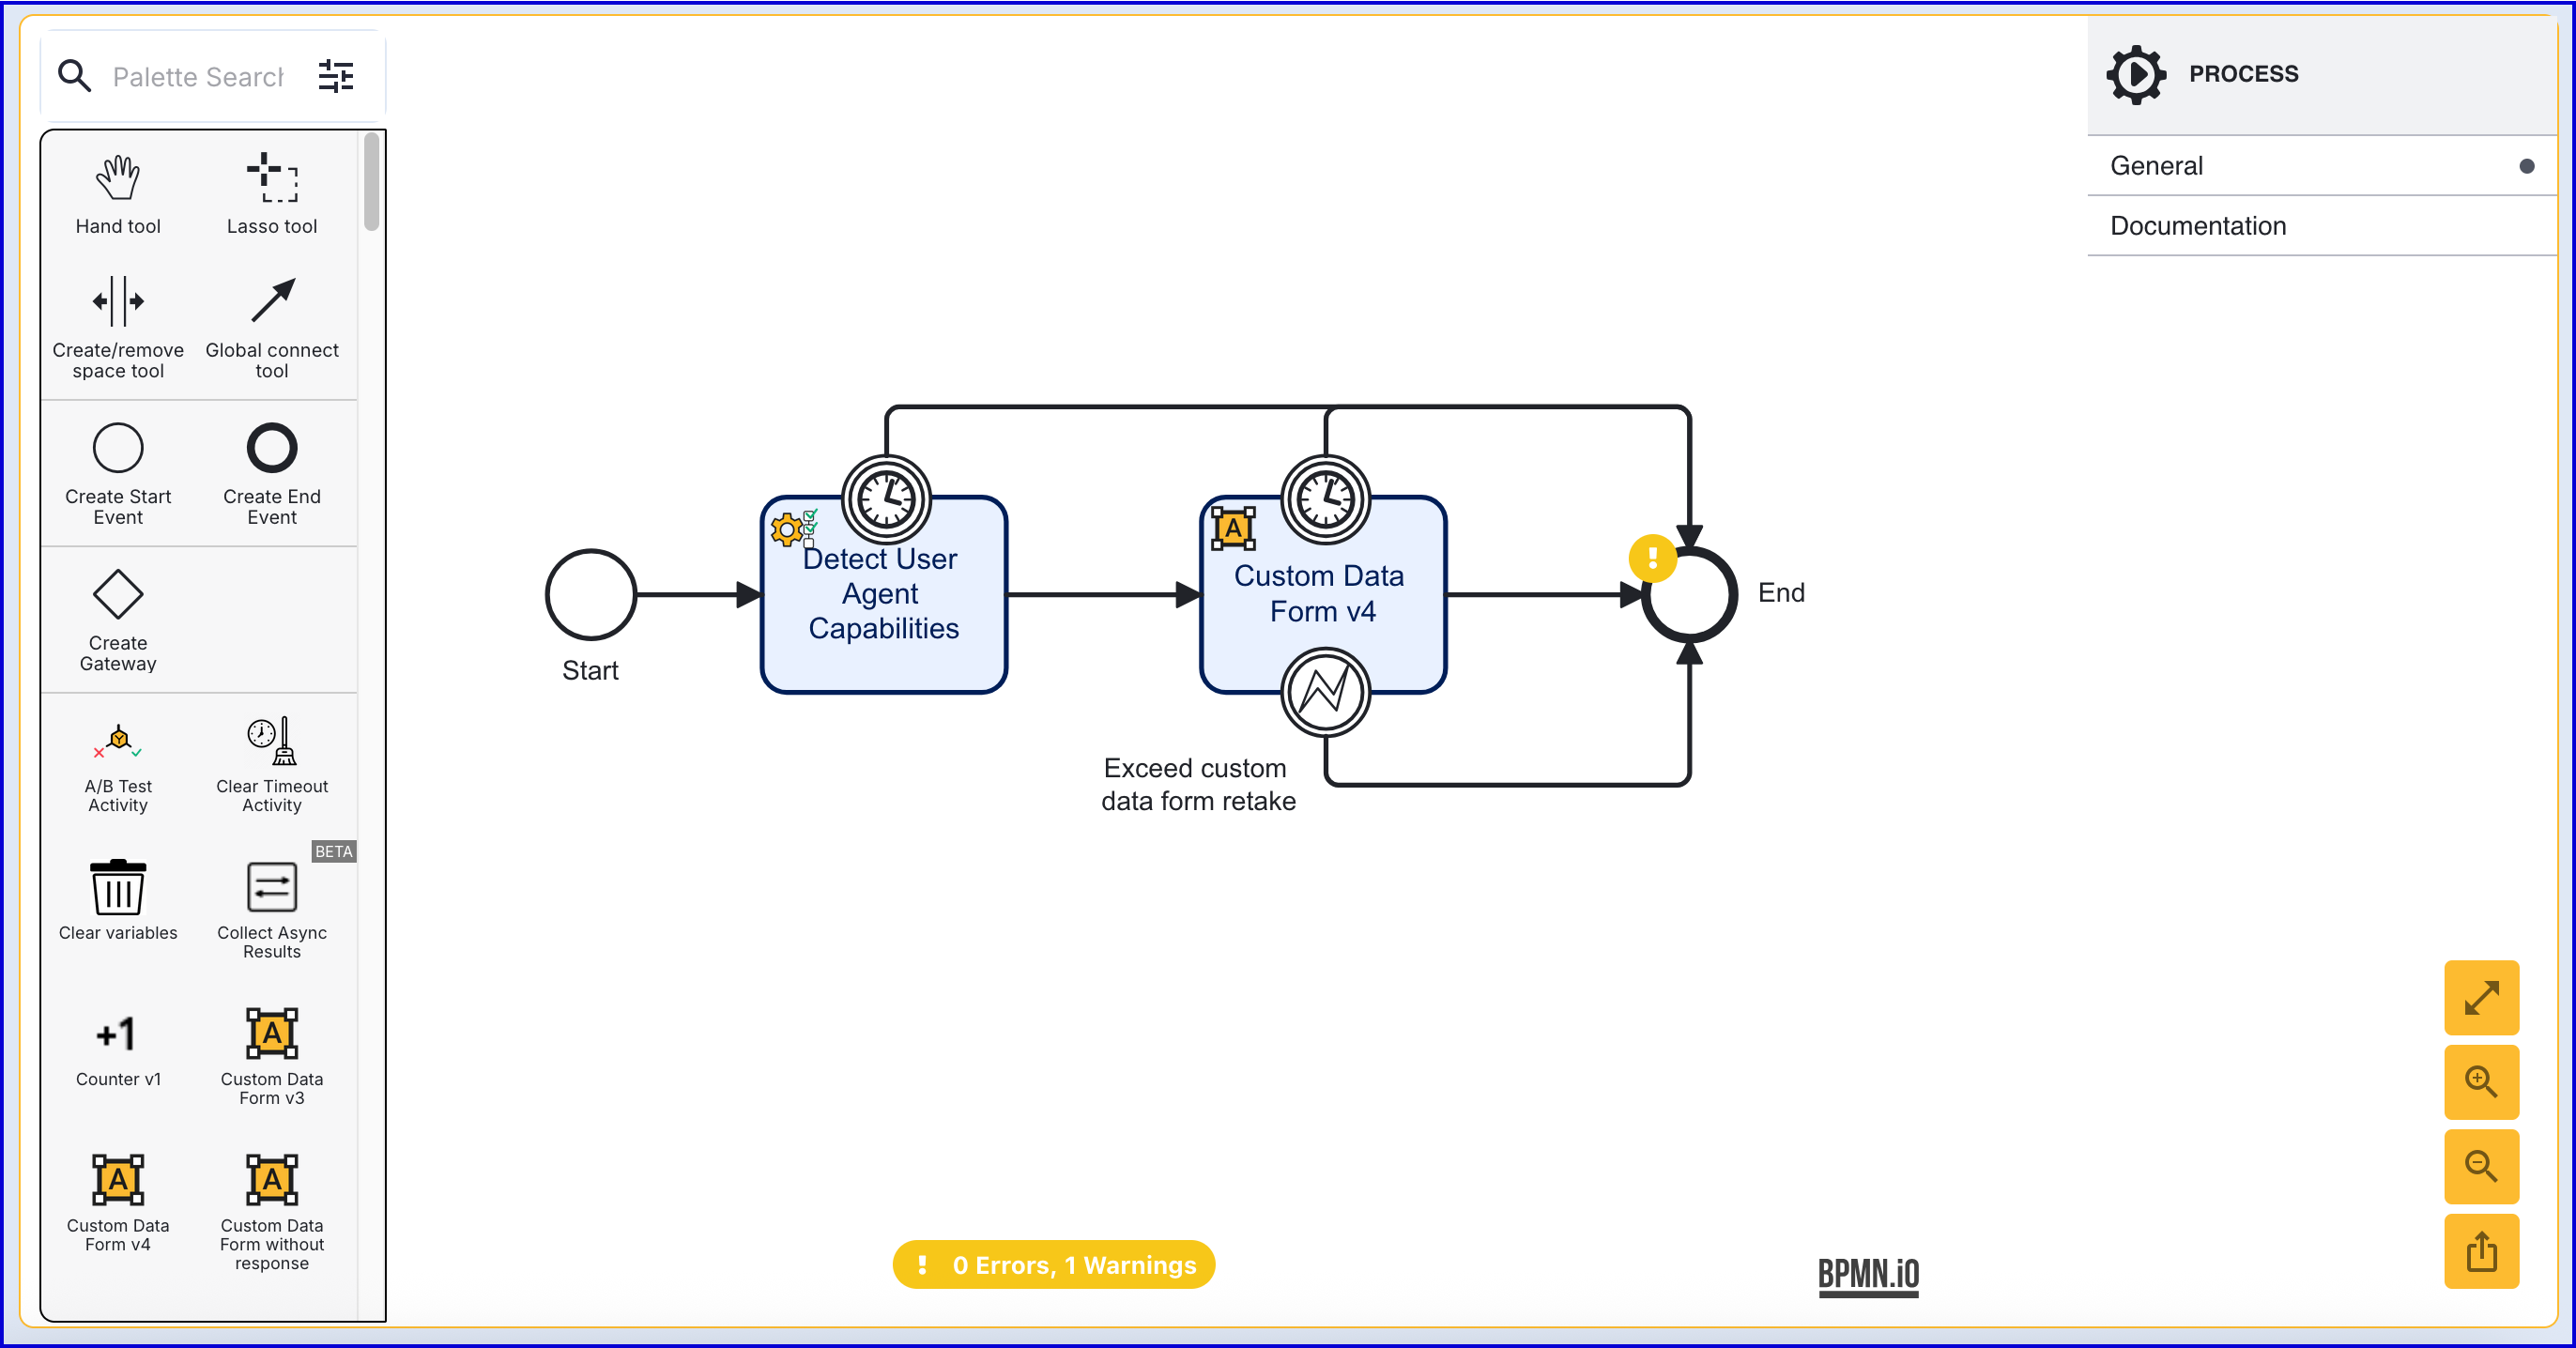
In the Process Designer, add a 'Custom Data Form v3' activity and connect it to the 'Detect User Agent Capabilities'.
Integration Method 1
The integration method described in this section provides a customizable solution using a Custom Page to invoke the Appkey capabilities in the browser, passing in the request from TrustX and sending the response to TrustX.
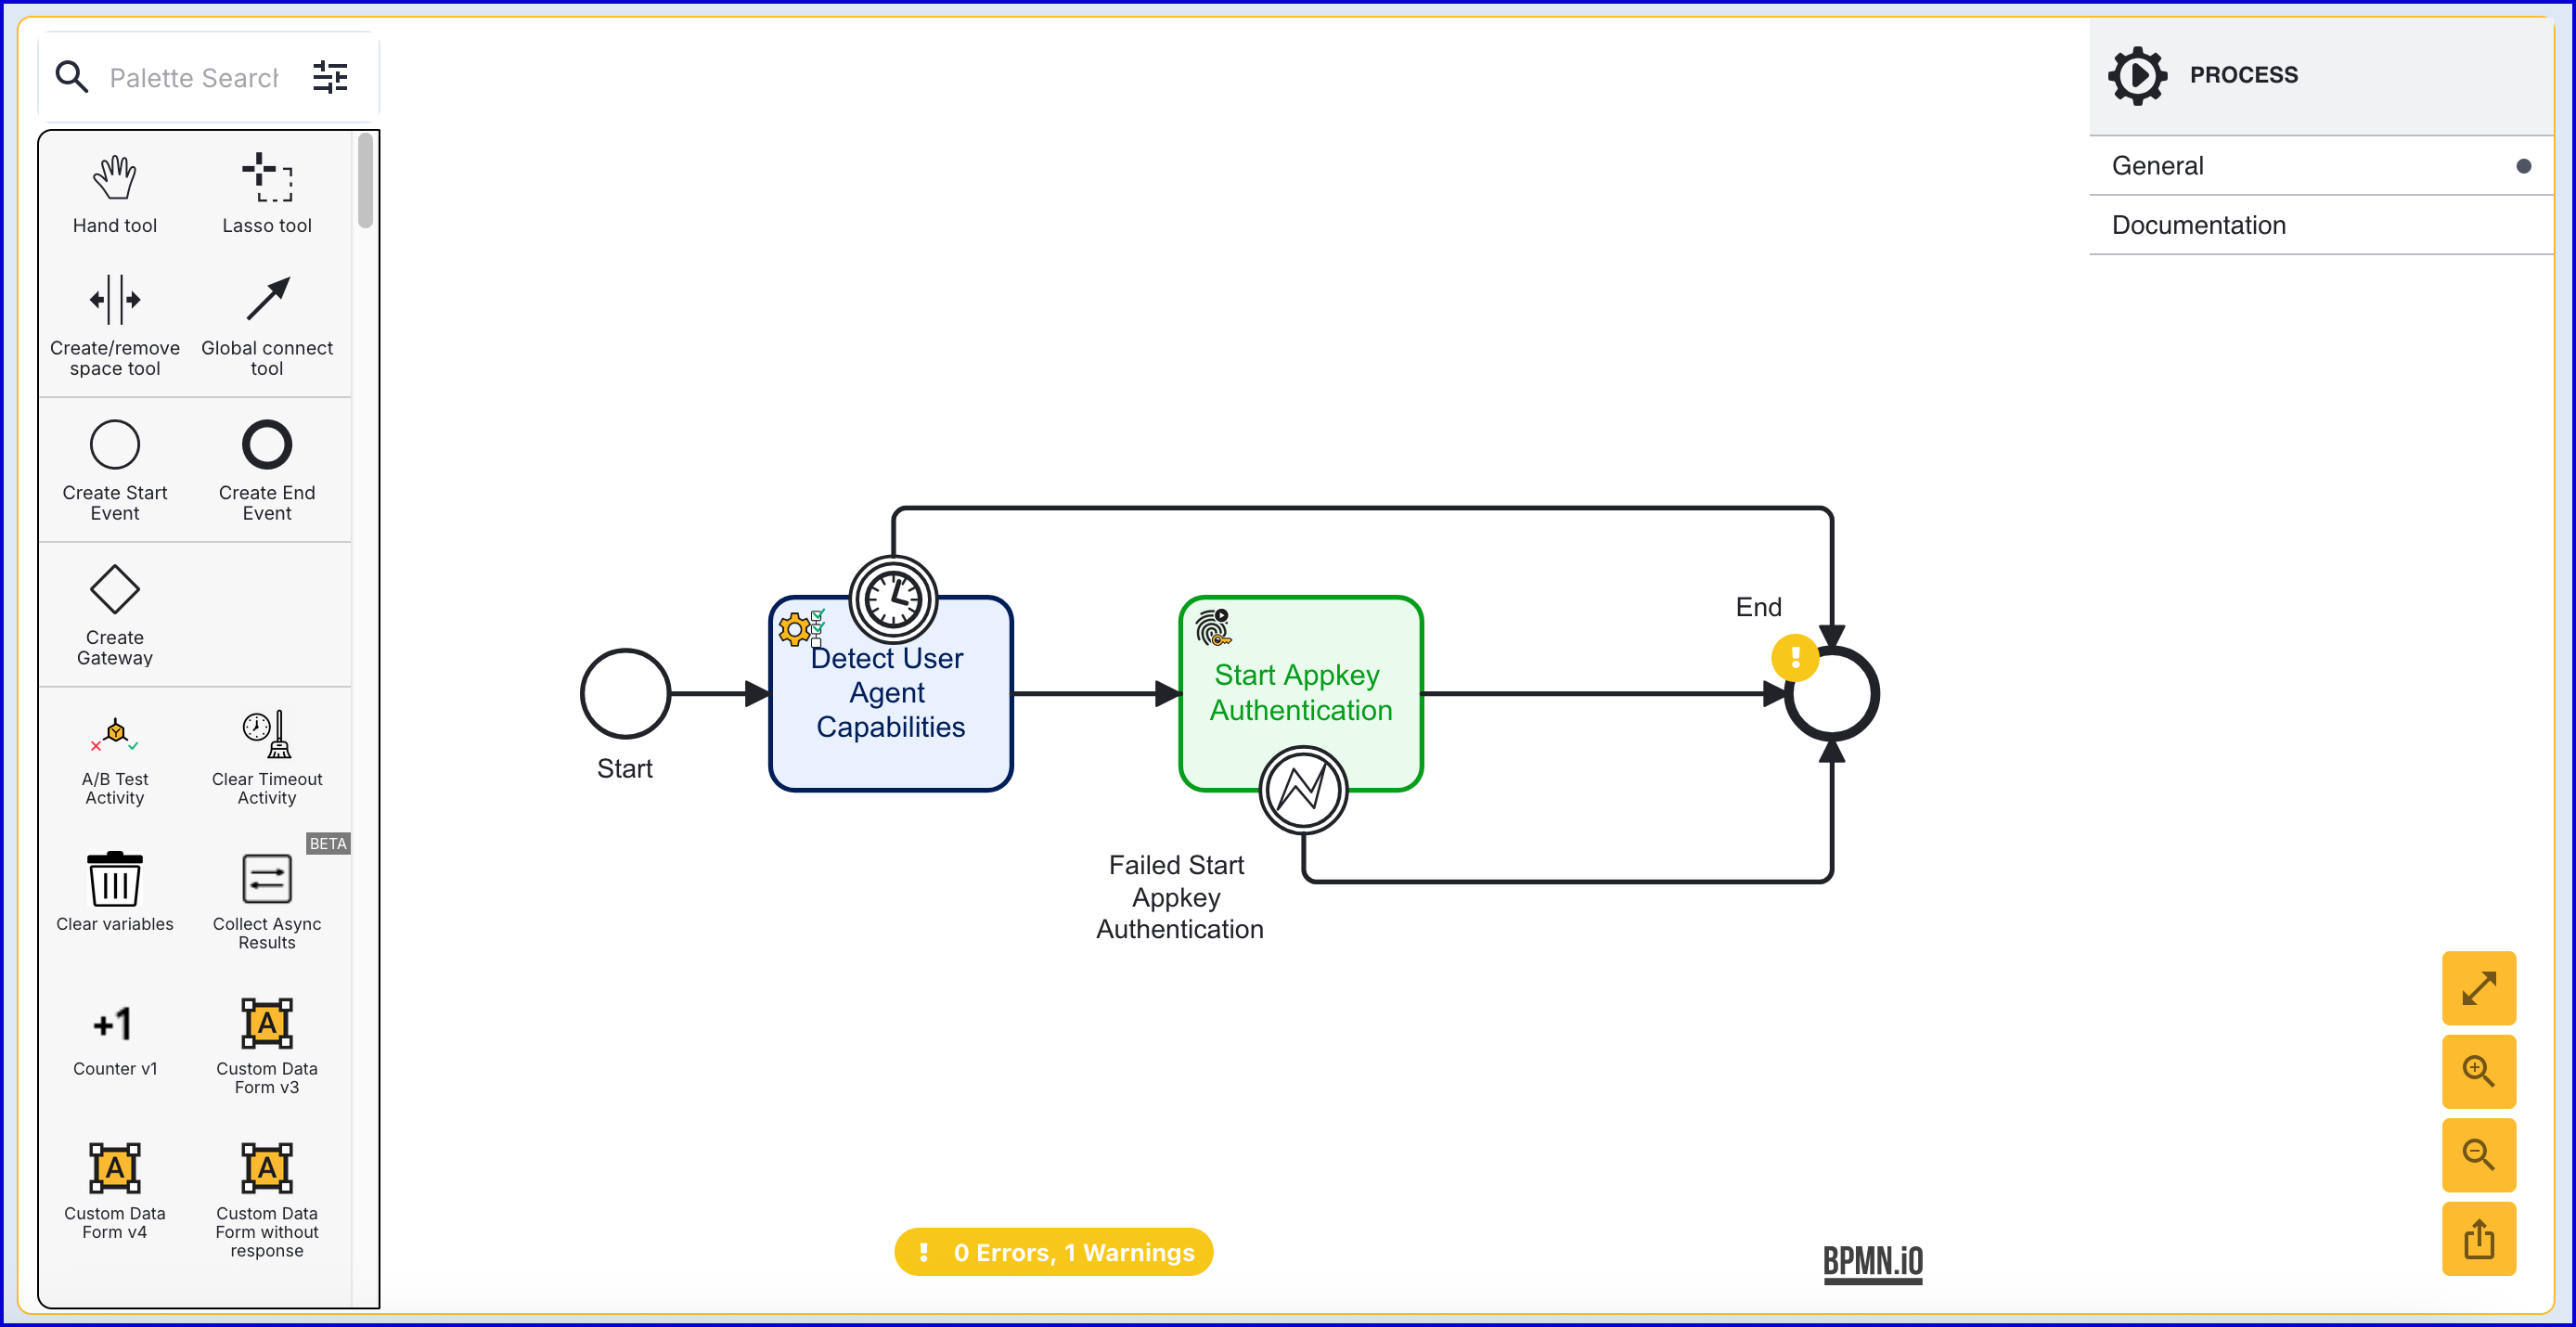
Step 3 - Start Appkey Authentication
The 'Start Appkey Authentication' activity will begin the Appkey authentication process.
Add the 'Start Appkey Authentication' activity to the Process Designer and connect it to the 'Detect User Agent Capabilities' activity using the 'Global connect tool'.
The 'Start Appkey Authentication' activity contains 10 input parameters defined accordingly:
Input Parameter | Type | Description |
|---|---|---|
Appkey Authentication Key | String | Required - The unique ID associated with the appkey authentication activity. |
Challenge | String | The signed challenge is represented by a public key registered to the User. This value is auto-generated. |
Authentication Policy | String | Required - The name of the authentication policy. |
Relying Party ID | String | Required - The ID of the relying party whose Appkey authentication configuration will be used. |
Server Data | String | This field can contain optional session data that a relying party can associate with the request. |
Store Name | String | Required - The name of the Identity Store. |
Transaction Text | String | A human-readable description of a transaction that is displayed to the user during the transaction confirmation process. |
User External ID | String | This property can be used to identify the User that the Appkey authentication applies to. |
User ID | String | The unique ID automatically generated when the User is created. In the context of the 'Start Appkey Authentication' activity, this ID can be used to identify the User that the appkey authentication applies to. |
User Key | String | The User Key that can be used to identify the User that the Appkey authentication applies to. |
(Optional) Start Appkey Authentication via API
The Appkey authentication process can be started via the API by calling either:
/api/identity-store/stores/{storeName}/users/{userId}/appkeys/relyingParties/{rpId}/authentications/{authPolicyName}/api/identity-store/{tenantId}/stores/{storeName}/users/{userExtId}/appkeys/relyingParties/{rpId}/authentications/{authPolicyName}/ext.
Permissions: TNT#{tenant}#IdentityStore:createAppkeyAuthenticationForUser, TNT#{tenant}#IdentityStore:createAppkeyAuthenticationForUserByExtId , TNT#{tenant}#IdentityStore:createAppkeyAuthentication
Example Request:
Step 4 - Prepare the Custom Page
Create a new Custom Page under the Integration Hub > Custom Pages section of the Backoffice.
Click the 'New Custom Page'
Below is an example Custom Page.
Once the Custom Page has been created, add a 'Custom Page V3' activity to the Process Definition and connect it to the 'Start Appkey Authentication' activity.
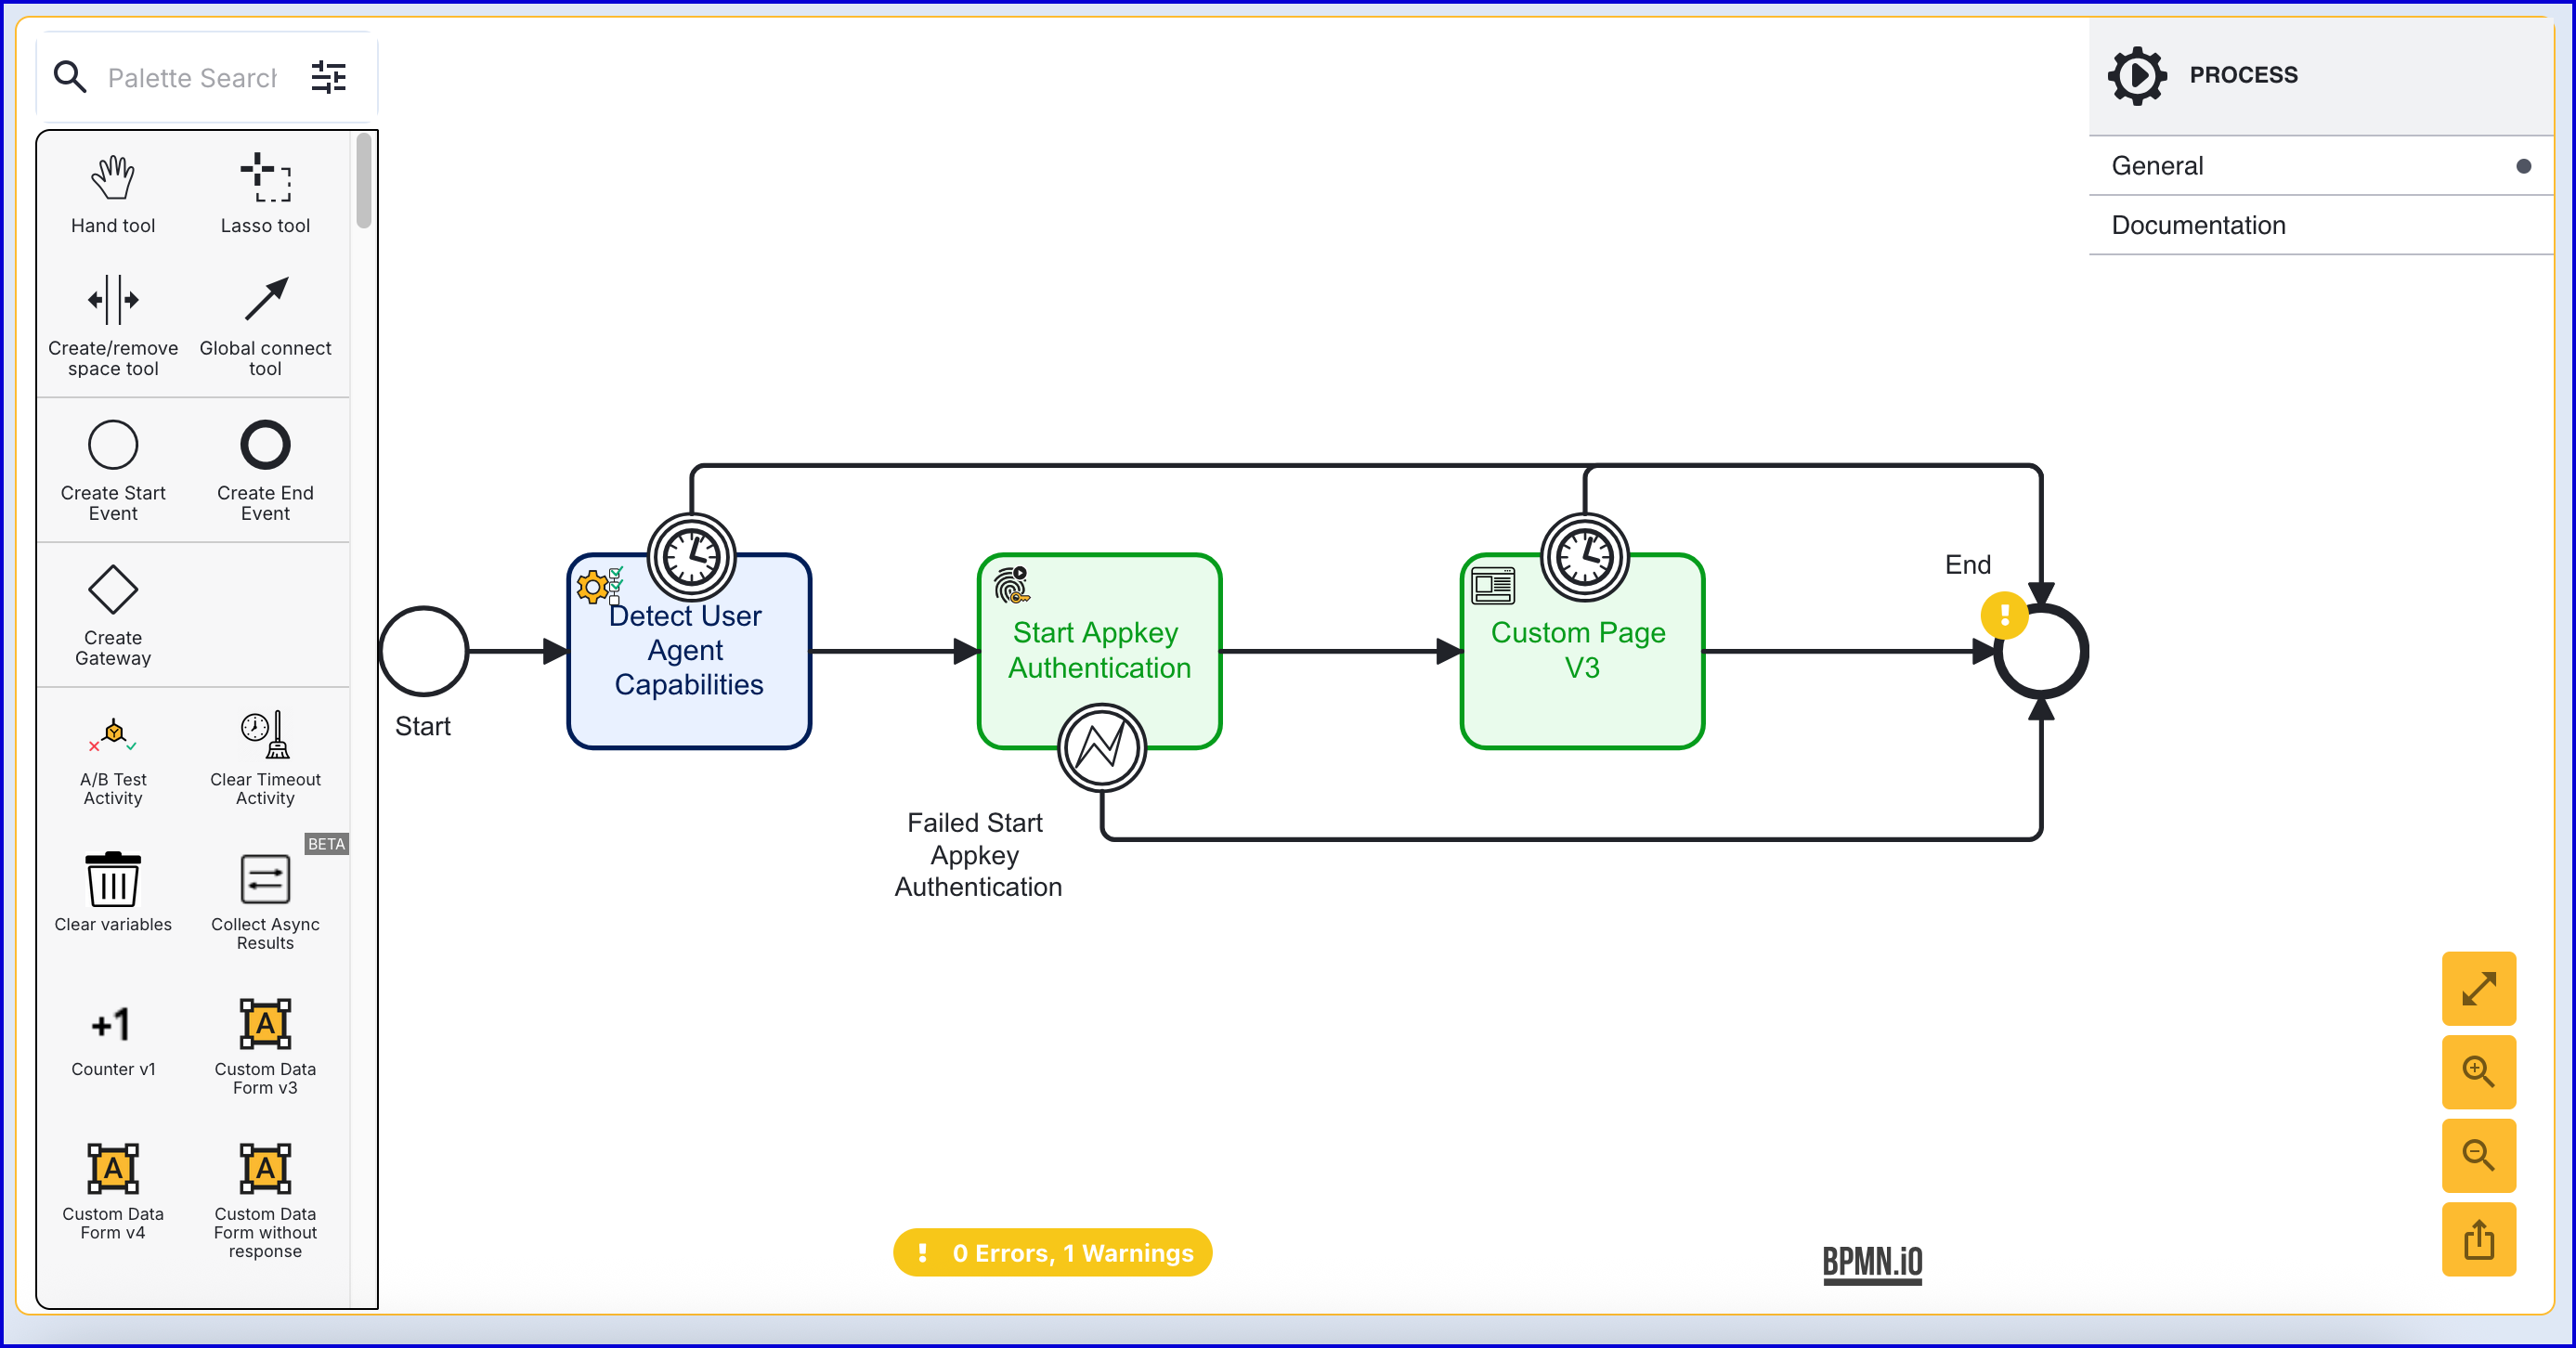
Click the 'Custom Page V3' activity to open the right-side contextual menu and expand the 'Session Data' input parameter.
Add the following map entry:
Key: appkeyAuthClientRequest
Value:
${_identityStore.appkeys.authentications["appkeyAuth2"].currentAppkeyAuthenticationRecord.startAppkeyAuthenticationResponse.clientRequestMessage}
Step 5 - Complete Appkey Authentication
The 'Complete Appkey Authentication' activity is used to finalize the appkey authentication process.
Add the 'Complete Appkey Authentication' activity after the 'Custom Page V3' activity and connect using a sequence flow arrow.
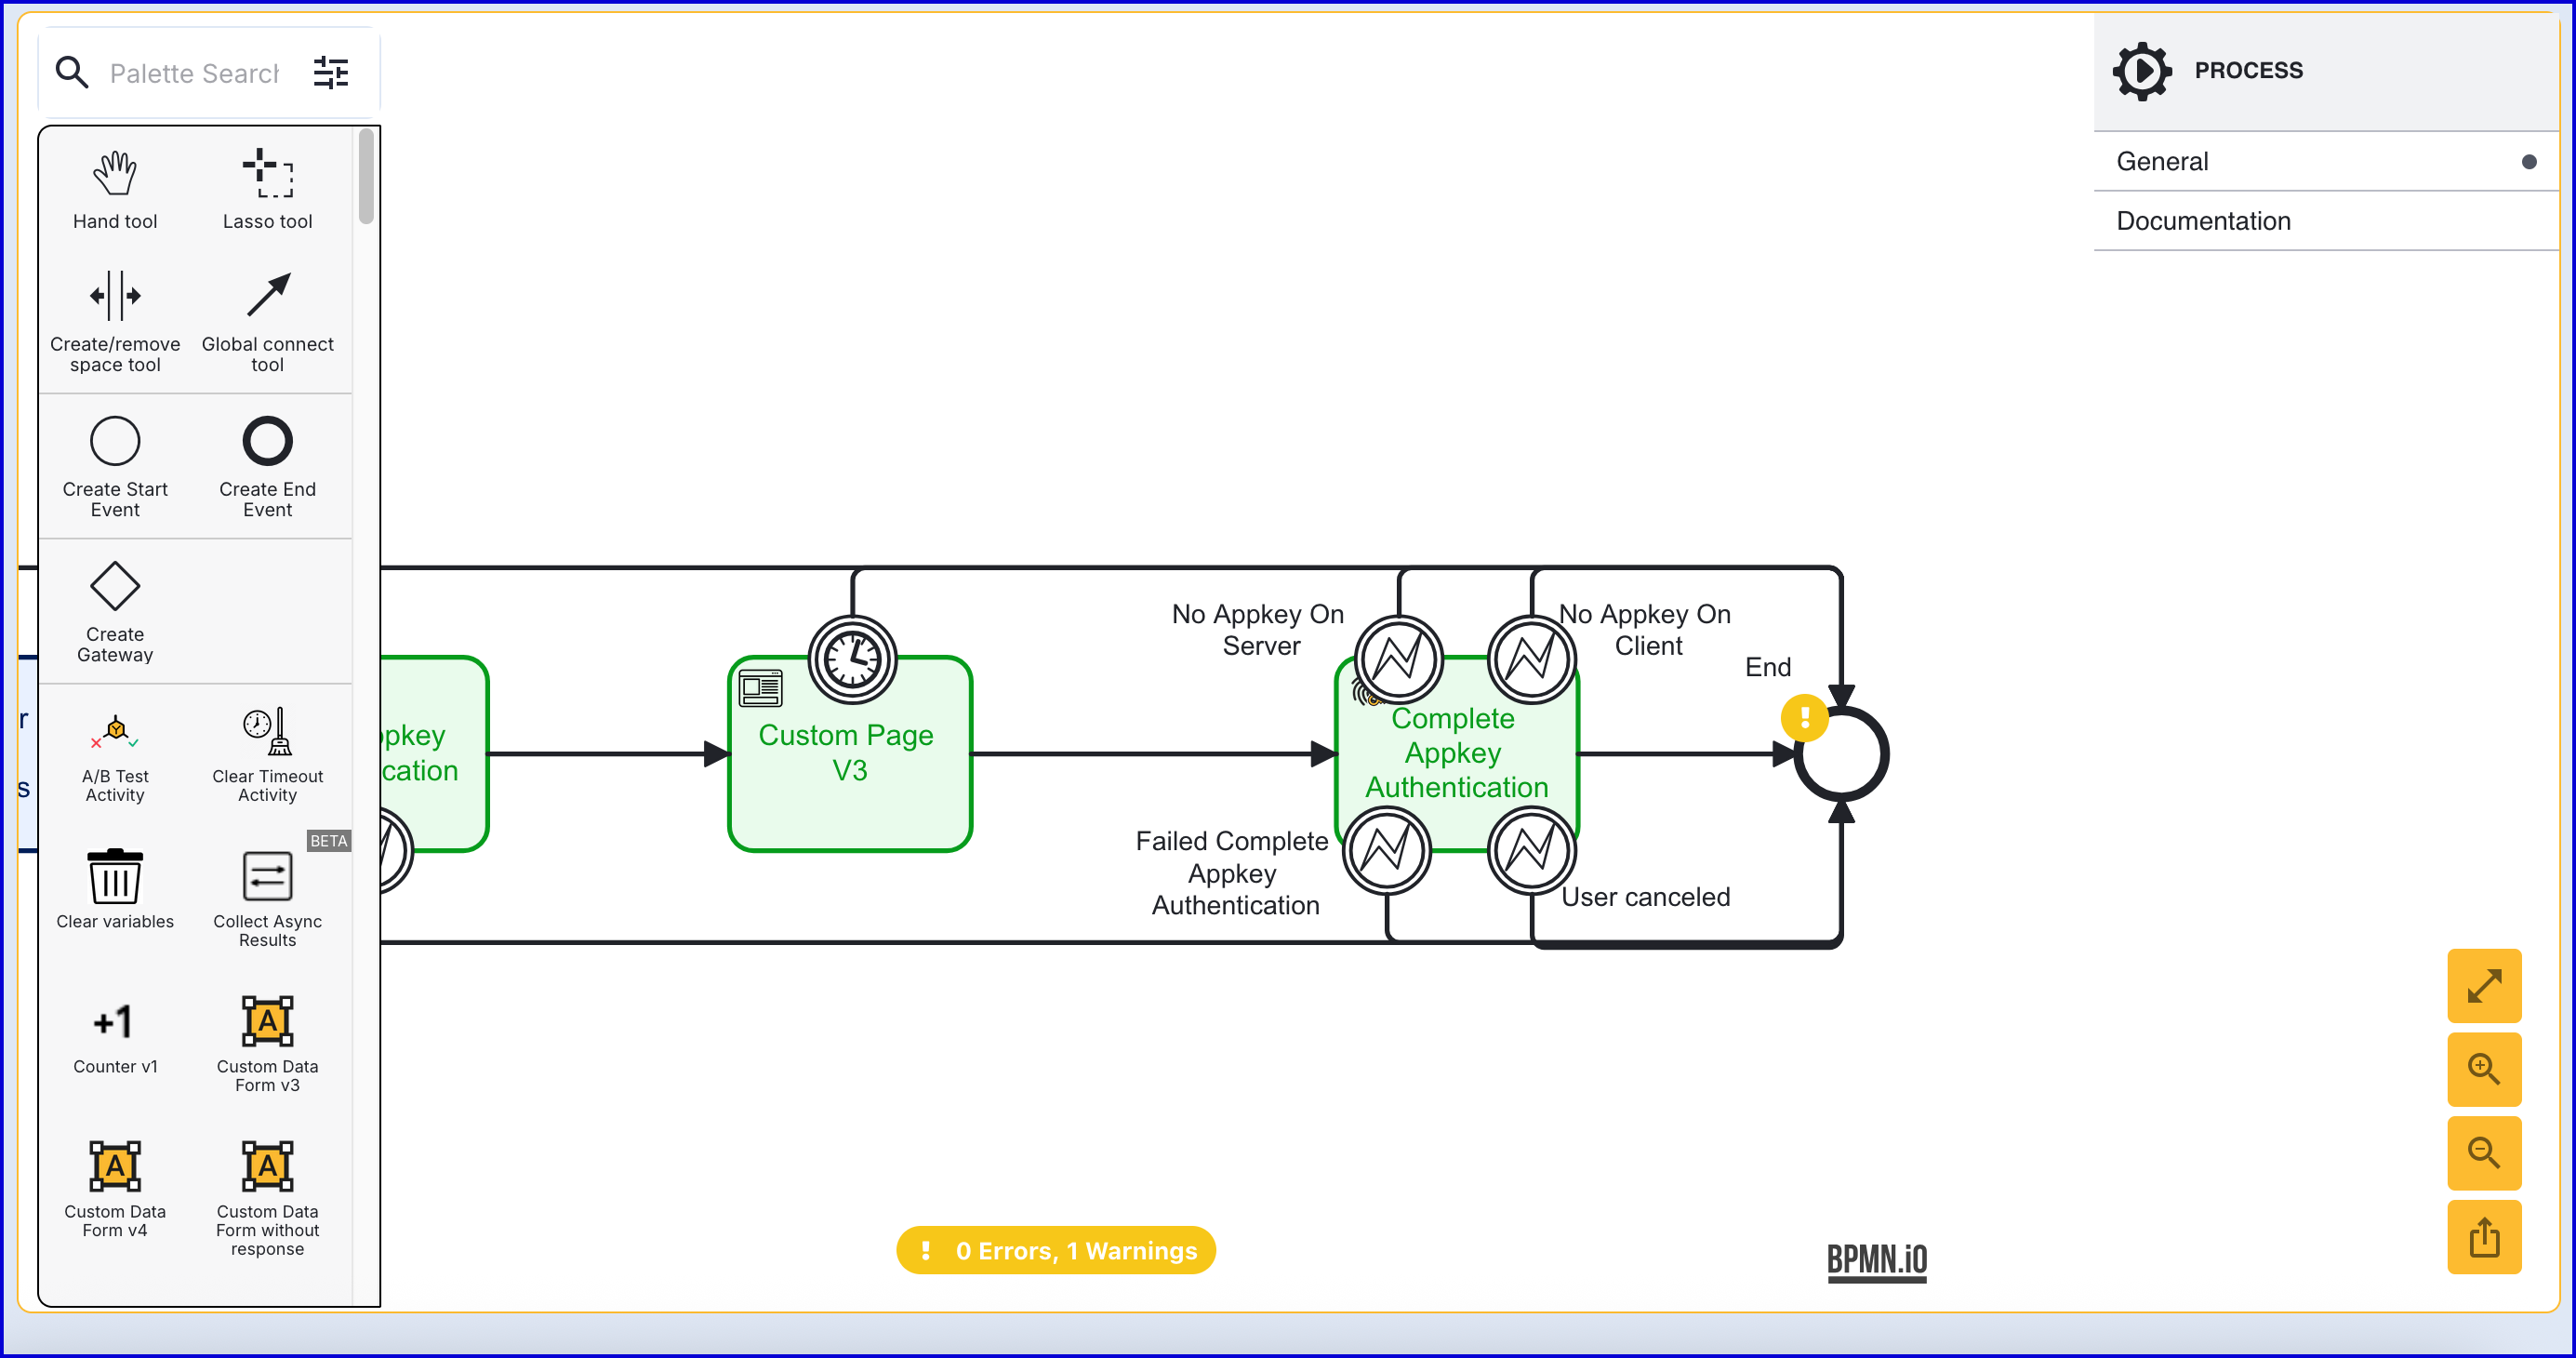
The 'Complete Appkey Authentication' activity has the following configurable input parameters:
Input Parameter | Type | Description |
|---|---|---|
Appkey Authentication Browser Response | String | In order to complete the appkey authentication, a response from the browser must be provided. This response is returned from the Custom Page and can be entered into the 'Appkey Authentication Browser Response' using variable substitution.
|
Appkey Authentication Key | String | The unique ID associated with the appkey authentication attempt. |
Fail Check On Cancel | Boolean | If enabled, checks will fail if the end-user cancels out of the process. Default behavior is disabled. |
The Activity also contains the following error navigation events:
No Appkey On Server: No Appkey was detected on the TrustX server.
No Appkey On Client: No Appkey was detected on the client device.
Failed Complete Appkey Authentication: The Appkey authentication failed to complete.
User Canceled: The user manually cancelled out of the flow.
(Optional) Complete Appkey Authentication via API
The appkey authentication process can be started via the API by calling either:
/api/identity-store/stores/{storeName}/users/{userId}/appkeys/relyingParties/{rpId}/authentications/{authPolicyName}/api/identity-store/{tenantId}/stores/{storeName}/users/{userExtId}/appkeys/relyingParties/{rpId}/authentications/{authPolicyName}/ext
Permissions: TNT#{tenant}#IdentityStore:createAppkeyAuthenticationForUser, TNT#{tenant}#IdentityStore:createAppkeyAuthenticationForUserByExtId , TNT#{tenant}#IdentityStore:createAppkeyAuthentication
Example Request:
Integration Method 2
The 'Appkey Authentication' activity provides a quick out-of-the-box solution to Appkey authentication compared to the method discussed in Integration Method 1.
The method described in this section will demonstrate how to configure a Process Definition to use this activity.
Step 3 - Appkey Authentication
After the 'Detect User Agent Capabilities', add an 'Appkey Authentication' activity to the flow and connect them using the 'Global connect tool'.
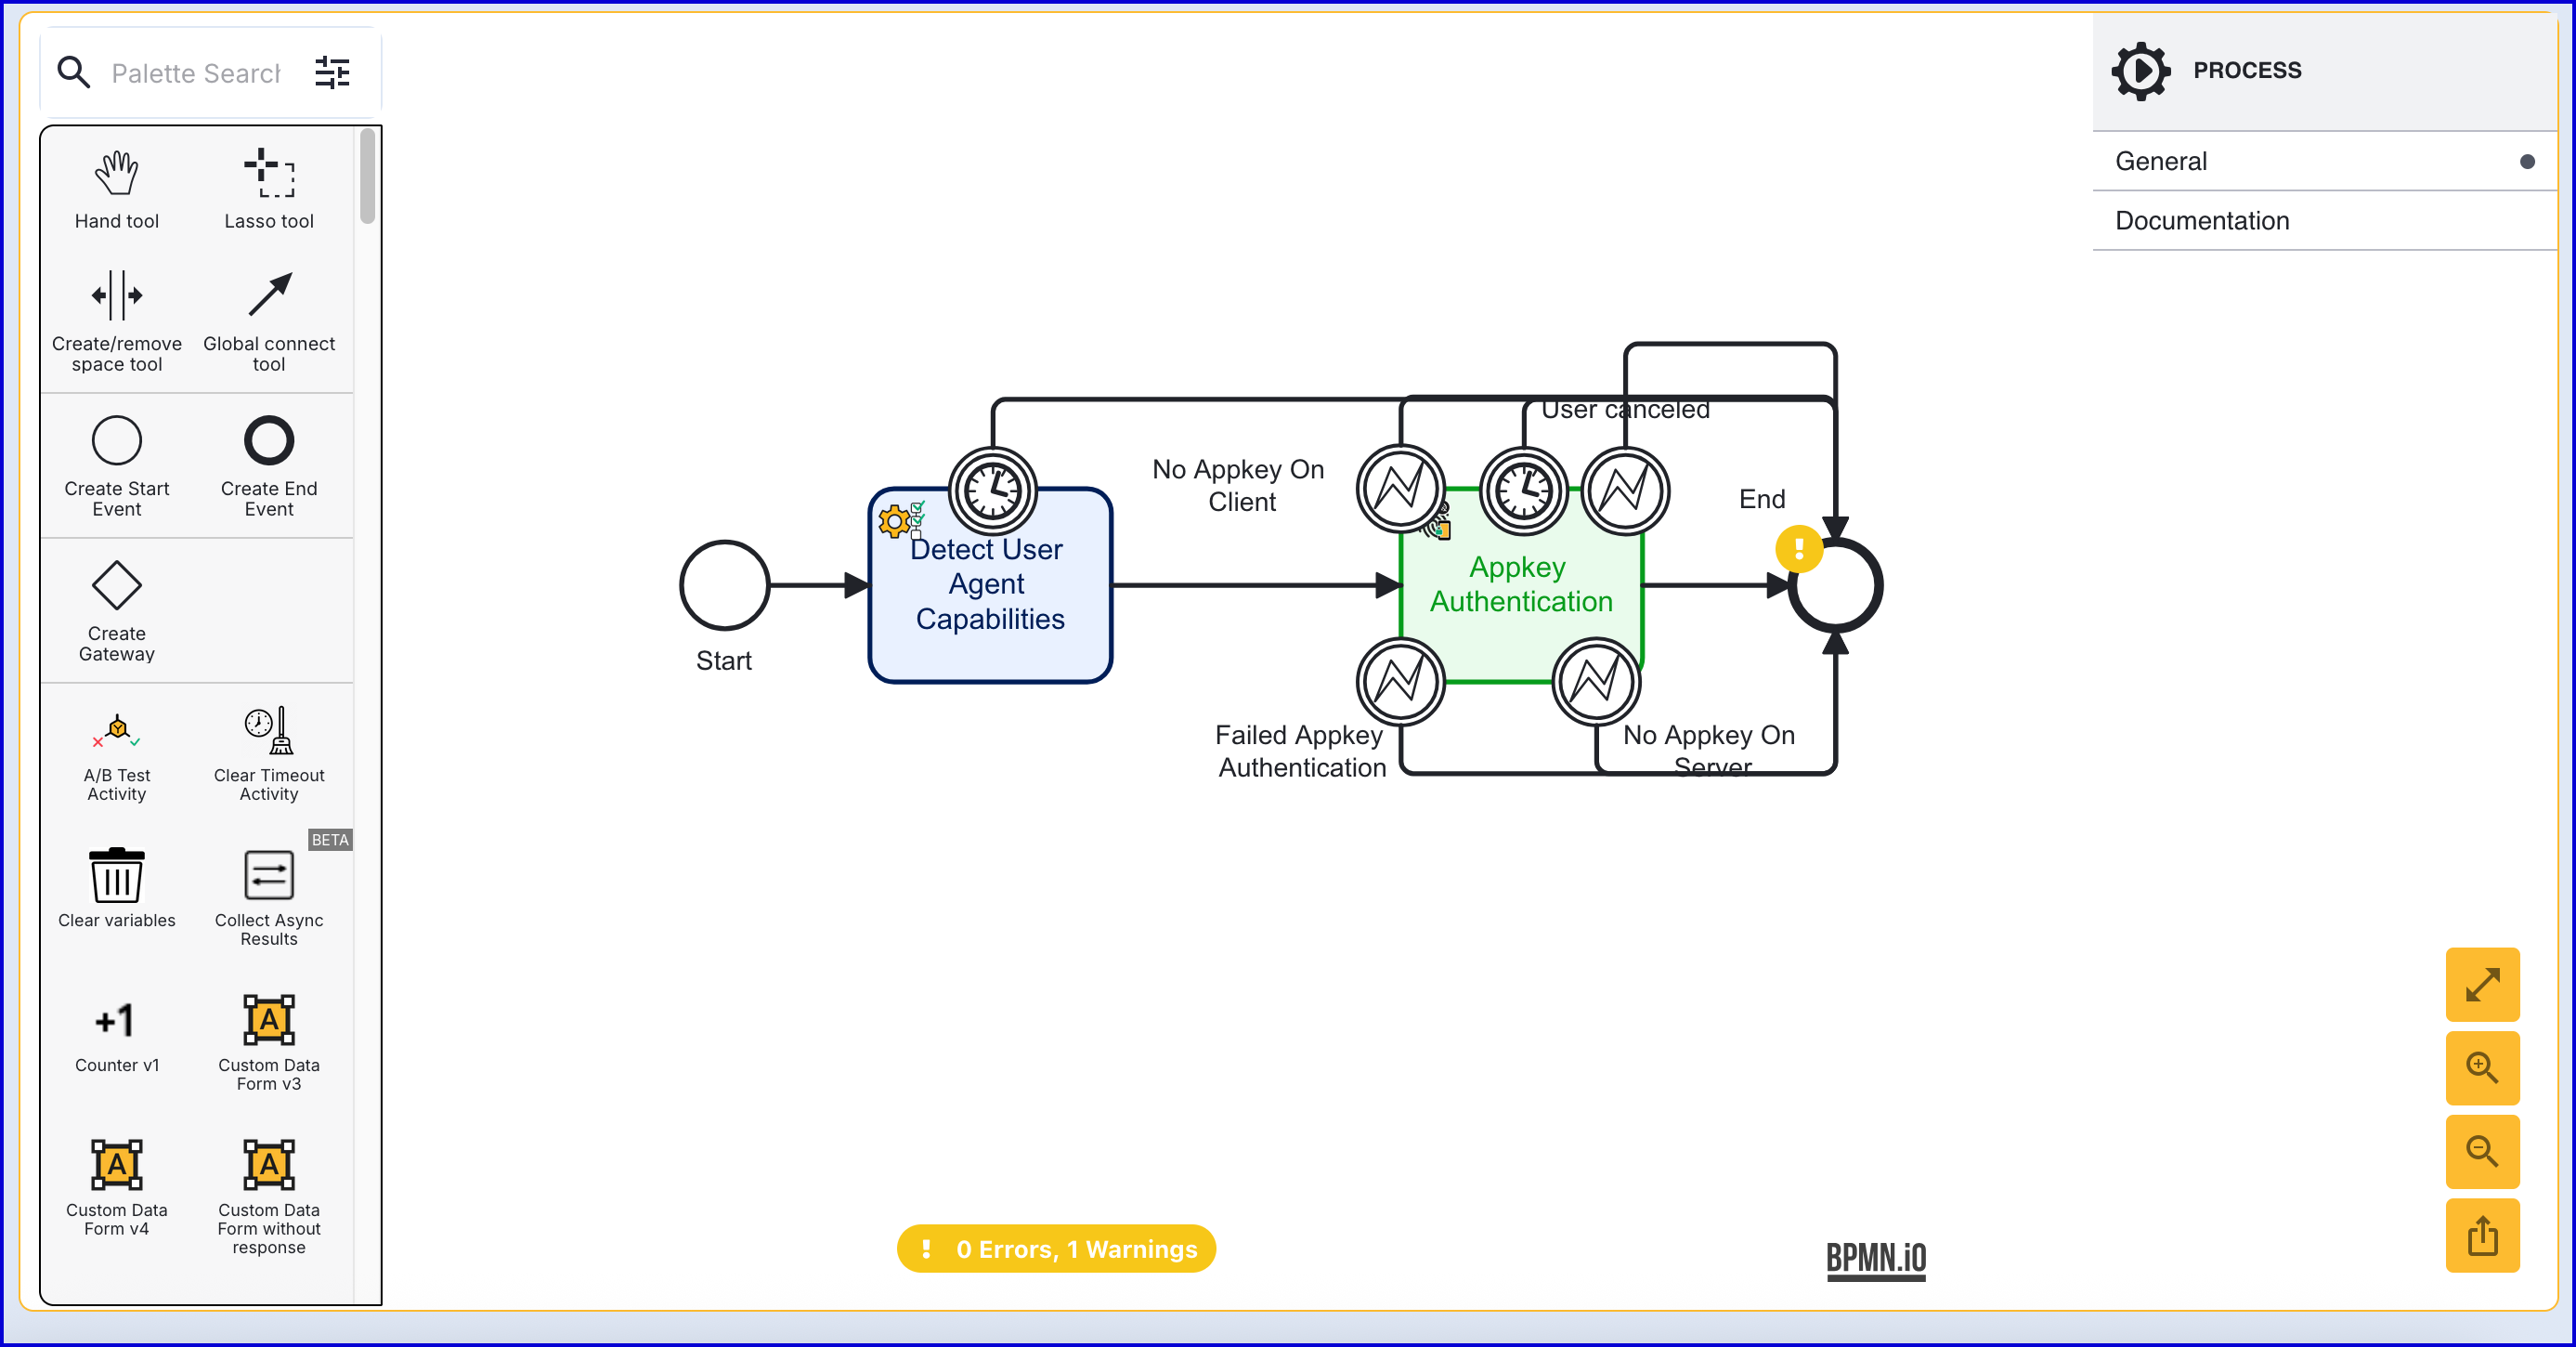
The 'Appkey Authentication' activity contains the following input parameters:
Input Parameter | Type | Description |
|---|---|---|
Appkey Authentication Key | String | Required - The unique ID associated with the appkey authentication activity. |
Challenge | String | The signed challenge is represented by a public key registered to the User. This value is auto-generated. |
List of Screens | List [String] | The list of screens to display to the end-user. |
Authentication Policy | String | Required - The name of the authentication policy. |
Relying Party ID | String | Required - The ID of the relying party whose appkey authentication configuration will be used. |
Server Data | String | This field can contain optional session data that a relying party can associate with the request. |
Starting Component ID | String | The unique identifier of the starting component. |
Store Name | String | Required - The name of the Identity Store. |
User External ID | String | This property can be used to identify the User that the appkey authentication applies to. |
User ID | String | The unique ID automatically generated when the User is created. In the context of the 'Start Appkey Authentication' activity, this ID can be used to identify the User that the appkey authentication applies to. |
User Key | String | The User Key that can be used to identify the User that the appkey authentication applies to. |
Test Appkey Authentication
Test Authentication Flow
This section will demonstrate a simple appkey device authentication and how to view the results of the Process Instance and device information captured during the Process Instance.
To begin testing, create a new Process Token by following the steps below.
From the Backoffice application, navigate to Process Definitions > Process Tokens.
Click the 'New Process Token' button on the Process Tokens landing page.
Choose the Process Definition and version then click the 'Create Token' button
Access the URL or scan the QR code to begin the flow.
When reaching the TrustWeb flow, the Custom Page requesting an identifier will appear. Enter a unique ID and click the 'Continue' button to complete the process.
View Results
To view the results of the completed Process Instance, navigate to the Process Instances page in the Backoffice application.
Navigate to the Process Instances page and search for the Process Instance completed as part of the Appkey authentication.
From the individual Process Instance page, details about the Appkey authentication can be found listed under the 'Checks' section as 'appkeyAuthentication'.

The Client Response retrieved from the Custom Page can be viewed under the 'Custom Pages' section.
