Introduction
This guide is aimed at developers and will provide the necessary steps for integrating with TrustX Identity Verification. The guide offers a step by step walkthrough on how to authenticate with TrustX and start a TrustX Identity Verification Process.
To complete this guide, the reader must have access to the TrustX back office application in order to create API Keys and Process definitions. If the reader does not have access to the TrustX back office application, they can request access via support@daon.com
Overview
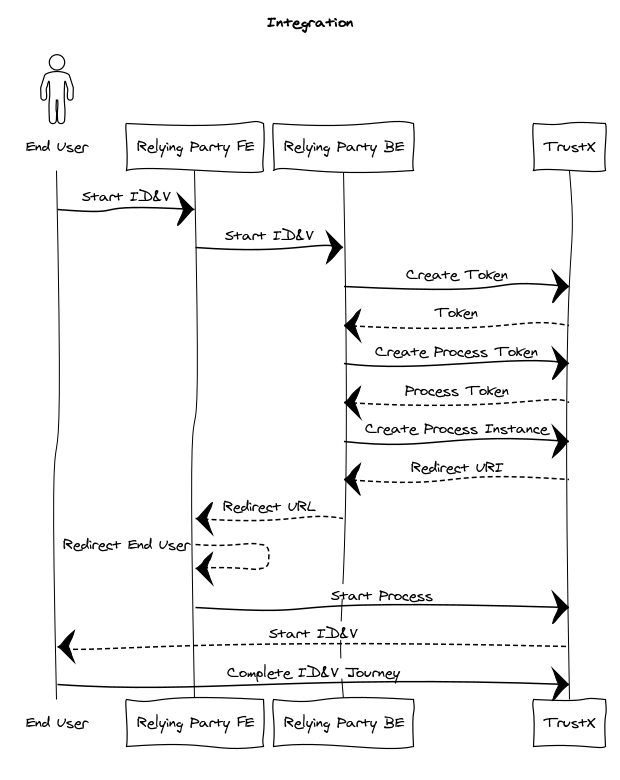
Sequence Diagram with calls for a typical integration scenario.
This guide assumes that the user is integrating from a web application. In summary:
The End User starts the journey on a Relying Party's website, possibly by clicking on a button or a link to start the TrustX Identity Verification journey.
The Relying Party makes a series of calls to TrustX. These calls serve a number of purposes:
- Authenticate the relying party so that they can makes calls to TrustX.
- Create a Process Instance from a Process Definition based on a Process Token.
Start the Process Definition and redirect the End User to TrustX so that the end user can complete the journey.
A Relying Party is a term commonly used to refer to the entity wishing to establish a claim of Identity.
Step 1. Create Token
A Token is created by invoking the API call below:
xxxxxxxxxxPOST https://{{tenant}}.{{region}}.trustx.com/api/arthr/apiKeys/issueContent-Type: application/jsonX-API-Key: {{apiKey}} {}A token grants access to the caller to invoke API calls on TrustX. Once the token is generated it can be reused, however it must be noted that the token has a 'time to live'. Once the 'time to live' has expired a new token must be generated.
When calling the API to issue a token, you will need to provide an API Key. This API Key is obtained from an API Key's secret. See the API Key Guide for information on how to manage API keys.
When the api/arthr/apiKeys/issue API is invoked, the response to this call provides a bearer token. This bearer token is used to authenticate subsequent calls to TrustX.
The permissions required for the APIs calls within this integration guide are as follows (note: replace {tenantid} with literal value):
xxxxxxxxxxTNT#{tenantid}#ProcessManager:addProcessTokenTNT#{tenantid}#ProcessManager:getProcessInstanceTNT#{tenantid}#UserDataServer:getProcessInstanceUserDataTokens should be protected - they should reside only in the back end service and should not be publicly shared by embedding in web pages. If a token is compromised it can provide bad actors access to your services and data in TrustX.
Step 2. Create Process Token
A process token is used to create process instances from a Process Definition. For more information on creating a Process Definition, see the Process Definition Guide. When creating the process token the process definition name and version must be supplied.
xxxxxxxxxxPOST https://{{tenant}}.{{region}}.trustx.com/api/process-manager/processTokensContent-Type: application/jsonAuthorization: Bearer {{token}} { "name": "My Process Token", "description": "A token that allows me to start create an instance of my process definition", "status": "ACTIVE", "type": "MULTI_USE_COUNT_LIMITED", "maxCount": 1, "processDefnName": "{{processDefnName}}", "processDefnVersion": "{{processDefnVersion}}", "uiUrl": "https://{{tenant}}.{{region}}.trustx.com/web/trustweb", "parameters": { "email": "myemail@daon.com", "_redirectUrl": "https://www.daon.com" }}When creating a process instance, extra parameters can be passed to provide additional information about the process. For example, the End User's details such as email, phone, first-name, surname, etc. can be passed as parameters. See the Parameters section of the Process Tokens guide in for more information.
Process Token Resource
The process token resource above contains the following attributes.
| Type | Description | |
|---|---|---|
| name | string | A unique name to describe the process token. |
| description | string | A short description of the token |
| status | string | The process token status. In the example above we create the token to be active. Valid values: ACTIVE,INACTIVE |
| type | string | The process token status. In the example above we create the token to be active. Valid values: UNLIMITED, MULTI_USE COUNT_LIMITED,_ MULTI_USE_TIME_LIMITED |
| maxCount | number | The number of times the token can be used. In the example above the token can be used once only. |
| processDefnName | string | The process definition name. Using the combination of process definition name and process definition version a specific process definition is bound to the process token to be used when a process instance created with a token (See Step 3.) |
| processDefnVersion | string | The process definition version. Using the combination of process definition name and process definition version a specific process definition is bound to the process token to be used when a process instance created with a token (See Step 3.) |
| uiUrl | string | The URI of the application to execute the process definition when the process instance is started. Currently on TruxtX user interfaces are supported. |
| parameters | Map<String,String> | A map of additional parameters can be supplied to provide extra information when the process instance is started. This additional parameter map could typically contain information such as:
These are typically attributes that are useful for searching for an ID&V applicant. Any set of additional parameters may be passed in. |
In order to set the redirect URL for the end of a process instance - a special parameter should be added to parameters map - _redirectUrl. This parameter is used to redirect the end user back to the relying party. For more information see Update RedirectURL and the auto$.
Step 3. Create Process Instance
Once a Process Token is created, it can be used to create the Process Instance.
xxxxxxxxxxPOST https://{{tenant}}.{{region}}.trustx.com/api/process-manager/processInstances/create?pt={{ptoken}}Content-Type: application/jsonAuthorization: Bearer {{token}}The response provides the redirect URL that is then used to start the process definition.
Step 4. End User completes Journey
The end user will be redirected to TrustX where they can complete the Identity Verification journey as defined in the Process Definition.
Step 5. Getting Process Instance Status
Once the user has completed the journey the status of the process instance can be checked.
xxxxxxxxxxGET https://{{tenant}}.{{region}}.trustx.com/api/process-manager/processInstances/{{processInstanceId}}Authorization: Bearer {{token}}Alternatively webhooks can be used to get notification about the process instance at any stage in the process definition. For information on webhooks see the Webhooks Guide.
Step 6. Getting End User's provided Data
xxxxxxxxxxGET https://{{tenant}}.{{region}}.trustx.com//api/userdata-server/processDefinitions/{processDefnId}/processInstances/{processInstanceId}/userdataAuthorization: Bearer {{token}}| Type | Description | |
|---|---|---|
| processDefnId | String | The id of the process definition. This is generated when creating the process definition |
| processInstanceId | String | The id of the process instance. This is generated when creating the process instance. |