
Introduction
This guide is aimed at developers and will provide the necessary steps for integrating with the Trust SDK. The guide offers a step by step walkthrough on how to authenticate with TrustX and start a TrustX authentication or Identity Verification process through the Trust SDK.
To complete this guide, the reader must have access to the TrustX back office application in order to create API Keys and Process definitions. If the reader does not have access to the TrustX back office application, they can request access via support@daon.com
Overview
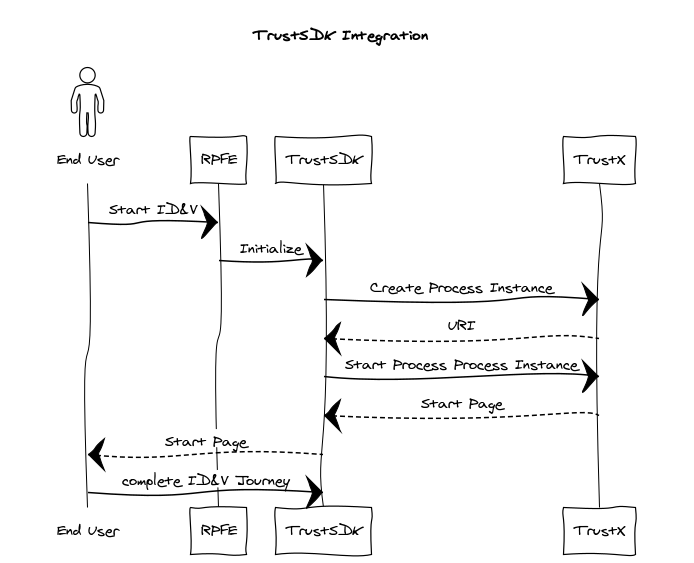
This guide assumes that the user is integrating from a mobile application. In summary:
The End User starts the journey on a Relying Party's application, possibly by clicking on a button or a link to start the TrustX Identity Verification and Authentication journey.
The Relying Party makes a series of calls to TrustX. These calls serve a number of purposes:
Authenticate the relying party so that they can makes calls to TrustX.
Create a Process Instance from a Process Definition based on a Process Token.
The mobile application has imported the Trust SDK. See iOS NFC Native Interface for more information.
Start the Process Definition and redirect the End User to TrustX so that the end user can complete the journey.
A Relying Party is a term commonly used to refer to the entity wishing to establish a claim of Identity.
Add the Trust SDK to your Xcode Project
The Trust SDK is distributed as a set of pre-built XCFrameworks via Swift Package Manager. To add the Trust SDK and its optional processors to your Xcode project, do the following:
1. Navigate to File → Add Package Dependencies…
2. Enter the repository URL: https://github.com/daoninc/trust-sdk-ios
3. Set the dependency rule (e.g. Up to Next Major Version).
4. Add the DaonTrustSDK library to your app target.
5. If any of the following optional modules, are required, also add them to your app target:
DaonTrustSDKAppkeysProcessorDaonTrustSDKDocumentProcessorDaonTrustSDKDeviceIntegrityProcessor
SPM will download the frameworks from the corresponding GitHub Release and verify its checksum automatically.
Core Dependency Required
Whichever optional processors are added, they all require the DaonTrustSDK library in order to function correctly. Ensure this is included in your target's "Frameworks, Libraries, and Embedded Content" section alongside your chosen processors.
Step 1. Create Token
A Token is created by invoking the API call below:
A token grants access to the caller to invoke API calls on TrustX. Once the token is generated it can be reused, however it must be noted that the token has a 'time to live'. Once the 'time to live' has expired a new token must be generated.
When calling the API to issue a token, you will need to provide an API Key. This API Key is obtained from an API Key's secret. See the API Key Guide for information on how to manage API keys.
When the api/arthr/apiKeys/issue API is invoked, the response to this call provides a bearer token. This bearer token is used to authenticate subsequent calls to TrustX.
The permissions required for the APIs calls within this integration guide are as follows (note: replace {tenantid} with literal value):
Tokens should be protected - they should reside only in the back end service and should not be publicly shared by embedding in web pages. If a token is compromised it can provide bad actors access to your services and data in TrustX.
Relying parties should ensure before starting the process that they are communicating with a genuine approved build of their native applications by using either Google Play Integrity or Apple App Attest.
Step 2. Create Process Token
A process token is used to create process instances from a Process Definition. For more information on creating a Process Definition, see the Process Definition Guide. When creating the process token the process definition name and version must be supplied.
When creating a process instance, extra parameters can be passed to provide additional information about the process. For example, the End User's details such as email, phone, first-name, surname, etc. can be passed as parameters. See the API Guide for more information.
Process Token Resource
The process token resource above contains the following attributes. See the API Guide for more information.
Type | Description | |
|---|---|---|
name | string | A unique name to describe the process token. |
description | string | A short description of the token |
status | string | The process token status. In the example above we create the token to be active. Valid values: ACTIVE,INACTIVE |
type | string | The process token status. In the example above we create the token to be active. Valid values: UNLIMITED, MULTI_USE COUNT_LIMITED,_ MULTI_USE_TIME_LIMITED |
maxCount | number | The number of times the token can be used. In the example above the token can be used once only. |
processDefnName | string | The process definition name. Using the combination of process definition name and process definition version a specific process definition is bound to the process token to be used when a process instance created with a token (See Step 3.) |
processDefnVersion | string | The process definition version. Using the combination of process definition name and process definition version a specific process definition is bound to the process token to be used when a process instance created with a token (See Step 3.) |
uiUrl | string | The URI of the application to execute the process definition when the process instance is started. Currently on TruxtX user interfaces are supported. |
parameters | Map<String,String> | A map of additional parameters can be supplied to provide extra information when the process instance is started. This additional parameter map could typically contain information such as:
These are typically attributes that are useful for searching for an ID&V applicant. Any set of additional parameters may be passed in. |
In order to set the redirect URL for the end of a process instance - a special parameter should be added to parameters map - _redirectUrl. This parameter is used to redirect the end user back to the relying party. For more information see Process Definition Tokens Guide and also API Keys Guide.
Step 3. Create Process Instance
Once a Process Token is created, it can be used to create the Process Instance.
The response provides the redirect URL that is then used to start the process definition.
Optional - Set Default Language
It is possible to set the default language by appending the redirect URL with the lang query parameter. This query parameter accepts an ISO language code as input in the format: redirectUrl + "&lang=<ISO language code>"
Example:
https://skyprod.oak.trustx-dev.com/web/trustweb/?pt=7BU2B6IHVVCZWE2PM5JMZW7GUE&lang=it
Step 4. Initializing the Trust SDK
With the URL generated, the Trust SDK can be initialized.
Initialize the DaonTrustSDK:
Daon Trust SDK offers setting a DaonOptions object for customization purposes. You can set your own initialization timeout as well as the URL of the environment that you want to use:
If you do not set the DaonOptions object, default values will be used. Initialization timeout default value is '10'. By not setting the custom environment URL, you are requesting of the Daon Trust SDK to launch a QR code scanning feature which expects the QR code that carries the URL of your environment as a value.
Finally, you can start the Onboarding process by calling 'start()' function of the TrustSDK:
Step 5. End User completes Journey
The end user will be redirected to TrustX where they can complete the Identity Verification and Authentication journey as defined in the Process Definition.
Step 6. Getting Process Instance Status
Once the user has completed the journey the status of the process instance can be checked.
Alternatively webhooks can be used to get notification about the process instance at any stage in the process definition. For information on webhooks see the Webhooks Guide.
Step 7. Getting End User's provided Data
Type | Description | |
|---|---|---|
processDefnId | String | The id of the process definition. This is generated when creating the process definition |
processInstanceId | String | The id of the process instance. This is generated when creating the process instance. |
Optional: Appkeys Integration
Appkeys utilize the FIDO Universal Authentication Framework (UAF) specification to provide a passwordless solution to registration and authentication where an identity is bound to only one device or biometric profile without the need for passwords or QR codes.
Step 1. Add the Processor
The DaonTrustSDKAppkeysProcessor should be added to your project using Swift Package Manager as described in the Add the Trust SDK to your Xcode Project section.
Step 2. Additional Dependencies
To take full advantage of Appkeys in TrustX, it is necessary to integrate the xAuth FIDO SDK with the Trust SDK to:
Store Appkeys on a device for stronger security than the web-based alternative.
Capture biometrics (face, fingerprint) to complete biometric-bound registration and authentication flows with Appkeys.
Add your GitHub account to Xcode and add the xAuth FIDO SDK as a Swift Package:
Navigate to File → Add Package Dependencies…
Enter the repository URL:
<https://github.com/daoninc/fido-sdk-ios>Set the dependency rule (e.g. Up to Next Major Version).
Add the
DaonFIDOSDKlibrary to your app target.
SPM will download the framework from the corresponding GitHub Release and verify its checksum automatically.
Step 3. Configure the Processor
Optional: NFC Integration
The Daon Trust SDK Document Processor provides features to perform OCR of MRZ from document images and NFC scanning of passports and other documents.
This section will describe how to add the Document Processor and add the processor to your project.
Step 1. Add the Processor
The DaonTrustSDKDocumentProcessor should be added to your project using Swift Package Manager as described in the Add the Trust SDK to your Xcode Project section.
Step 2. Additional Dependencies
To take full advantage of document capture in TrustX, it is necessary to integrate the Daon NFC SDK with the Trust SDK to provide ePassport NFC scanning capabilities.
Add your GitHub account to Xcode and add the Daon NFC SDK as a Swift Package:
1. Navigate to File → Add Package Dependencies…
2. Enter the repository URL: https://github.com/daoninc/nfc-sdk-ios
3. Set the dependency rule (e.g. Up to Next Major Version).
4. Add the DaonNFCSDK library to your app target.
SPM will download the framework from the corresponding GitHub Release and verify its checksum automatically.
Step 3. Update Application Capabilities
In order for iOS to allow your application to support NFC scanning, a couple of changes must be made.
Entitlements
Add or update your entitlements file to include the following:
Plist
Update your Info.plist to add a usage description as well as ISO 7816 Application Identifiers for ICAO e-passports:
Step 4. Configure the Processor
To create a new instance of the Document Processor you must use the ``DocumentProcessor/Builder class which allows you to configure and then build the processor using method chaining. The document processor can then be added to the Trust SDK instance.
Once configured, the process can be started by performing the following:
Optional: Device Integrity Integration
The device-integrity module is an optional add-on to the Daon Trust SDK that collects Device Integrity Signals. Device Integrity Signals are used to collect rich, high-fidelity telemetry from every web and native session. Device signals can be used to uniquely identify visitors and additional device signals (for example, if a device is rooted/ jailbroken) that can be applied for further fraud analysis.
Requirements
Requirements | Details |
|---|---|
iOS Deployment | 14.0 |
Xcode | 14.0+ |
| Must be linked first |
|
The Device Integrity Signal provider is embedded inside DaonTrustSDKDeviceIntegrityProcessor.xcframework via SPM. No separate installation is required.
Step 1. Add the Processor
The DaonTrustSDKDeviceIntegrityProcessor should be added to your project using Swift Package Manager as described in the Add the Trust SDK to your Xcode Project section.
Step 2. Additional Dependencies
In order to provide device fingerprinting and signals functionality, it is neccesary to also integrate the FingerprintPro library.
Add your GitHub account to Xcode and add the library as a Swift Package:
1. Navigate to File → Add Package Dependencies…
2. Enter the repository URL: https://github.com/fingerprintjs/fingerprintjs-pro-ios
3. Set the dependency rule (e.g. Up to Next Major Version).
4. Add the FingerprintPro library to your app target.
SPM will download the framework from the corresponding GitHub Release and verify its checksum automatically.
App Clip targets: Exclude the framework from App Clip targets to stay within the 15 MB size budget. See App Clip Builds below.
Step 3. Configuring the Processor
Integration requires three lines of code added before TrustSDK.start(withDaonOptions:) is called.
Swift (UIKit)
SwiftUI
DeviceIntegrityProcessor can be combined with other processors. Registration order does not matter.
App Clip Builds
DeviceIntegrityProcessor depends on the Device Integrity Signal provider, which adds non-trivial binary size. Exclude it from App Clip targets using a compiler flag:
Set the APPCLIP Swift Active Compilation Condition on your App Clip target under Build Settings → Swift Compiler — Custom Flags → Active Compilation Conditions. When the processor is not registered the Device Integrity module is simply absent from the capabilities response, and the server skips the device integrity step for that session.
Error Handling
Errors from the Device Integrity Processor are surfaced through the standard DaonEventDelegate callbacks — no additional error handling is required in the application. When a fingerprint operation fails, the SDK reports the failure back to the web layer and the server determines how to proceed with the onboarding flow.
API Reference
DeviceIntegrityProcessor conforms to the DaonDeviceIntegrityProcessorModule protocol defined in DaonTrustSDK .
Method | Description |
|---|---|
| Returns |
| Returns the FingerprintPro SDK version string ( |
| Returns the list of supported capability identifiers ( |
| Performs a device fingerprint operation and returns a sealed result via the completion handler. Called automatically by the SDK; applications do not invoke this directly. |
| Releases processor resources. Called automatically by the SDK on |
Privacy
DaonTrustSDKDeviceIntegrityProcessor.xcframework declares:
NSPrivacyTracking:
false— the framework itself does not perform tracking.NSPrivacyCollectedDataTypes: empty — no data types are declared as collected at the framework level.