Introduction
This guide is aimed at developers and will provide the necessary steps for integrating with the Trust SDK. The guide offers a step by step walkthrough on how to authenticate with TrustX and start a TrustX authentication or Identity Verification process through the Trust SDK.
To complete this guide, the reader must have access to the TrustX back office application in order to create API Keys and Process definitions. If the reader does not have access to the TrustX back office application, they can request access via support@daon.com
Add the Trust SDK to your Gradle Project
To get started with the Trust SDK, add the SDK to your Gradle project using the Daon Maven registry
hosted on GitHub Packages.
A GitHub account with read access to the daoninc/sdk-packages registry is required. Generate a fine-grained personal access token with the read:packages permission.
Step 1. Configure Repositories and Version Catalog
Open your project-level settings.gradle file and add the Daon Maven registry inside dependencyResolutionManagement. Register the version catalog at the same time so that every module in the project can reference it.
Step 2. Create the Version Catalog
Create gradle/libs.versions.toml at the project root and add the following Daon Trust SDK entries alongside any other dependencies your project requires.
Step 3. Add Dependencies
Open your module-level app/build.gradle and add the Trust SDK dependencies. You might already have other libraries listed — leave them as they are and add the new entries alongside them.
Optional - Configure Local AAR Files
This is an alternative approach for environments that cannot access the Daon Maven registry. The Maven-based approach described above is recommended for all new integrations.
Copy the following AAR files to your module's
libsfolder. If you don't have alibsfolder, create one. The default location for new projects isMy Application/app/libs.daon-trust-sdk-1.0.x.aar
Open your module-level Gradle settings file (
My Application/app/build.gradle).Make the
libsfolder accessible. Add the following to yoursettings.gradlefile:
By default, you might not have any repository settings in your module-level build.gradle . If so, add the block to the end of the file outside any other objects. If flatDir { dirs 'libs' } is already present in your repositories, no change is necessary.
Add the Trust SDK and other required dependencies to your module Gradle dependencies:
TrustX Integration Overview
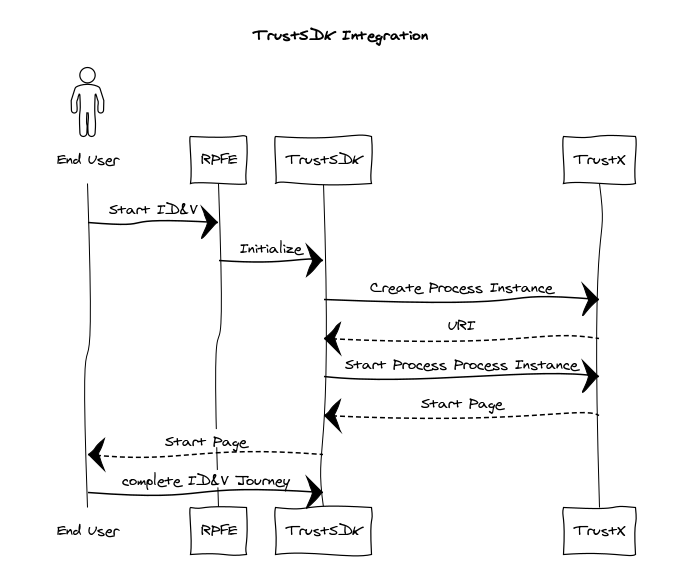
This guide assumes that the user is integrating from a mobile application. In summary:
The End User starts the journey on a Relying Party's application, possibly by clicking on a button or a link to start the TrustX Identity Verification and Authentication journey.
The Relying Party makes a series of calls to TrustX. These calls serve a number of purposes:
Authenticate the relying party so that they can makes calls to TrustX.
Create a Process Instance from a Process Definition based on a Process Token.
The mobile application has imported the Trust SDK. See Android Trust SDK Native Interface for more information.
Start the Process Definition and redirect the End User to TrustX so that the end user can complete the journey.
A Relying Party is a term commonly used to refer to the entity wishing to establish a claim of Identity.
Step 1. Create Token
A Token is created by invoking the API call below:
A token grants access to the caller to invoke API calls on TrustX. Once the token is generated it can be reused, however it must be noted that the token has a 'time to live'. Once the 'time to live' has expired a new token must be generated.
When calling the API to issue a token, you will need to provide an API Key. This API Key is obtained from an API Key's secret. See the API Key Guide for information on how to manage API keys.
When the api/arthr/apiKeys/issue API is invoked, the response to this call provides a bearer token. This bearer token is used to authenticate subsequent calls to TrustX.
The permissions required for the APIs calls within this integration guide are as follows (note: replace {tenantid} with literal value):
Tokens should be protected - they should reside only in the back end service and should not be publicly shared by embedding in web pages. If a token is compromised it can provide bad actors access to your services and data in TrustX.
Step 2. Create Process Token
A process token is used to create process instances from a Process Definition. For more information on creating a Process Definition, see the Process Definition Guide. When creating the process token the process definition name and version must be supplied.
Daon recommends that the _redirectUrl uses the HTTPS protocol.
When creating a process instance, extra parameters can be passed to provide additional information about the process. For example, the End User's details such as email, phone, first-name, surname, etc. can be passed as parameters. See the API Guide for more information.
Process Token Resource
The process token resource above contains the following attributes. See the API Guide for more information.
Type | Description | |
|---|---|---|
name | string | A unique name to describe the process token. |
description | string | A short description of the token |
status | string | The process token status. In the example above we create the token to be active. Valid values: ACTIVE,INACTIVE |
type | string | The process token status. In the example above we create the token to be active. Valid values: UNLIMITED, MULTI_USE COUNT_LIMITED,_ MULTI_USE_TIME_LIMITED |
maxCount | number | The number of times the token can be used. In the example above the token can be used once only. |
processDefnName | string | The process definition name. Using the combination of process definition name and process definition version a specific process definition is bound to the process token to be used when a process instance created with a token (See Step 3.) |
processDefnVersion | string | The process definition version. Using the combination of process definition name and process definition version a specific process definition is bound to the process token to be used when a process instance created with a token (See Step 3.) |
uiUrl | string | The URI of the application to execute the process definition when the process instance is started. Currently on TruxtX user interfaces are supported. |
parameters | Map<String,String> | A map of additional parameters can be supplied to provide extra information when the process instance is started. This additional parameter map could typically contain information such as:
These are typically attributes that are useful for searching for an ID&V applicant. Any set of additional parameters may be passed in. |
In order to set the redirect URL for the end of a process instance - a special parameter should be added to parameters map - _redirectUrl. This parameter is used to redirect the end user back to the relying party.
Step 3. Create Process Instance
Once a Process Token is created, it can be used to create the Process Instance.
The response provides the redirect URL that is then used to start the process definition.
Optional - Set Default Language
It is possible to set the default language by appending the redirect URL with the lang query parameter. This query parameter accepts an ISO language code as input in the format: redirectUrl + "&lang=<ISO language code>"
Example:
https://skyprod.oak.trustx-dev.com/web/trustweb/?pt=7BU2B6IHVVCZWE2PM5JMZW7GUE&lang=it
Step 4. End User completes Journey
The end user will be redirected to TrustX where they can complete the Identity Verification and Authentication journey as defined in the Process Definition.
Step 5. Getting Process Instance Status
Once the user has completed the journey the status of the process instance can be checked.
Alternatively webhooks can be used to get notification about the process instance at any stage in the process definition. For information on webhooks see the Webhooks Guide.
Step 6. Getting End User's provided Data
Type | Description | |
|---|---|---|
processDefnId | String | The id of the process definition. This is generated when creating the process definition |
processInstanceId | String | The id of the process instance. This is generated when creating the process instance. |
Optional: Appkeys Integration
Appkeys utilize the FIDO Universal Authentication Framework (UAF) specification to provide a passwordless solution to registration and authentication where an identity is bound to only one device or biometric profile without the need for passwords or QR codes.
To take full advantage of Appkeys in TrustX, it is necessary to integrate the FIDO SDK with the Trust SDK to
Store Appkeys on a device for stronger security than the web-based alternative.
Capture biometrics (face, fingerprint) to complete biometric-bound registration and authentication flows with Appkeys.
This section will describe the configuration steps to include the SDK with your Android application.
Dependencies
The xAuth FIDO SDK is provided as a Maven package on the same Daon registry configured in (link). Make sure that setup is complete before continuing.
Step 1. Update the Version Catalog
Add the following entries to gradle/libs.versions.toml :
The AppKeysManager package can be imported by adding com.daon.trustsdk.appkeysManager to your project.
Step 2. Add Dependencies
Add the following to your module-level app/build.gradle :
Alternative - Local AAR Files
This is an alternative approach for environments that cannot access the Daon Maven registry. The Maven-based approach described above is recommended for all new integrations.
Copy the following AAR files into your module's libs folder and declare them as dependencies in app/build.gradle :
Optional: NFC Integration
The Trust SDK supports optional integration of the NFC capture and processing using the TrustNFCManager class.
Step 1. Update Dependencies
To utilize NFC functionality in your project, first complete the setup described in (link).
Update the Version Catalog
Add the following libraries to gradle/libs.versions.toml :
Add Dependencies
Add the following libraries to your module-level app/build.gradle :
Alternative: Local AAR Files
This is an alternative approach for environments that cannot access the Daon Maven registry. The Maven-based approach described above is recommended for all new integrations.
Step 2. Initialization
The code sample below implements NFC functionality into the standard document and face capture flow. This occurs during initialization detailed in Step 5.
In the above sample, a new TrustNFCManager is defined and added to the DaonTrustSDK using the addTrustNFCManager(TrustNFCManager) method.
When the flow is started, NFC capture and processing will be included as part of the flow. To start the flow, define Trust SDK options and call the start(Options) method as highlighted in Step 5.
ProGuard / R8 Configuration
When code shrinking or obfuscation is enabled (minifyEnabled true), some components may be removed or altered by ProGuard / R8, which can lead to runtime failures during NFC passport reading or certificate verification.
To ensure correct behavior, the following ProGuard rules must be added to your application's proguard-rules.pro file.
See Also
Optional: Device Integrity Integration
The device-integrity module is an optional add-on to the Daon Trust SDK that collects Device Integrity Signals. Device Integrity Signals are used to collect rich, high-fidelity telemetry from every web and native session. Device signals can be used to uniquely identify visitors and additional device signals (for example, if a device is rooted/ jailbroken) that can be applied for further fraud analysis.
Requirements
Requirements | Details |
|---|---|
Minimum Android SDK | 24 (Android 7.0) |
Runtime permissions (Optional) |
|
Quick Start
Step 1. Verify The Maven Repository
The Device Integrity Signal provider library is served from a dedicated registry. If you have already followed Add the Trust SDK to your Gradle Project this entry is already present. If not, add it to your settings.gradle inside dependencyResolutionManagement :
Step 2. Update The Version Catalog
Add the following entry to gradle/libs.versions.toml (skip any lines already present from the core setup):
The Device Integrity Signal provider library is declared as a dependency in the trust-deviceintegrity Maven POM and is resolved automatically — no catalog entry is needed for it in the host project.
Step 3. Add The Dependency
In your module-level app/build.gradle :
Alternative: Local AAR File
This is an alternative approach for environments that cannot access the Daon Maven registry. The Maven-based approach described above is recommended for all new integrations.
Copy the following AAR file to your module's
libsfolder:com.daon.sdk.trust.deviceIntegrity-<version>.aar
In your module-level
app/build.gradle, add:
Because the Device Integrity Signal provider transitive dependency is not embedded in the AAR, also add the
maven.fpregistry.iorepository tosettings.gradle(see Step 1 above) and declare the dependency explicitly in the version catalog:
Request Necessary Permissions
The Device Integrity Signals provider uses location signals when the user grants access. Request the appropriate permissions before starting the SDK flow by performing the following request:
The coarse location permission is required. Note that accuracy will be lower without the fine location permission.
The following permissions are declared in the module's AndroidManifest.xml and merged into the host application's manifest automatically:
Permission | Required | Purpose |
|---|---|---|
| No | Used by the Device Integrity Signal provider. When granted - improves signal accuracy |
| No | Used by the Device Integrity Signal provider. When granted - improves signal accuracy |
Both are dangerous permissions on Android 6.0+ and must be requested at runtime by the host application. The SDK never requests permissions on behalf of the host app.
Construct and Register DeviceIntegrityManager
Create the manager in your Activity.onCreate() and register it with your DaonTrustSDK instance before calling start() .
Always pass
applicationContext— never pass anActivityreference to avoid memory leaks.addDeviceIntegrityManager()must be called beforedaonTrustSDK.start(options).
Full Initialization Example
The example below shows DeviceIntegrityManager in context alongside the other optional modules,matching the pattern used in the sample applications: